Disassembling/Assembling the CoverPanel forIndoorUnit Installation ![]()
Please scan this QR code for detail video of indoor unit installation.
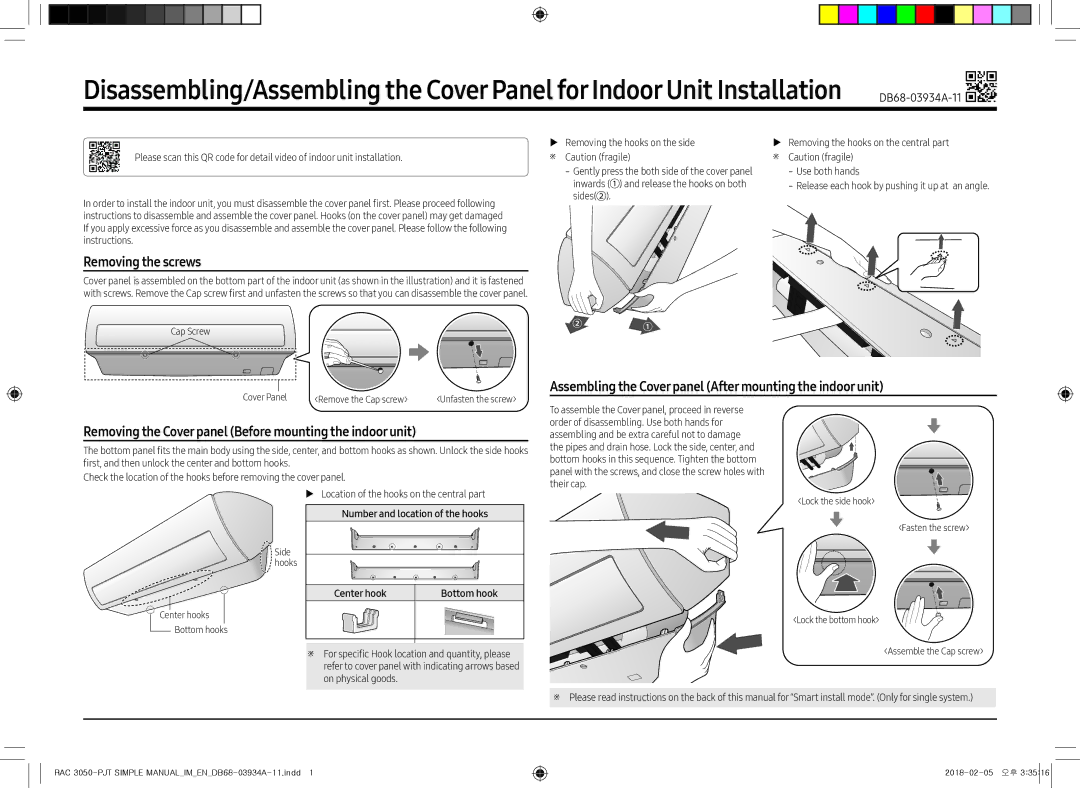
In order to install the indoor unit, you must disassemble the cover panel first. Please proceed following instructions to disassemble and assemble the cover panel. Hooks (on the cover panel) may get damaged If you apply excessive force as you disassemble and assemble the cover panel. Please follow the following instructions.
Removing the screws
Cover panel is assembled on the bottom part of the indoor unit (as shown in the illustration) and it is fastened with screws. Remove the Cap screw first and unfasten the screws so that you can disassemble the cover panel.
Cap Screw
▶▶ Removing the hooks on the side ※※ Caution (fragile)
˗˗Gently press the both side of the cover panel inwards (![]() ) and release the hooks on both sides(
) and release the hooks on both sides(![]() ).
).
▶▶
※※
Removing the hooks on the central part Caution (fragile)
˗˗Use both hands
˗˗Release each hook by pushing it up at an angle.
Cover Panel | <Remove the Cap screw> | <Unfasten the screw> |
Removing the Coverpanel (Before mounting the indoorunit)
The bottom panel fits the main body using the side, center, and bottom hooks as shown. Unlock the side hooks first, and then unlock the center and bottom hooks.
Check the location of the hooks before removing the cover panel.
▶▶ Location of the hooks on the central part
Assembling the Coverpanel (Aftermounting the indoorunit)
To assemble the Cover panel, proceed in reverse order of disassembling. Use both hands for assembling and be extra careful not to damage the pipes and drain hose. Lock the side, center, and bottom hooks in this sequence. Tighten the bottom panel with the screws, and close the screw holes with their cap.
<Lock the side hook>
![]()
![]() Side
Side ![]()
![]() hooks
hooks
Center hooks
Bottom hooks
Number and location of the hooks
Center hook | Bottom hook |
|
|
|
|
<Fasten the screw>
<Lock the bottom hook>
※※ For specific Hook location and quantity, please refer to cover panel with indicating arrows based on physical goods.
<Assemble the Cap screw>
※※ Please read instructions on the back of this manual for “Smart install mode”. (Only for single system.)
RAC