Smart Install mode(Option) ※ For the multi system, this function is not supported.
1.Check the installation status of the air conditioner.
1)Check the power supply, service valve (if it's open), power cable of the indoor and outdoor unit and amount of additional refrigerant required for pipe extension.
2)Status of the indicator after supplying the power : Standby status
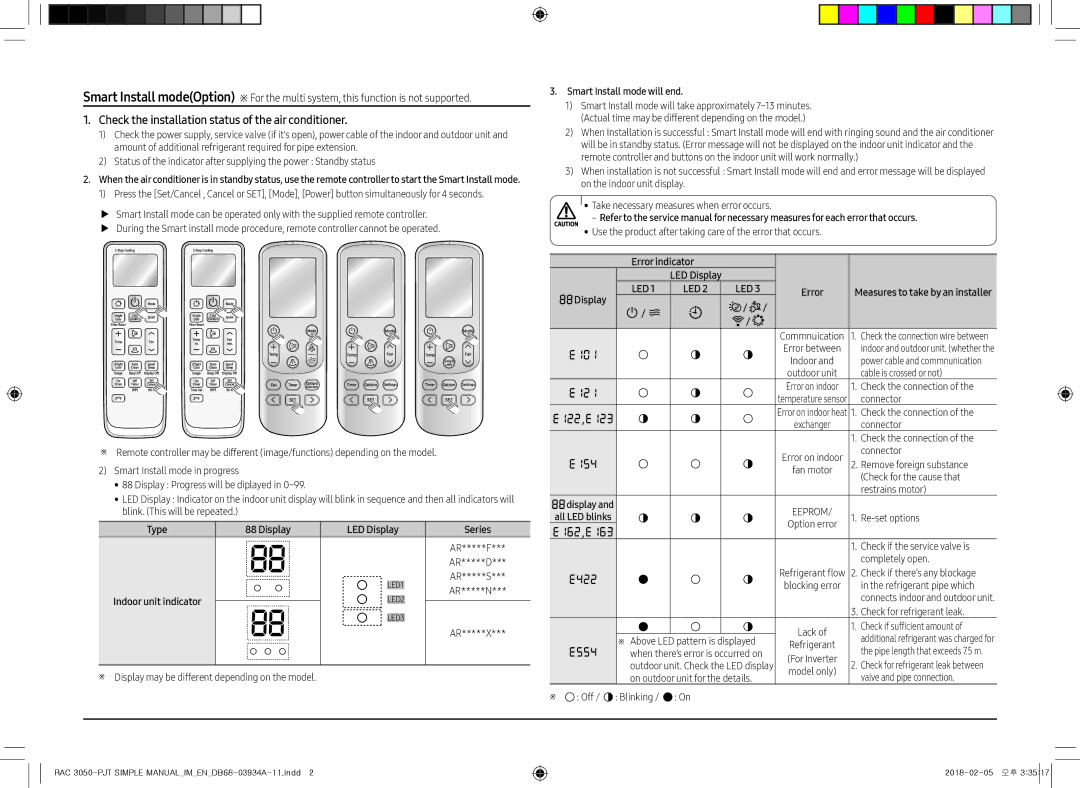
2.When the air conditioner is in standby status, use the remote controllerto start the Smart Install mode.
1)Press the [Set/Cancel , Cancel or SET], [Mode], [Power] button simultaneously for 4 seconds.
▶▶ Smart Install mode can be operated only with the supplied remote controller. ▶▶ During the Smart install mode procedure, remote controller cannot be operated.
※※ Remote controller may be different (image/functions) depending on the model.
2)Smart Install mode in progress
•88 Display : Progress will be diplayed in 0~99.
•LED Display : Indicator on the indoor unit display will blink in sequence and then all indicators will blink. (This will be repeated.)
Type | 88 Display | LED Display | Series |
|
|
| AR*****F*** |
|
|
| AR*****D*** |
|
| LED1 | AR*****S*** |
|
| AR*****N*** | |
Indoor unit indicator |
| LED2 | |
|
| ||
|
| LED3 |
|
|
|
| AR*****X*** |
※※ Display may be different depending on the model.
3.Smart Install mode will end.
1)Smart Install mode will take approximately 7~13 minutes. (Actual time may be different depending on the model.)
2)When Installation is successful : Smart Install mode will end with ringing sound and the air conditioner will be in standby status. (Error message will not be displayed on the indoor unit indicator and the remote controller and buttons on the indoor unit will work normally.)
3)When installation is not successful : Smart Install mode will end and error message will be displayed on the indoor unit display.
••Take necessary measures when error occurs.
˗˗Referto the service manual for necessary measures for each errorthat occurs.
••Use the product after taking care of the error that occurs.
|
| Error indicator |
|
|
|
|
| |||
|
|
|
| LED Display |
|
|
|
|
| |
| Display | LED 1 | LED 2 |
| LED 3 |
| Error | Measures to take by an installer | ||
|
| / |
|
| / | / | ||||
|
|
|
|
|
|
| ||||
|
|
|
|
|
|
|
| |||
|
|
|
|
| / |
|
|
|
| |
|
|
|
|
|
|
|
|
|
| |
|
|
|
|
|
|
|
| Commnuication | 1. | Check the connection wire between |
|
|
|
|
|
|
|
| Error between |
| indoor and outdoor unit. (whether the |
|
|
|
|
|
|
|
| Indoor and |
| power cable and commnunication |
|
|
|
|
|
|
|
| outdoor unit |
| cable is crossed or not) |
|
|
|
|
|
|
|
| Error on indoor | 1. | Check the connection of the |
|
|
|
|
|
|
|
| temperature sensor |
| connector |
| , |
|
|
|
|
|
| Error on indoor heat | 1. | Check the connection of the |
|
|
|
|
|
|
| exchanger |
| connector | |
|
|
|
|
|
|
|
|
| ||
|
|
|
|
|
|
|
|
| 1. | Check the connection of the |
|
|
|
|
|
|
|
| Error on indoor |
| connector |
|
|
|
|
|
|
|
| 2. | Remove foreign substance | |
|
|
|
|
|
|
|
| fan motor |
| (Check for the cause that |
|
|
|
|
|
|
|
|
|
| |
|
|
|
|
|
|
|
|
|
| restrains motor) |
| display and |
|
|
|
|
|
| EEPROM/ |
|
|
all LED blinks |
|
|
|
|
|
| 1. | |||
|
|
|
|
|
| Option error | ||||
| , |
|
|
|
|
|
|
|
| |
|
|
|
|
|
|
|
|
|
| |
|
|
|
|
|
|
|
|
| 1. | Check if the service valve is |
|
|
|
|
|
|
|
|
|
| completely open. |
|
|
|
|
|
|
|
| Refrigerant flow | 2. | Check if there’s any blockage |
|
|
|
|
|
|
|
| blocking error |
| in the refrigerant pipe which |
|
|
|
|
|
|
|
|
|
| connects indoor and outdoor unit. |
|
|
|
|
|
|
|
|
| 3. | Check for refrigerant leak. |
|
|
|
|
|
|
|
| Lack of | 1. | Check if sufficient amount of |
|
| ※ Above LED pattern is displayed |
|
| additional refrigerant was charged for | |||||
|
|
| Refrigerant |
| ||||||
|
| when there’s error is occurred on |
|
| the pipe length that exceeds 7.5 m. | |||||
|
|
| (For Inverter |
| ||||||
|
| outdoor unit. Check the LED display | 2. | Check for refrigerant leak between | ||||||
|
| model only) | ||||||||
|
| on outdoor unit for the details. |
|
| valve and pipe connection. | |||||
|
|
|
|
| ||||||
※※ | : Off / : Blinking / | : On |
|
|
|
|
| |||
RAC
