Blu-ray Disc Player
Please register your product at
Blu-ray Disc Features
Key features
Blu-ray Disc Player Features
Safety Information
No rights are granted for commercial use
Important Safety Instructions
Precautions
Disc Handling
Disc Storage & Management
Maintenance of Cabinet
Disc Storage
Handling Cautions
Restrictions on Playback
Contents
Still Mode
Using the Disc menu/Title menu/Popup menu
Using the Disc Menu
Using the Title Menu
Using the Popup Menu
BD-LIVE
Getting Started
Disc Types and Contents that can be played
Disc types that cannot be played
Blu-ray Disc Compatibility Disc Types
BD-ROM
Supported File Formats
Audio CD CD-DA
Video File Support
AC3
Region Code
Copyright
Music File Support
Avchd Advanced Video Codec High Definition
Logos of Discs that can be played
Accessories
Java
Front Panel
Front Panel Display
Rear Panel
Remote Control
Tour of the Remote Control
Installing batteries
Setting the Remote Control
TV Power
Controllable Tv Codes
TV Mute
Connecting to a TV
Connections
HDMI-DVI cable Not included Audio cable
Red White
Resolution is actually 576i/480i
Case 3 Connecting to a TV Component Better Quality
Red White Red Blue Green
Case 4 Connecting to a TV Video Good Quality
Red White Yellow
Connecting to an Audio System
1CH audio cables Not included Channel Amplifier
Case 4 Audio cable
Case 3 Optical cable not included
Connecting to the Network
Cable Network
Wireless Network
Wireless IP sharer
Broadband service
PBC WPS
Before Starting Initial Settings
Setup
Press the Enter button to select Start button
Setting the Menu
Access step may differ depending on the selected menu
Exit Button Press this to exit the menu
Home Menu
Resolution
TV Aspect
BD Wise Samsung Products only
Display
Resolution according to the output mode
Component Mode
Auto
1080i
Progressive Mode
Still Mode
Hdmi Format
Movie Frame 24Fs
Set whether to downsample 96KHz signals
PCM Downsampling
Digital Output Selection
Bitstream
Downmixing Mode
Speaker Setting
Dynamic Range Control
DTS Neo6
Initial Settings
Internet@TV Screen Size
Anynet+HDMI-CEC
BD Data Management
Network Settings
Network Setup
Clock
DivXR Deactivation
Wired Network
Setting Up a Wired Connection Auto
Setting Up a Wired Connection Manual
This process can take up to five minutes
Wireless Network
Setting Up the Wireless Network Connection PBC WPS
Setting Up the Network Connection
Press the Return button on your remote
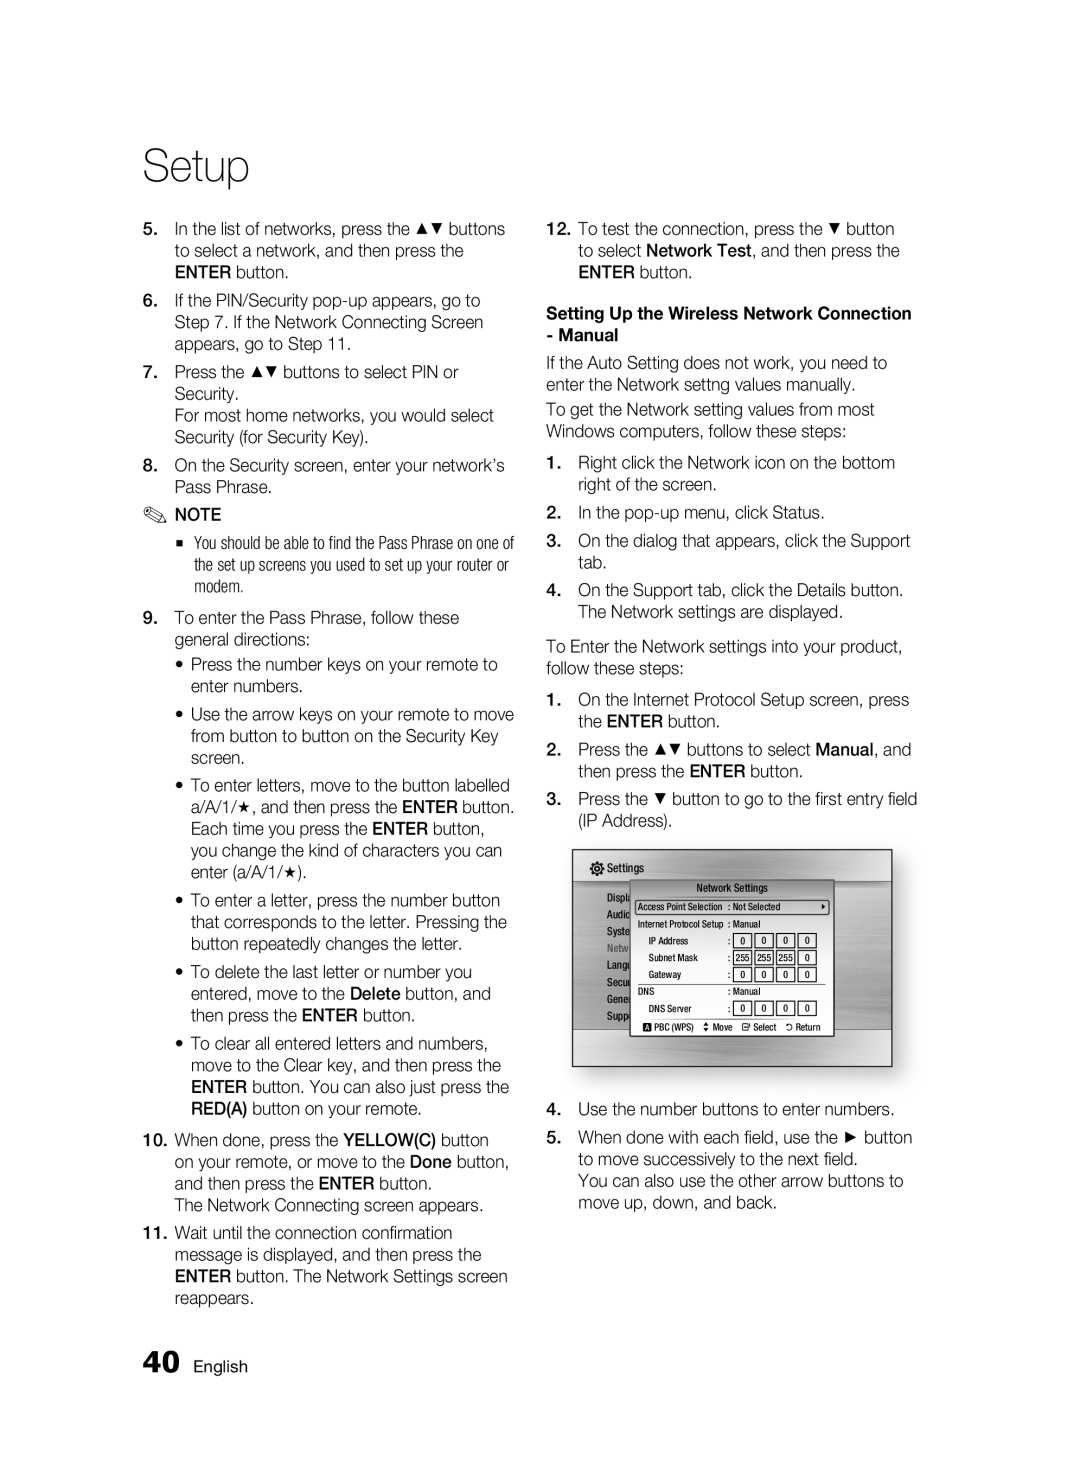
Setting Up the Wireless Network Connection Manual
Use the number buttons to enter numbers
Network Status
BD-LIVE Internet Connection
Parental Rating
Language
Change Password
Power On/Off Sound
Background
Energy Saving
Software Upgrade
Press the Power button to turn on the product
Contact Samsung
Support
Basic Functions
Using the Popup Menu
Skipping Chapters
Searching for a Desired Scene
Slow Motion Play
Using the Tools button
Repeat the Title or Chapter
Repeat the Section
Moving to a Desired Scene Directly
Selecting the Picture Setting
Selecting the Audio Language
Changing the Camera Angle
Selecting the Subtitle Language
Listening to Music
Search buttons Fast Play
Pause button Pauses playback
Playlist
Playing an Audio CD CD-DA/MP3
Repeat an Audio CD CD-DA/MP3
Playlist
Audio CD CD-DA/MP3 Screen Elements
Using the Tools button
Repeat this procedure to select additional Tracks
Playing a Jpeg Disc
Playing back a Picture
Playing back a USB Storage Device
Network Services
Using Internet@TV
Getting Started with Internet@TV
Internet@TV at a Glance
Using the Keypad
Press the Enter button Map and address appear on the screen
Settings
Account Login
System Setup
Internet@TV ID
Samsung Apps
Service Manager
Properties
Software Upgrade Notification
Using the AllShare Function
Application Program at a Glance
Background Music and Background Music Setting functions
My Computer Displays a list of the folders
Troubleshooting
Appendix
Forgot password
Authorized service centre Picture is noisy or distorted
Clean the disc No Hdmi output
Resolution Abnormal Hdmi output screen
BD-LIVE service
Occurs BD-LIVE service
Network Test menu. See
Or not
Romote Control Downmixing Mode Resolution DTS Neo6 Repeat
Index
Jpeg
BD-LIVE Bonusview
Specifications
Compliance and Compatibility Notice
Copy Protection
Network Service Disclaimer
License
Area Contact Center Web Site ` North America Canada
Mexico
800-6225 Guatemala Jamaica Panama 800-7267
Trinidad
Correct disposal of batteries in this product
AK68-01859Y
Lecteur de disque Blu-ray
Caractéristiques du disque Blu-ray
Caractéristiques du lecteur de disque Blu-ray
Informations relatives à la sécurité
Ce symbole précède les consignes
Avertissement
Consignes de sécurité importantes
Manipulation des disques
Précautions
Rangement et manipulation des Disques
Rangement des disques
Consignes pour manipuler l’appareil
Nettoyage du meuble
Restrictions de lecture
Sommaire
Branchements 24 Raccordement à une chaîne hi-fi
Lecture en vitesse lente/en mode pas à pas
Lecture en mode pas à pas
Lecture d’un disque
Lecture
Utilisation du service Internet@TV
Premiers pas avec Internet@TV
Paramètres
Utilisation de la fonction AllShare
Premiers pas
Types de disques et contenus pouvant être lus
Types de disques ne pouvant pas être lus
Avant de lire le manuel d’utilisation
Compatibilité des disques Blu-ray
Types de disques
Le disque ne doit pas être sali ou rayé
Blu-ray Disc est un format nouveau et en pleine évolution
Formats de fichiers pris en charge
Conteneur Codec vidéo Codec audio Résolution
Prise en charge des fichiers vidéo
Code régional
Droits d’auteur
Prise en charge des fichiers musicaux
Avchd Codec Vidéo Avancé Haute Définition
Accessoires
Logos des disques pouvant être lus
Blu-ray Disc Dolby TrueHD DTS-HD Master Audio
France, en Allemagne, etc DivX
Face avant
Bouton Arrêt
Afficheur de la face avant
Pour obtenir une meilleure qualité sonore
Panneau arrière
Permet de relier un récepteur
Télécommande
Boîtier de la télécommande
Insertion des piles
Réglage de la télécommande
Codes TV utilisables
Bouton Fonction
Téléviseur
Branchements
Raccordement à un téléviseur
Câble HDMI-DVI Non fourni Câble audio
Rouge Blanc
Cas 3 Raccordement à un téléviseur Composant Haute qualité
Rouge Blanc Rouge Bleu Vert
Cas 4 Raccordement à un téléviseur Vidéo Bonne qualité
Rouge Blanc Jaune
Raccordement à une chaîne hi-fi
Remarque
Cas 4 câble audio
Réseau filaire
Connexion au réseau
Dispositif de partage IP sans fil
Réseau sans fil
Type de cryptage WEP, AES
Configuration
Avant de démarrer paramètres Initiaux
Réglage du menu
Boutons Entrée / directionelles
Bouton Exit pour quitter le menu
’accès diffère selon le menu choisi
Résolution
Format écran
Affichage
Large
Résolution en fonction du mode de sortie
Mode Composant
Mode progressif
Mode image fixe
Format Hdmi
Trame vidéo 24Fs
Sous-Échantillonnage PCM
Configuration
Options de sortie numérique
Mode sous-mixage
Contrôle de la dynamique
Param. haut-parleur
Tonalité dessai
Paramètre initial
Taille écran Internet@TV
Anynet+ HDMI-CEC
Système
Configuration du réseau
Horloge
Enregistrement DivXR
DivXR Désactivation
’écran Config. prot. Internet apparaît
Réseau filaire
Paramétrage d’une connexion filaire Auto
Return
Appuyez sur le bouton Return de votre télécommande
Configuration de la connexion au réseau
Il y a trois manières de configurer un réseau sans fil
Réseau sans fil
Configuration de la connexion au réseau sans fil Manuel
Appuyez sur les boutons pour sélectionner PIN ou Sécurité
Pour saisir le mot de passe, suivez ces consignes générales
Pour changer la lettre, appuyez plusieurs fois de suite
État du réseau
Connexion internet BD-Live
Classement parental
Langue
Mode éco
Modifier mot de passe
Arrière-plan
Affichage du lecteur
Mise à niveau du logiciel
Contacter Samsung
Assistance
Internet
Fonctions de base
Lecture en mode pas à pas
Utilisation du menu contextuel
Rechercher une scène
Ignorer des chapitres
Répétition du titre ou du chapitre
Répétition de la section
Accès direct à la scène souhaitée
Répétition de la lecture
Sélection de la langue audio
Changement d’angle de la caméra
Sélection du réglage de l’image
Appuyez sur les boutons pour sélectionner Sous-titre
Réglage de la fonction Bonusview
Boutons de la télécommande servant à écouter de la musique
Écouter de la musique
Répétition d’un CD Audio CD-DA/ MP3
Lecture d’un CD Audio CD-DA/ MP3
Liste de lecture
Lecture d’un disque Jpeg
Utilisation du bouton Tools
Lecture d’une image
Le diaporama démarre automatiquement
Appuyez sur le bouton Rougea
Lecture d’un périphérique de stockage
Appuyez sur le bouton Bleud
Services réseau
Utilisation du service Internet@TV
Premiers pas avec Internet@TV
Vue d’Internet@TV
Appuyez sur « 1 », « 0 », « 5 »
Utilisation du clavier
« Imposs. lire fichier en cours. » s’affiche
Config. système
Paramètres
Connexion au compte
ID Internet@TV
Gestionnaire service
Propriétés
Notification de mise à niveau de logiciel
Utilisation de la fonction AllShare
Vue de l’application
Serveur affichage du nom du serveur de partage
Fonction Changer de groupe Fonction Retrait sécurisé
Partagés
Fonctions Fond musical et Paramètres de musique de fond
Annexe
Dépannage
Oubli du mot de passe
Réglages seront réinitialisés, y compris le mot de passe
’utilisez ce bouton que si c’est vraiment nécessaire
Ceux énumérés ci-dessus
Menu Test
Reportez-vous aux
Caractéristiques
Conformité et compatibilité
Protection contre la copie
Network Service Disclaimer
Licence
Cher Client
@ Garantie
@ Conditions DE Garantie
Samsung Electronics France
Samsung
Elimination des batteries de ce produit
Déchets d’équipements électriques et électroniques
Blu-ray Disc-Players
Blu-ray Disc-Funktionen
Hauptfunktionen
Blu-ray Disc-Player-Funktionen
Sicherheitsinformationen
Warnung
Abdeckung Oder Rückwand Nicht ÖFFNEN! Stromschlaggefahr
Eine gewerbliche Verwendung ist nicht gestattet
Wichtige Sicherheitshinweise
Handhabung von Disks
Vorsichtsmassnahmen
Lagerung und Handhabung der Disks
Disk-Lagerung
Vorsichtsmaßnahmen für den Betrieb
Wartung des Gehäuses
Beschränkungen bei der Wiedergabe
Inhalt
Anschlüsse 24 Anschluss an ein Audiosystem
Frontdisplay
Ein/Aus-Ton
Disk wiedergeben
Wiedergabe
Grundfunktionen 48 Musikwiedergabe hören
Internet@TV verwenden
Erste Internet@TV -Schritte
Einstellungen
Erste Schritte
Abspielbare Disktypen und Inhalte
Nicht abspielbare Disktypen
Vor dem Lesen dieser Bedienungsanleitung
Blu-ray Disc-Kompatibilität
Disktypen
Unterstützte Dateiformate
Audio-CD CD-DA
Unterstützte Videodatei
Video Codec Audio Codec Auflösung
Unterstützte Musikdatei
Regionalcode
Avchd Advanced Video Codec Höchauflösung
Logos von abspielbaren Disks
Zubehör
Vorderseite
Display auf der Gerätevorderseite
Rückseite
Erreichen
An einen Receiver anschließen
Verbindung zu einem Gerät mit Komponent-Videoeingang
Übersicht der Fernbedienung
Fernbedienung
Batterien einlegen
Achtung
Fernbedienung einrichten
Fernbedienungscodes für Fernsehgeräte
Anschlüsse
Anschluss an ein Fernsehgerät
Audiokabel
Rot Weiß
Die tatsächliche Auflösung beträgt 576i/480i
Schaltet der Blu-ray Disc-Player und das Fernsehgerät ein
Rot Weiß Rot Blau Grün
Schaltet der Blu-ray Disks-Player ein
Option Anschluss an ein Fernsehgerät Video Gute Qualitat
Rot Weiß Gelb
Anschluss an ein Audiosystem
HDMI-Kabel Nicht im Lieferumfang enthalten
Kanal-Verstärker Anschlüsse
Nicht im
Option Audiokabel
Kabel-Netzwerk
Anschluss an das Netzwerk
Wireless-Netzwerk
Einstellung
Bevor Sie beginnen Werkeinstellungen
Siehe Seiten 38 zu
Dies ist Gewiss keine Fehlfunktion
Home Menü
Das Menü einstellen
Eingabe
TV-Bildformat
Auflösung
Anzeige
Breit
Auflösung nach Wiedergabemodus
HDMI-Format
Film-Bildfrequenz24 fps
Progressiver Modus
Standbild-Modus
PCM-Downsampling
Auswahl des Digitalausgangs
Verbindung
Primary-Audio Der Audio-Soundtrack der Hauptfunktion
Dynamikumfangsteuerung
Downmix-Modus
Lautsprechereinst
Testton
SystemBD-Datenmanagement Ersteinstellung
Internet@TV-Bildschirmgröße
Uhr
DivXR-Registrierung
DivXR Deaktivierung
Netzwerkeinstellungen
Kabelnetzwerk
Eine Kabel-Verbindung konfigurieren Automatisch
Dieser Vorgang dauert bis zu 5 Minuten
Eine Kabelverbindung einstellen Manuell
Drahtlos-Netzwerk
Drücken Sie auf der Fernbedienung die Taste
Siehe Seite
Drahtlos Netzwerk Verbindung PBC WPS konfigurieren
Drücken Sie die Tasten , um PIN oder Sicherheit auszuwählen
Die Wireless Netzwerkverbindung einrichten Manuell
Verwenden Sie die Nummerntasten, um Nummern einzugeben
Netzwerkstatus
BD-Live Internet-Verbindung
Sicherungsstufe
Sprache
Kennwort ändern
Hintergrund
Energiesparmod
Frontdisplay
Drücken Sie die Taste Power um den Player einzuschalten
Softwareaktualisierung
Samsung kontaktieren
Unterstützung
Grundfunktionen
Popup-Menü verwenden
Nach gewünschter Szene suchen
Kapitel überspringen
Wiedergabe in Zeitlupe
Wiederholung des aktuellen Kapitels oder Titels
Abschnittwiederholen
Eine gewünschte Szene direkt auswählen
Wiedergabe wiederholen
Audiosprache wählen
Kamerawinkel ändern
Untertitelsprache wählen
Bildeinstellungen wählen
Tasten auf der Fernbedienung für die Wiedergabe
Bonusview Einstellen
Musikwiedergabe hören
Gesamtdauer an
Wiedergabeliste
Zeigt den Wiederholungsstatus an
JPEG-Disk wiedergeben
Die Taste Tools verwenden
Ein Bild wiedergeben
Die ausgewählten Titel werden automatisch wiedergegeben
Drücken Sie die Taste Rotea
Drücken Sie die Taste , um die
Drücken Sie die Taste Blaud
Wählen Sie mit den Tasten USB aus, und
Netzwerkdienst
Erste Internet@TV -Schritte
Internet@TV verwenden
Überblick über Internet@TV
Keypad verwenden
Drücken Sie zum Verwenden des Suchlaufs die Taste Eingabe
Drücken Sie ‘1’, ‘0’, ‘5’
Darüber hinaus kann sich das Gerät automatisch ausschalten
Einstellungen
Benutzerkonto anmelden
Geben Sie das Benutzerkennwort und Passwort ein
Zurückset
Dienstmanager
Benachrichtigung der Software-Aktualisierung
AllShare-Funktion verwenden
PC-Program-Übersicht
Gemeinsame Ordner Zeigt eine Liste der Gemeinsame Ordner an
Mein Computer Zeigt eine Liste der vorhandenen
Anhang
Fehlerbehebung
Standardeinstellungen zurückgesetzt
Verwenden Sie diese Option nur wenn unbedingt nötig
Nochmals
Samsung-Kundendienst in Ihrer Nähe
Werden. Siehe Seite
Dienste zu ermöglichen
Alle gestellt ist
Dienste Dienste zu ermöglichen
Technische Daten
Kopierschutz
Compliance und Kompatibilität
Nicht Alle Disks sind kompatibel
Network Service Disclaimer
Lizenz
@ Garantiebedingungen
Europäische Garantiekarte
Samsung
Korrekte Entsorgung der Batterien dieses Produkts
Blu-ray Disc-speler
Kunt u uw product registreren op
Kenmerken van de Blu-ray Disc
Belangrijke kenmerken
Kenmerken van Blu-ray Disc-speler
Informatie over veiligheid
Waarschuwing
DIT Product Wordt Gebruik Gemaakt VAN EEN Laserstraal
Er worden geen rechten verleend voor commerciële doeleinden
Belangrijke veiligheidsinstructies
Gebruik van schijven
VoorzorgsmaAtregelen
Opslag en beheer van schijven
Schijven bewaren
Waarschuwingen voor gebruik
Onderhoud van behuizing
Beperkingen bij het afspelen
Inhoud
Aansluiting op een audiosysteem
Aanbevolen
Kanaals versterker Betere kwaliteit
Een verbinding maken met het netwerk
Software-upgrade
Taal
Beveiliging
Leeftijdsbeperking
Melding software-upgrade
Problemen oplossen
Naar muziek luisteren
Afspelen van muziek
Inleiding
Kunt de volgende typen schijven niet afspelen
Voordat u de gebruikershandleiding gebruikt
Opmerking
Typen schijven
Compatibiliteit van Blu-ray Disc
Deze Blu-ray disc kan worden opgenomen en afgespeeld
Ondersteunde bestandsindelingen
Ondersteunde videobestanden
Houder Videocodec Audiocodec Resolutie
Bestandsextensie
Regiocode
Ondersteunde muziekbestanden
Logos van schijven die kunnen worden afgespeeld
Voorpaneel
Display voorpaneel
Aanduiding Schijf
Software-upgrades via een netwerkverbinding
Achterpaneel
Geluidskwaliteit
Hiermee maakt u verbinding met een ontvanger
Uitleg over de afstandsbediening
Afstandsbediening
Batterijen plaatsen
LET OP
De afstandsbediening instellen
Instelbare TV-codes
Invoerbron voor de tv
Aan
Aansluiten op een TV
Aansluitingen
HDMI-kabel Niet meegeleverd
HDMI-DVI-kabel niet meegeleverd
Rood Wit
Situatie 3 Aansluiting op een TV Component Betere kwaliteit
Aansluiting op uw tv via Component videokabels
De werkelijke resolutie is dan echter 576i/480i
Component-kabel niet meegeleverd Rood Wit Rood Blauw Groen
Situatie 4 Aansluiting op een TV Video Goede kwaliteit
Rood Wit Geel
Aansluiting op een audiosysteem
Kanaalversterker Aansluitingen
Situatie 4 Audiokabel
Schakel het product, de tv en de versterker
Router Breedbandmodem Service
Kabelnetwerk
Een verbinding maken met het netwerk
Breedbandmodem
Breedband service
Breedband Service Draadloze IP-verdeler
Draadloos netwerk
Instellen
Voordat u begint Eerste instelling
Het menu instellen
Enter
Druk op de knop Exit om het menu af te sluiten
Hiermee worden de beschikbare knoppen weergegeven
Norm,/Breedb
Resolutie
Weergave
Breed
Resolutie volgens de uitgangsmodus
Blu-ray Disc afspelen
Hdmi / aangesloten
Componentmodus
HDMI-formaat
Filmbeeld 24Fs
Progressieve functie
Stille Functie
Selectie van digitale uitvoer
Installatie
Primaire audio De audiosoundtrack van de hoofdfilm
Dynamisch bereik instellen
Downmixingfunctie
Luidsprekerinst
Testtoon
Begininstelling
Schermformaat Internet@TV
Management BD-gegevens
Systeem
Klok
DivXR Deactivering
DivXR registratrie
Netwerkinstelling
Bedraad netwerk
Een bedrade verbinding instellen Handmatig
Het scherm Internetprotocol wordt weergegeven
Dit proces kan tot vijf minuten in beslag nemen
De draadloze netwerkverbinding instellen PBC WPS
Draadloos netwerk
Te verlaten
De draadloze netwerkverbinding instellen Handmatig
Kunt de laatste ingevoerde letter
Druk op het scherm Internetprotocol op
Netwerkstatus
BD-Live internet verbinding
Leeftijdsbeperking
Taal
Toegangscode wijzig
Achtergrond
Spaarstand
Front paneel
Software-upgrade
Druk op de POWER-knop om het product in te schakelen
Contact opnemen met Samsung
Ondersteuning
Basisfuncties
Het pop-upmenu gebruiken
Een bepaalde scène opzoeken
Hoofdstukken overslaan
Vertraagd afspelen
De titel of het hoofdstuk herhalen
Sectie herhalen
Direct naar een gewenste scène gaan
Afspelen herhalen
De audiotaal selecteren
De camerabeeldhoek wijzigen
De ondertitelingstaal selecteren
De beeldinstelling selecteren
Bonusview instellen
Naar muziek luisteren
Een Audio-CD CD-DA/MP3 herhalen
Afspeellijst
Onderdelen van het scherm voor de Audio-CD CD-D/MP3
Afspeeltijd weergegeven
De knop Tools gebruiken
Een JPEG-schijf afspelen
Een afbeelding afspelen
Druk op om USB te selecteren, en druk vervolgens op Enter
Een USB-opslagapparaat afspelen
Druk op de Blauwe knop D
Netwerkservices
Aan de slag met Internet@TV
Internet@TV gebruiken
Internet@TV in het kort
Het toetsenblok gebruiken
Instellingen
Aanmelden bij een account
Systeeminst
Internet@TV-ID
Servicemanager
Eigenschappen
Melding software-upgrade
De functie AllShare gebruiken
Toepassingsprogramma in het kort
Schakel het product
Met gedeelde mappen
Met de mappen en bestanden op de pc
Gedeelde map hier wordt een lijst weergegeven
Deze computer hier wordt een lijst weergegeven
Problemen oplossen
Bijlage
Hebt u andere problemen
Betreffende procedure
Erkend servicecentrum van Samsung in uw buurt
High-bandwidth Digital Content Protection ondersteunt
BD-LIVE-service te kunnen ondersteunen
Er een fout op BD-LIVE-service te kunnen ondersteunen
BD-LIVE-server Netwerktest. Zie pagina
Zie pagina
Specificaties
Opmerking i.v.m. compatibiliteit
Kopieerbeveiliging
Network Service Disclaimer
Licentie
@ Garantiecondities
Europese Garantie
Luxembourg Belgique
Garantie Européenne
Samsung
Correcte behandeling van een gebruikte accu uit dit product
Elektrische & elektronische afvalapparatuur