Setup

Setting Up a Wired Connection - Auto

1.If you selected Auto, the Network Function acquires and fills in the values for IP Address, Subnet Mask, etc., automatically.

NOTE

This process can take up to five minutes.

Settings

Display


Network Setting


Internet Protocol Setup

: Auto


Audio

0

0

\

System


IP Address

:

0

0


Subnet Mask

:

0

0

0

0

Network

Language Gateway

:

0

0

0

0


DNS

: Auto


Security

DNS Server

:

0

0

0

0

General

Support

> Move


" Select

' Return


2.After the Network Function has acquired the network values, press the RETURN button. Then, run a Network Test to ensure the product has connected to your network (See page 41).

3.If the Network Function does not acquire the network values or you selected Manual, go to the directions for Manual Setup.

Setting Up a Wired Connection - Manual

If the Auto Setting does not work, you’ll need to set the Network Setting values manually.

To get the Network setting values from most Windows computers, follow these steps:

1.Right click the Network icon on the bottom right of the screen.

2.In the pop-up menu, click Status.

3.On the dialog that appears, click the Support tab.

4.On the Support tab, click the Details button. The Network settings are displayed.

To enter the Network settings into your product, follow these steps:

1.On the Internet Protocol Setup screen, press the ENTER button.

2.Press the ▲▼ buttons to select Manual, and then press the ENTER button.

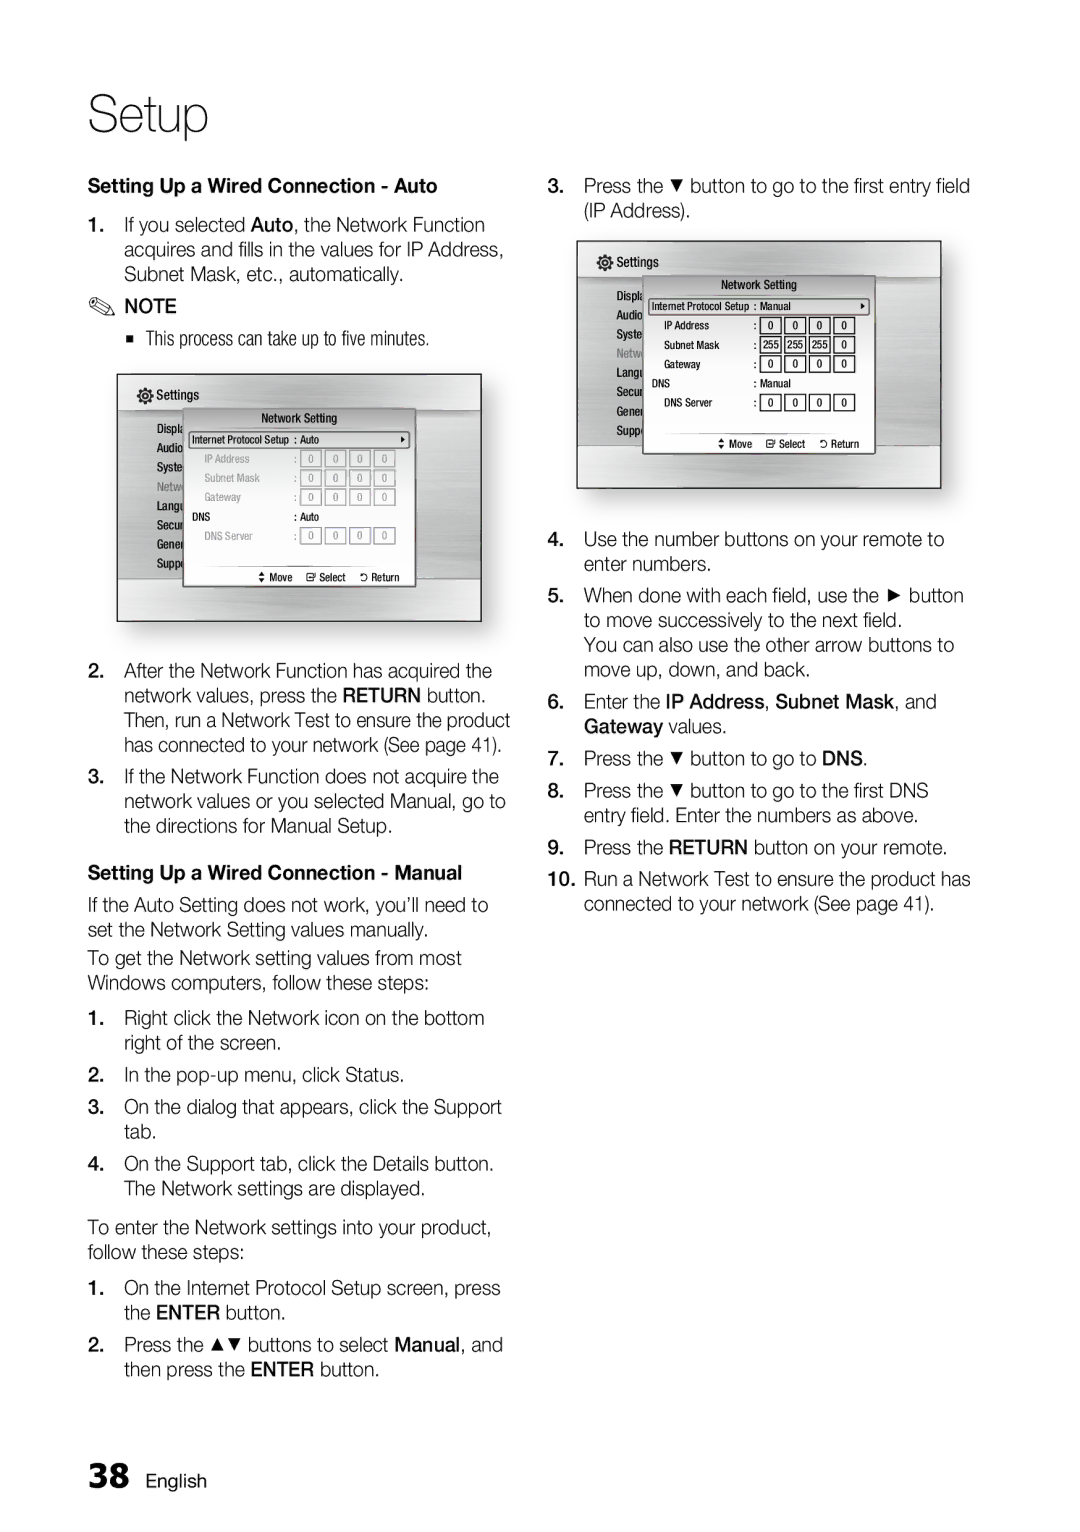
3.Press the ▼ button to go to the first entry field (IP Address).

Settings

Display


Network Setting


Internet Protocol Setup

: Manual


Audio

0

\

System


IP Address

:

0

0

0


Subnet Mask

:

255

255

255

0

Network

Language Gateway

:

0

0

0

0


DNS

: Manual


Security

DNS Server

:

0

0

0

0

General

Support

> Move


" Select

' Return


4.Use the number buttons on your remote to enter numbers.

5.When done with each field, use the ► button to move successively to the next field.

You can also use the other arrow buttons to move up, down, and back.

6.Enter the IP Address, Subnet Mask, and Gateway values.

7.Press the ▼ button to go to DNS.

8.Press the ▼ button to go to the first DNS entry field. Enter the numbers as above.

9.Press the Return button on your remote.

10.Run a Network Test to ensure the product has connected to your network (See page 41).

38 English

Page 38
Image 38
Samsung BD-C7500/XAA This process can take up to five minutes, Use the number buttons on your remote to enter numbers

BD-C7500/XEE, BD-C7500/EDC, BD-C7500/XEF, BD-C7500/XAA specifications

The Samsung BD-C7500 is a standout Blu-ray player that combines high-definition video playback with advanced multimedia features, making it an appealing option for home theater enthusiasts. This player is designed to deliver an exceptional viewing experience, supporting Full HD 1080p resolution for stunning visuals. One of its prominent characteristics is its ability to upscale standard DVDs, enhancing them to near high-definition quality, ensuring that all content looks its best.

One of the key features of the BD-C7500 is its integrated Wi-Fi capability, allowing users to connect to their home network without the need for additional cables. This connectivity enables access to Samsung's Smart Hub, where users can explore a myriad of online content, including streaming services such as Netflix, YouTube, and Pandora. This integration of online services adds great value, transforming the BD-C7500 into a versatile multimedia hub.

The BD-C7500 also supports a variety of disc formats, including Blu-ray, DVD, and CD, providing flexibility for media playback. Additionally, it offers compatibility with various audio and video formats, ensuring that users can enjoy their favorite media without limitations. The player features Dolby TrueHD and DTS-HD Master Audio, which deliver superior sound quality, enriching the home theater experience.

Furthermore, the BD-C7500 is equipped with an HDMI output, allowing for a simplified connection to HDTVs and other AV components. It also features a USB port, enabling users to play video, music, and photo files directly from compatible USB flash drives. This feature is particularly convenient for sharing personal media or enjoying content stored on external devices.

In terms of design, the BD-C7500 boasts a sleek and modern appearance, fitting seamlessly into any home entertainment setup. Its intuitive interface enhances user experience, making navigation through menus and content straightforward.

Overall, the Samsung BD-C7500/XEF and BD-C7500/EDC are remarkable Blu-ray players that blend advanced technology with user-friendly features. From exceptional video quality to extensive connectivity options, they offer an enriched multimedia experience, ensuring that users can enjoy their favorite films, shows, and online content with optimal performance.