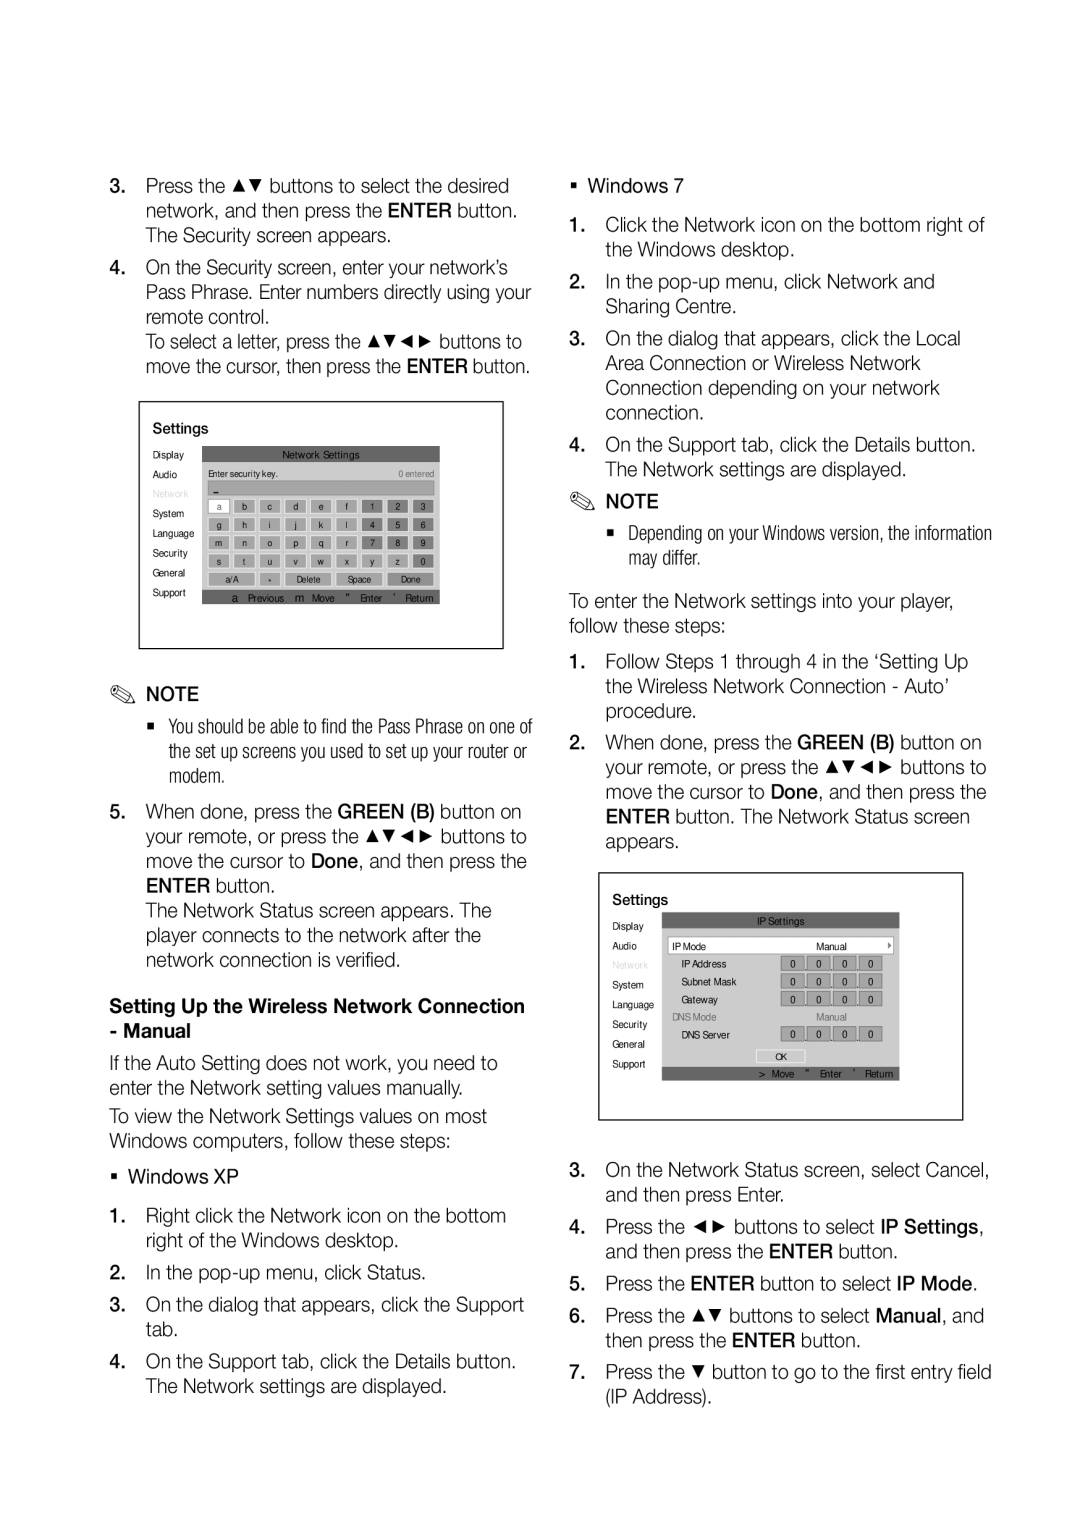
3.Press the ▲▼ buttons to select the desired network, and then press the ENTER button. The Security screen appears.

4.On the Security screen, enter your network’s Pass Phrase. Enter numbers directly using your remote control.

To select a letter, press the ▲▼◄► buttons to move the cursor, then press the ENTER button.

Settings

Display


Network Settings


Audio

Enter security key.


0 entered


Network


System


a


b

c

d

e

f

1

2

3


Language


g


h

i

j

k

l

4

5

6


m


n

o

p

q

r

7

8

9


Security


s


t

u

v

w

x

y

z

0


General


a/A

*

Delete

Space


Done


Support


aPrevious

mMove

"Enter

'Return


NOTE

`` You should be able to find the Pass Phrase on one of the set up screens you used to set up your router or modem.

5.When done, press the GREEN (B) button on your remote, or press the ▲▼◄► buttons to move the cursor to Done, and then press the ENTER button.

The Network Status screen appears. The player connects to the network after the network connection is verified.

Setting Up the Wireless Network Connection - Manual

If the Auto Setting does not work, you need to enter the Network setting values manually.

To view the Network Settings values on most Windows computers, follow these steps:

ƒƒ Windows XP

1.Right click the Network icon on the bottom right of the Windows desktop.

2.In the pop-up menu, click Status.

3.On the dialog that appears, click the Support tab.

4.On the Support tab, click the Details button. The Network settings are displayed.

ƒƒ Windows 7

1.Click the Network icon on the bottom right of the Windows desktop.

2.In the pop-up menu, click Network and Sharing Centre.

3.On the dialog that appears, click the Local Area Connection or Wireless Network Connection depending on your network connection.

4.On the Support tab, click the Details button. The Network settings are displayed.

NOTE

`` Depending on your Windows version, the information may differ.

To enter the Network settings into your player, follow these steps:

1.Follow Steps 1 through 4 in the ‘Setting Up the Wireless Network Connection - Auto’ procedure.

2.When done, press the GREEN (B) button on your remote, or press the ▲▼◄► buttons to move the cursor to Done, and then press the ENTER button. The Network Status screen appears.

Settings


IP Settings


Display

IP Mode


Manual


Audio

0

.

.

0

Network

IP Address

0 .

0

System

Subnet Mask

0

.

0 .

0

.

0

Language

Gateway

0

.

0 .

0

.

0

Security

DNS Mode


Manual


DNS Server

0

.

0 .

0

.

0

General


OK


Support


"Enter


'Return


>Move


3.On the Network Status screen, select Cancel, and then press Enter.

4.Press the ◄► buttons to select IP Settings, and then press the ENTER button.

5.Press the ENTER button to select IP Mode.

6.Press the ▲▼ buttons to select Manual, and then press the ENTER button.

7.Press the ▼ button to go to the first entry field (IP Address).

05 Setup

English 31

Page 41
Image 41
Samsung BD-D7500/EN, BD-D7500/ZF, BD-D7500B/XE, BD-D7500/XE manual Setting Up the Wireless Network Connection Manual

BD-D7500/EN, BD-D7500B/XE, BD-D7500/XE, BD-D7500/ZF specifications

The Samsung BD-D7500 series is a sophisticated range of Blu-ray players that combines cutting-edge technology with an impressive array of features. This series includes model variants such as BD-D7500B/ZF, BD-D7500E/ZF, BD-D7500/ZF, BD-D7500/XN, and BD-D7500/EN, all engineered to deliver an exceptional home entertainment experience.

At the heart of the BD-D7500 series is its 3D Blu-ray playback capability, allowing users to enjoy an immersive viewing experience with compatible 3D content. The advanced picture processing enhances video quality, ensuring that images are crisp, vibrant, and true to life. This series also supports Full HD 1080p playback, providing clarity and detail in high-definition content.

One of the standout features of the BD-D7500 series is its Smart Hub functionality, which opens up a world of entertainment beyond physical media. Users can access popular streaming services such as Netflix, YouTube, and Hulu directly from their Blu-ray player. The user-friendly interface allows seamless navigation through apps and content, making it easy to find your favorite shows and movies.

Additionally, the BD-D7500 series boasts built-in Wi-Fi connectivity, enabling effortless access to the internet without the need for additional cables or adapters. This feature complements its Smart Hub capabilities, allowing for firmware updates and content streaming with minimal hassle. For those who appreciate a more wired connection, Ethernet support is also included.

The Samsung BD-D7500 players support a variety of audio formats, including Dolby TrueHD and DTS-HD Master Audio, ensuring that users enjoy high-fidelity sound that complements their video experience. With 7.1 channel audio output, this series fully supports a surround sound setup, creating an engaging and cinematic atmosphere.

Furthermore, the sleek design of the BD-D7500 series is an aesthetic addition to any home theater setup. Its compact and stylish form factor fits well into various entertainment setups without compromising on performance.

In conclusion, the Samsung BD-D7500B/ZF, BD-D7500E/ZF, BD-D7500/ZF, BD-D7500/XN, and BD-D7500/EN models represent a significant step forward in Blu-ray technology. With features like 3D playback, Smart Hub access, Wi-Fi connectivity, and superior audio performance, these players cater to the demands of modern home entertainment enthusiasts, ensuring that they are well-equipped to enjoy high-quality multimedia content.