Step 5 : Run Plug & Play
When you turn on your TV for the first time, it automatically launches the Plug & Play function. With Plug & Play, you can select the On Screen Display language, set the clock mode, and launch the TV’s channel memorizing process. It also displays connection instructions similar to those in this guide.
To navigate while Plug & Play is running, press the Up, Down, Left or Right arrow buttons on your remote. To make a selection, press the EnterE button. To skip a screen, press the Menu button.
To turn on your TV, press the Power button on the remote or press the Power button on the TV. To run Plug & Play, follow these steps:
| Plug & Play | |||||
|
|
|
| |||
Select Language of the OSD. |
|
|
|
| ||
|
|
| ||||
| English |
|
| |||
Language | : | Español |
| |||
Français |
| |||||
|
|
| ||||
|
|
| UMove EEnter | |||
1. On the Language screen, select the language for the On Screen Display |
(OSD) using your remote control, and then press EnterEbutton. The |
Home Use screen appears. |
After you have selected the cable system type, select Start, and then press the EnterEbutton on your remote.
✎✎ Most cable systems are Standard (STD) systems. If you are not sure about what kind of cable system you have, contact your cable company.
5.The TV memorizes the available channels. This process can take up to 45 minutes. After the TV has memorized the channels, the Clock Mode screen appears.
6.Choose the Clock Mode. Select Auto if you have a digital channel in your area. Select Manual if you don’t, or if you have a cable or satellite box. When done, press EnterEbutton. The Daylight Savings screen appears.
✎✎ If you select Manual, the clock setting screen appears.
7.Select the daylight saving time setting: Off, On, or Auto, and then press EnterEbutton.
8.After the time zone screen, The connection method for best HD screen quality is displayed. Press Right arrow button on your remote to view each screen in succession. Press the Blue button to skip this section.
9.The Enjoy your TV screen appears. and then press EnterEbutton.
Basic Functions
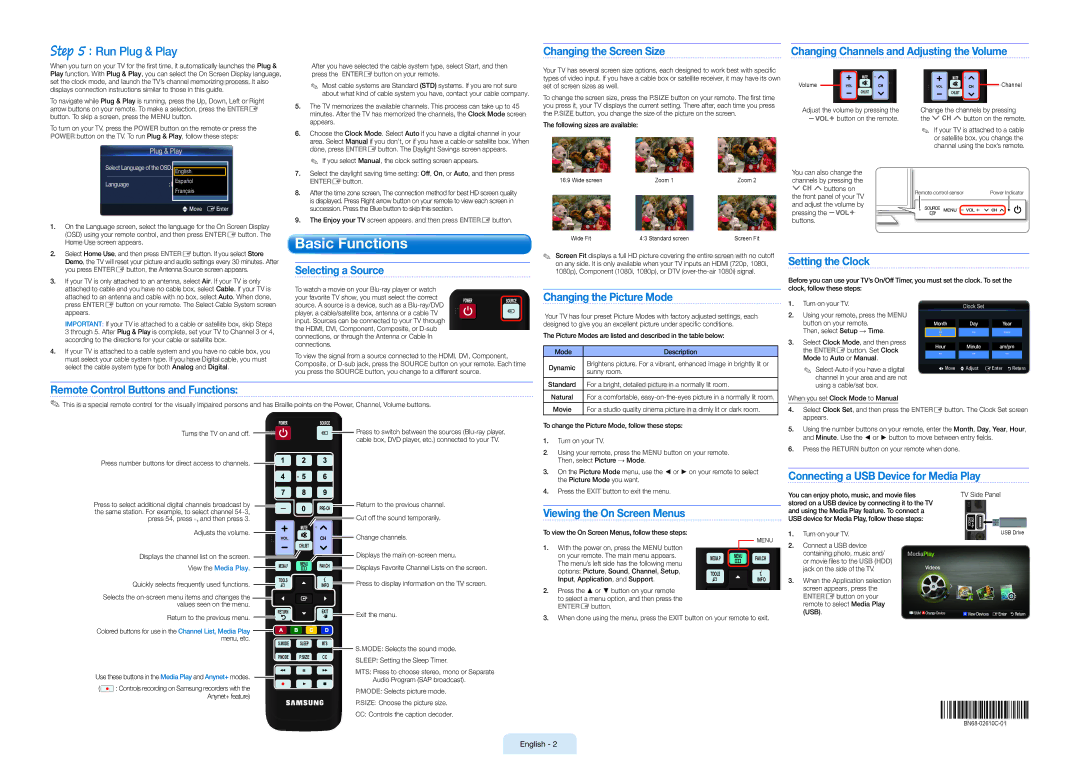
Changing the Screen Size
Your TV has several screen size options, each designed to work best with specific types of video input. If you have a cable box or satellite receiver, it may have its own set of screen sizes as well.
To change the screen size, press the P.Size button on your remote. The first time you press it, your TV displays the current setting. There after, each time you press the P.Size button, you change the size of the picture on the screen.
The following sizes are available:
16:9 Wide screen | Zoom 1 | Zoom 2 |
Wide Fit | 4:3 Standard screen | Screen Fit |
Changing Channels and Adjusting the Volume
Volume |
| Channel | |
CHLIST | CHLIST |
| |
Adjust the volume by pressing the | Change the channels by pressing | ||
ybutton on the remote. | the zbutton on the remote. | ||
| ✎✎ If your TV is attached to a cable | ||
| or satellite box, you change the | ||
| channel using the box’s remote. | ||
You can also change the |
|
| |
channels by pressing the |
|
| |
zbuttons on | Remote control sensor | Power Indicator | |
the front panel of your TV | |||
|
| ||
and adjust the volume by |
|
| |
pressing the y |
|
| |
buttons. |
|
| |
2. | Select Home Use, and then press EnterEbutton. If you select Store |
| Demo, the TV will reset your picture and audio settings every 30 minutes. After |
| you press EnterEbutton, the Antenna Source screen appears. |
3. | If your TV is only attached to an antenna, select Air. If your TV is only |
| attached to cable and you have no cable box, select Cable. If your TV is |
| attached to an antenna and cable with no box, select Auto. When done, |
Selecting a Source
To watch a movie on your
✎✎ Screen Fit displays a full HD picture covering the entire screen with no cutoff on any side. It is only available when your TV inputs an HDMI (720p, 1080i, 1080p), Component (1080i, 1080p), or DTV
Changing the Picture Mode
Setting the Clock
Before you can use your TV’s On/Off Timer, you must set the clock. To set the clock, follow these steps:
press EnterEbutton on your remote. The Select Cable System screen |
appears. |
IMPORTANT: If your TV is attached to a cable or satellite box, skip Steps |
3 through 5. After Plug & Play is complete, set your TV to Channel 3 or 4, |
according to the directions for your cable or satellite box. |
4. If your TV is attached to a cable system and you have no cable box, you |
must select your cable system type. If you have Digital cable, you must |
select the cable system type for both Analog and Digital. |
source. A source is a device, such as a Blu-ray/DVD
player, a cable/satellite box, antenna or a cable TV input. Sources can be connected to your TV through
the HDMI, DVI, Component, Composite, or
To view the signal from a source connected to the HDMI, DVI, Component, Composite, or
Your TV has four preset Picture Modes with factory adjusted settings, each designed to give you an excellent picture under specific conditions.
The Picture Modes are listed and described in the table below:
Mode | Description | |
Dynamic | Brightens picture. For a vibrant, enhanced image in brightly lit or | |
sunny room. | ||
|
1. | Turn on your TV. |
2. | Using your remote, press the Menu |
| button on your remote. |
| Then, select Setup → Time. |
3. | Select Clock Mode, and then press |
| the EnterEbutton. Set Clock |
| Mode to Auto or Manual. |
| ✎✎ Select Auto if you have a digital |
| channel in your area and are not |
Clock Set
Month |
| Day |
|
| Year |
|
|
|
|
| |||
|
|
|
| |||
|
|
|
|
|
|
|
Hour |
| Minute |
|
| am/pm |
|
|
|
|
|
|
|
|
|
| |||||
LMove |
| UAdjust | EEnter RReturn | |||
Remote Control Buttons and Functions:
✎✎This is a special remote control for the visually impaired persons and has Braille points on the Power, Channel, Volume buttons.
Standard | For a bright, detailed picture in a normally lit room. |
|
|
Natural | For a comfortable, |
using a cable/sat box. |
When you set Clock Mode to Manual
Turns the TV on and off. | Press to switch between the sources |
| cable box, DVD player, etc.) connected to your TV. |
Press number buttons for direct access to channels.
Movie | For a studio quality cinema picture in a dimly lit or dark room. |
To change the Picture Mode, follow these steps:
1.Turn on your TV.
2. Using your remote, press the Menu button on your remote. Then, select Picture → Mode.
3. On the Picture Mode menu, use the ◄ or ► on your remote to select |
the Picture Mode you want. |
4.Select Clock Set, and then press the EnterEbutton. The Clock Set screen appears.
5.Using the number buttons on your remote, enter the month, day, year, hour, and minute. Use the ◄ or ► button to move between entry fields.
6.Press the Return button on your remote when done.
Connecting a USB Device for Media Play
Press to select additional digital channels broadcast by
Return to the previous channel. |
4. Press the Exit button to exit the menu. |
You can enjoy photo, music, and movie files stored on a USB device by connecting it to the TV
TV Side Panel
the same station. For example, to select channel
Cut off the sound temporarily.
Viewing the On Screen Menus
and using the Media Play feature. To connect a USB device for Media Play, follow these steps:
Adjusts the volume.
![]() Change channels.
Change channels.
To view the On Screen Menus, follow these steps:
Menu
1. Turn on your TV. |
USB Drive
Displays the channel list on the screen.
View the Media Play.
Quickly selects frequently used functions.
Selects the
| CHLIST |
|
MEDIA.P | MENU | FAV.CH |
| ||
TOOLS |
| INFO |
|
|
Displays the main
Displays Favorite Channel Lists on the screen.
Press to display information on the TV screen.
1. | With the power on, press the Menu button |
| on your remote. The main menu appears. |
| The menu’s left side has the following menu |
| options: Picture, Sound, Channel, Setup, |
| Input, Application, and Support. |
2. | Press the ▲ or ▼ button on your remote |
| to select a menu option, and then press the |
| EnterEbutton. |
MEDIA.P MENU FAV.CH
TOOLS
INFO
2. | Connect a USB device |
| containing photo, music and/ |
| or movie files to the USB (HDD) |
| jack on the side of the TV. |
3. | When the Application selection |
| screen appears, press the |
| EnterEbutton on your |
| remote to select Media Play |
MediaPlay
Videos
Return to the previous menu.
Colored buttons for use in the Channel List, Media Play menu, etc.
Use these buttons in the Media Play and Anynet+ modes.
(![]() : controls recording on Samsung recorders with the Anynet+ feature)
: controls recording on Samsung recorders with the Anynet+ feature)
RETURN |
| EXIT |
S.MODE | SLEEP | MTS |
P.MODE | P.SIZE | CC |
Exit the menu.
S.MODE: Selects the sound mode.
SLEEP: Setting the Sleep Timer.
MTS: Press to choose stereo, mono or Separate Audio Program (SAP broadcast).
P.MODE: Selects picture mode.
P.SIZE: Choose the picture size.
CC: Controls the caption decoder.
3.When done using the menu, press the Exit button on your remote to exit.
(USB). |
SUM A Change Device
D View Devices EEnter RReturn
English - 2