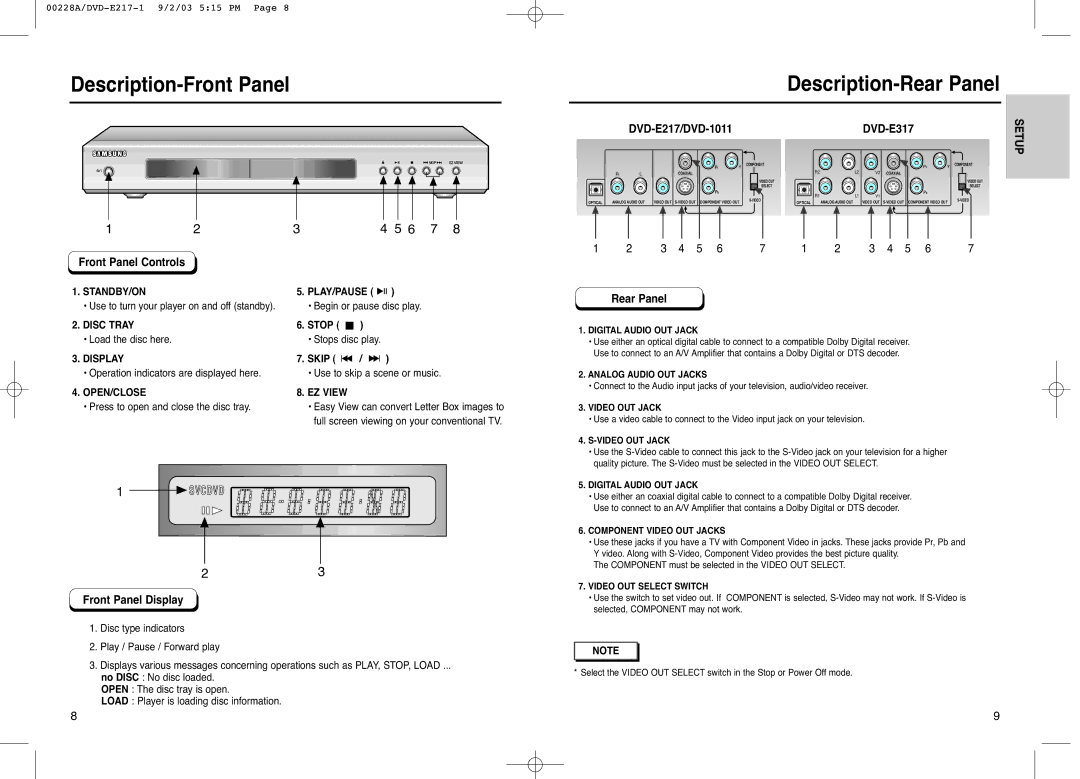
Description-Front Panel
Description-Rear Panel
1 | 2 | 3 | 4 5 6 | 7 | 8 |
COAXIAL
OPTICAL | ANALOG AUDIO OUT | VIDEO OUT |
DVD-E317
COMPONENT | COMPONENT |
R2 | L2 | V2 | COAXIAL |
VIDEO OUT |
|
| VIDEO OUT |
SELECT |
|
| SELECT |
R1 | L1 | V1 | |||
OPTICAL | ANALOG AUDIO OUT | VIDEO OUT | |||
|
|
SETUP
1 | 2 | 3 | 4 | 5 | 6 | 7 | 1 | 2 | 3 | 4 | 5 | 6 | 7 |
Front Panel Controls
1.STANDBY/ON
•Use to turn your player on and off (standby).
2.DISC TRAY
•Load the disc here.
3.DISPLAY
•Operation indicators are displayed here.
4.OPEN/CLOSE
•Press to open and close the disc tray.
5.PLAY/PAUSE ( ![]()
![]()
![]() )
)
•Begin or pause disc play.
6.STOP ( ![]() )
)
•Stops disc play.
7.SKIP ( ![]()
![]() /
/ ![]()
![]() )
)
•Use to skip a scene or music.
8.EZ VIEW
•Easy View can convert Letter Box images to full screen viewing on your conventional TV.
Rear Panel
1. DIGITAL AUDIO OUT JACK |
• Use either an optical digital cable to connect to a compatible Dolby Digital receiver. |
Use to connect to an A/V Amplifier that contains a Dolby Digital or DTS decoder. |
2. ANALOG AUDIO OUT JACKS |
• Connect to the Audio input jacks of your television, audio/video receiver. |
3. VIDEO OUT JACK |
• Use a video cable to connect to the Video input jack on your television. |
4. |
• Use the |
quality picture. The |
5. DIGITAL AUDIO OUT JACK |
1
23
Front Panel Display
1.Disc type indicators
2.Play / Pause / Forward play
3.Displays various messages concerning operations such as PLAY, STOP, LOAD ...
no DISC : No disc loaded.
OPEN : The disc tray is open.
LOAD : Player is loading disc information.
• Use either an coaxial digital cable to connect to a compatible Dolby Digital receiver. |
Use to connect to an A/V Amplifier that contains a Dolby Digital or DTS decoder. |
6. COMPONENT VIDEO OUT JACKS |
• Use these jacks if you have a TV with Component Video in jacks. These jacks provide Pr, Pb and |
Y video. Along with |
The COMPONENT must be selected in the VIDEO OUT SELECT. |
7. VIDEO OUT SELECT SWITCH |
• Use the switch to set video out. If COMPONENT is selected, |
selected, COMPONENT may not work. |
NOTE |
* Select the VIDEO OUT SELECT switch in the Stop or Power Off mode. |
8 | 9 |