Playback ( à)

Deleting images

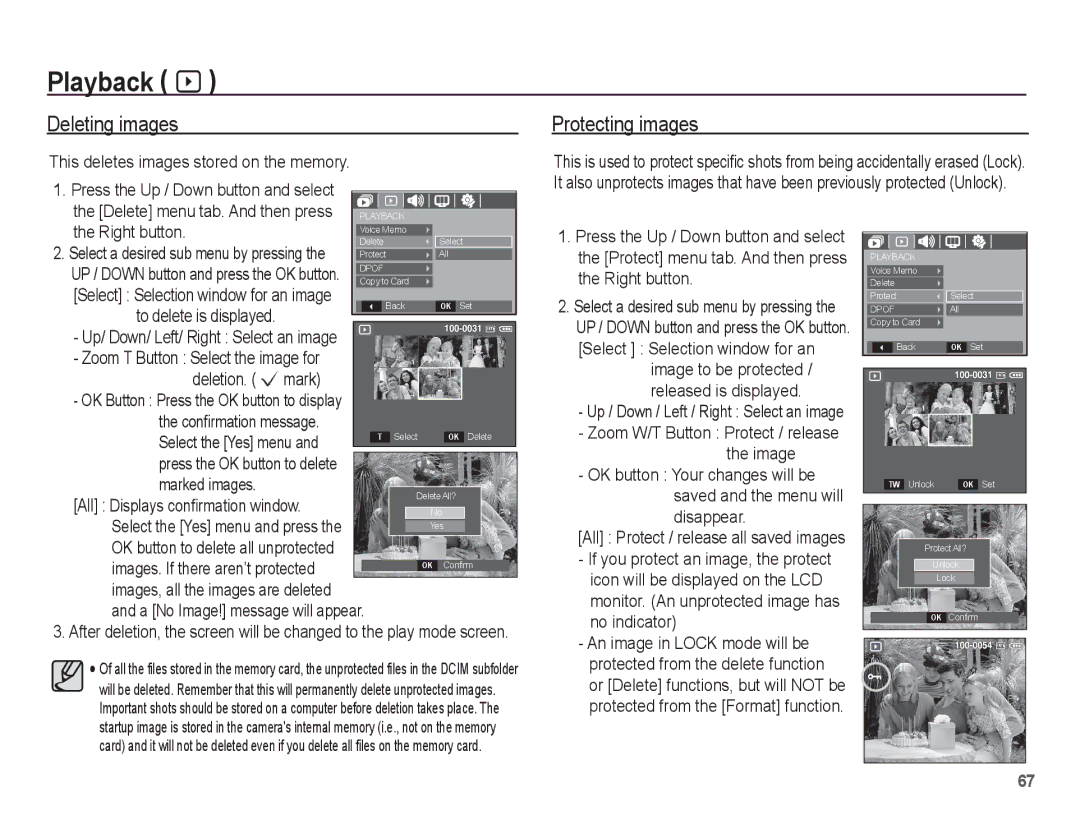
This deletes images stored on the memory.

1. Press the Up / Down button and select

the [Delete] menu tab. And then press PLAYBACK

Protecting images

This is used to protect specific shots from being accidentally erased (Lock). It also unprotects images that have been previously protected (Unlock).

the Right button.

Voice Memo


2. Select a desired sub menu by pressing the

Delete


Select


Protect


All


UP / DOWN button and press the OK button.

DPOF


Copy to Card


[Select] : Selection window for an image


Back


OK

Set

to delete is displayed.


- Up/ Down/ Left/ Right : Select an image


- Zoom T Button : Select the image for


deletion. ( Ëmark)


- OK Button : Press the OK button to display


the confirmation message.


T Select


Delete

Select the [Yes] menu and


OK


press the OK button to delete


marked images.


DeleteAll?


[All] : Displays confirmation window.


No


Select the [Yes] menu and press the


Yes


OK button to delete all unprotected


images. If there aren’t protected


OK

Confirm


images, all the images are deleted and a [No Image!] message will appear.

3. After deletion, the screen will be changed to the play mode screen.

Of all the files stored in the memory card, the unprotected files in the DCIM subfolder

will be deleted. Remember that this will permanently delete unprotected images. Important shots should be stored on a computer before deletion takes place. The startup image is stored in the camera's internal memory (i.e., not on the memory card) and it will not be deleted even if you delete all files on the memory card.

1.Press the Up / Down button and select the [Protect] menu tab. And then press the Right button.

2.Select a desired sub menu by pressing the UP / DOWN button and press the OK button. [Select ] : Selection window for an

image to be protected / released is displayed.

-Up / Down / Left / Right : Select an image

-Zoom W/T Button : Protect / release the image

-OK button : Your changes will be saved and the menu will disappear.

[All] : Protect / release all saved images

-If you protect an image, the protect icon will be displayed on the LCD monitor. (An unprotected image has no indicator)

-An image in LOCK mode will be protected from the delete function or [Delete] functions, but will NOT be protected from the [Format] function.

PLAYBACK


Voice Memo


Delete


Protect

Select

DPOF

All


Copy to Card


Back

OK

Set

TW Unlock

OK Set

ProtectAll?

Unlock

Lock

OK Confirm

67

Page 68
Image 68
Samsung EC-L201ZBBC/IT manual Deleting images, Protecting images, To delete is displayed, Deletion. Ëmark, Marked images

EC-L201ZEBA/RU, EC-L201ZUBA/VN, EC-L201ZSBE/ZA, EC-L201ZEBB/IT, EC-L201ZEBA/E3 specifications

The Samsung EC-L201 series of cameras, which includes models like EC-L201ZSBA/E1, EC-L201ZEBA/E1, EC-L201ZPBE/ZA, EC-L201ZUBE/ZA, and EC-L201ZUBA/E1, represents a notable achievement in compact digital photography. These models are particularly designed for users who seek versatility without sacrificing quality, making them an ideal choice for both casual photographers and enthusiasts.

At the heart of the Samsung EC-L201 series is its powerful sensor technology. These cameras come equipped with a 20.1-megapixel sensor that captures stunning images with remarkable detail. The high resolution ensures that photographs maintain clarity even when enlarged, making them suitable for printing or high-visibility platforms.

One of the standout features of the EC-L201 series is its optical zoom capability. With a 5x optical zoom lens, users can get close to the action, capturing subjects clearly from a distance. This feature is particularly advantageous for events like concerts or sporting activities, where moving closer to the subject may not be possible.

In terms of low-light performance, the EC-L201 models excel with their advanced sensitivity capabilities. The cameras are designed to deliver high-quality images even in dim lighting conditions, reducing the risk of noise and grain that can detract from an image's overall quality. This makes it easier for photographers to capture memorable moments at dusk or in indoor settings.

Another significant technology integrated into the Samsung EC-L201 series is its Smart Filter feature. This allows users to apply various creative effects to their photos directly from the camera, adding a unique touch without the need for post-processing on a computer.

Users will also appreciate the ease of operation that these models offer. Featuring a user-friendly interface and intuitive controls, navigating through settings and features is seamless. The built-in Smart Auto mode intelligently analyzes scenes, automatically selecting the best settings for optimal performance.

Battery life is yet another essential characteristic of the EC-L201 series, as users can capture hundreds of photos on a single charge. This long-lasting battery ensures that photographers can spend more time shooting and less time worrying about their camera dying mid-session.

In summary, the Samsung EC-L201ZSBA/E1, EC-L201ZEBA/E1, EC-L201ZPBE/ZA, EC-L201ZUBE/ZA, and EC-L201ZUBA/E1 encompass a combination of advanced features, user-friendly technology, and impressive image quality, making them an excellent choice for anyone looking to elevate their photography experience.