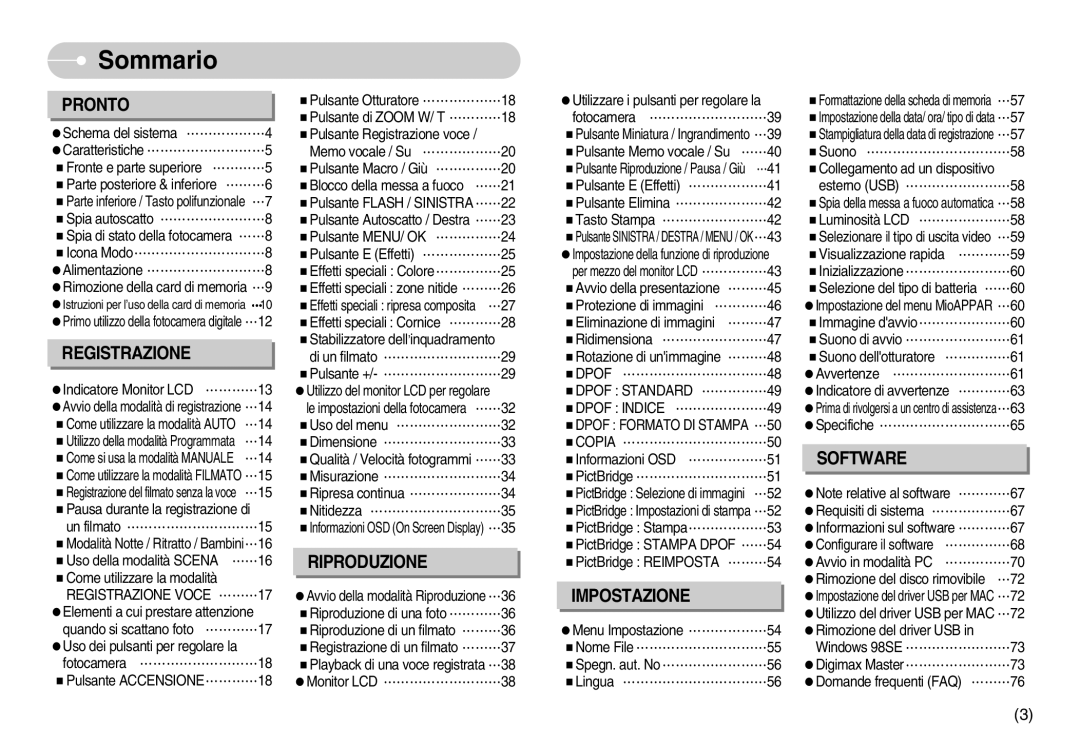
Sommario

PRONTO


Pulsante Otturatore ………………18

Schema del sistema ………………4

Pulsante di ZOOM W/ T …………18

Pulsante Registrazione voce /

Caratteristiche ………………………5

Memo vocale / Su ………………20

Fronte e parte superiore …………5

Pulsante Macro / Giù ……………20

Parte posteriore & inferiore ………6

Blocco della messa a fuoco ……21

Parte inferiore / Tasto polifunzionale 7

Pulsante FLASH / SINISTRA……22

Spia autoscatto ……………………8

Pulsante Autoscatto / Destra ……23

Spia di stato della fotocamera ……8

Pulsante MENU/ OK ……………24

Icona Modo…………………………8

Pulsante E (Effetti) ………………25

Alimentazione ………………………8

Effetti speciali : Colore……………25

Rimozione della card di memoria 9

Effetti speciali : zone nitide ………26

Istruzioni per l’uso della card di memoria 10

Effetti speciali : ripresa composita 27

Primo utilizzo della fotocamera digitale 12

Effetti speciali : Cornice …………28

REGISTRAZIONE


Stabilizzatore dellinquadramento


di un filmato ………………………29

Indicatore Monitor LCD …………13

Pulsante +/- ………………………29

Utilizzo del monitor LCD per regolare

Avvio della modalità di registrazione 14

le impostazioni della fotocamera ……32

Come utilizzare la modalità AUTO

14

Uso del menu ……………………32

Utilizzo della modalità Programmata

14

Dimensione ………………………33

Come si usa la modalità MANUALE

14

Qualità / Velocità fotogrammi ……33

Come utilizzare la modalità FILMATO 15

Misurazione ………………………34

Registrazione del filmato senza la voce

15

Ripresa continua …………………34

Pausa durante la registrazione di

Nitidezza …………………………35

un filmato …………………………15

Informazioni OSD (On Screen Display) 35

Modalità Notte / Ritratto / Bambini16

RIPRODUZIONE

Uso della modalità SCENA ……16

Come utilizzare la modalità


REGISTRAZIONE VOCE ………17

Avvio della modalità Riproduzione 36

Elementi a cui prestare attenzione

Riproduzione di una foto …………36

quando si scattano foto …………17

Riproduzione di un filmato ………36

Uso dei pulsanti per regolare la


Registrazione di un filmato ………37

fotocamera ………………………18

Playback di una voce registrata 38

Pulsante ACCENSIONE…………18

Monitor LCD ………………………38

Utilizzare i pulsanti per regolare la

Formattazione della scheda di memoria 57

fotocamera ………………………39

Impostazione della data/ ora/ tipo di data 57

Pulsante Miniatura / Ingrandimento 39

Stampigliatura della data di registrazione 57

Pulsante Memo vocale / Su ……40

Suono ……………………………58

Pulsante Riproduzione / Pausa / Giù 41

Collegamento ad un dispositivo

Pulsante E (Effetti) ………………41

esterno (USB) ……………………58

Pulsante Elimina …………………42

Spia della messa a fuoco automatica 58

Tasto Stampa ……………………42

Luminosità LCD …………………58

Pulsante SINISTRA / DESTRA / MENU / OK43

Selezionare il tipo di uscita video 59

Impostazione della funzione di riproduzione

Visualizzazione rapida …………59

per mezzo del monitor LCD ……………43

Inizializzazione ……………………60

Avvio della presentazione ………45

Selezione del tipo di batteria ……60

Protezione di immagini …………46

Impostazione del menu MioAPPAR 60

Eliminazione di immagini ………47

Immagine d'avvio…………………60

Ridimensiona ……………………47

Suono di avvio ……………………61

Rotazione di un'immagine ………48

Suono dell'otturatore ……………61

DPOF ……………………………48

Avvertenze ………………………61

DPOF : STANDARD ……………49

Indicatore di avvertenze …………63

DPOF : INDICE …………………49

Prima di rivolgersi a un centro di assistenza63

DPOF : FORMATO DI STAMPA 50

Specifiche …………………………65

COPIA ……………………………50

SOFTWARE


Informazioni OSD ………………51


PictBridge …………………………51


PictBridge : Selezione di immagini 52

Note relative al software …………67

PictBridge : Impostazioni di stampa 52

Requisiti di sistema ………………67

PictBridge : Stampa………………53

Informazioni sul software …………67

PictBridge : STAMPA DPOF ……54

Configurare il software

……………68

PictBridge : REIMPOSTA ………54

Avvio in modalità PC

……………70

IMPOSTAZIONE

Rimozione del disco rimovibile 72

Impostazione del driver USB per MAC 72


Utilizzo del driver USB per MAC 72

Menu Impostazione ………………54

Rimozione del driver USB in

Nome File …………………………55

Windows 98SE ……………………73

Spegn. aut. No ……………………56

Digimax Master……………………73

Lingua ……………………………56

Domande frequenti (FAQ) ………76

(3)

Page 4
Image 4
Samsung EC-S1030BBB/IT, EC-S1030SDC/DE, EC-S1030SBA/E1 manual Sommario, Registrazione Voce ………17, Dpof Formato DI Stampa …50

EC-S1030SBB/IT, EC-S1030BBA/IT, EC-S1030BBB/IT, EC-S1030BBA/E1, EC-S1030SBA/IT specifications

The Samsung EC-S1030 series, which includes models EC-S1030SDC/DE, EC-S1030BDC/DE, EC-S1030SBA/E1, EC-S1030SBB/E2, and EC-S1030SBA/IT, represents a robust entry into the compact digital camera market. Designed for users who prioritize ease of use without compromising on quality, these models embody Samsung's commitment to innovation and user-friendly technology.

One of the standout features of the EC-S1030 series is its sleek and compact design, making it highly portable for everyday use. The slim profile allows for easy storage in pockets or small bags, making it an excellent travel companion. Despite its compact size, the cameras are equipped with a powerful 10.2-megapixel sensor, ensuring sharp and detailed photos. Users can expect high-resolution images suitable for both online sharing and larger print formats.

The EC-S1030 cameras also feature a 3x optical zoom lens that enhances versatility, allowing users to capture a range of subjects from distant landscapes to close-up portraits. The lens is complemented by Samsung's Advanced Shake Reduction technology, which helps minimize blurriness caused by camera movement, especially in low-light situations. This makes it easier to capture high-quality images without needing a tripod.

In terms of usability, the EC-S1030 series boasts an intuitive interface along with an easy-to-read 2.7-inch LCD screen. This display features a clear menu system, enabling users to navigate functions swiftly and effortlessly. The camera also incorporates several scene modes, allowing users to adapt settings to various shooting environments, from scenic landscapes to dimly lit venues.

Samsung's Smart Face Recognition technology enhances user experience by automatically detecting and focusing on faces within the frame. This feature is particularly useful for group shots or when capturing candid moments. The cameras also offer various creative filters and effects, empowering users to add a personal touch to their photography.

The EC-S1030 series supports a range of shooting modes, including panorama and video recording capabilities, which further expand creative opportunities. With these features, users can effortlessly capture not just still images but also dynamic moments in motion.

In summary, the Samsung EC-S1030 digital camera series is ideal for beginners and casual photographers looking for a portable, easy-to-use camera that delivers high-quality results. With its combination of impressive specifications, innovative features, and user-friendly design, it stands out as a compelling option in the compact camera segment. Whether traveling, attending events, or simply capturing everyday moments, these cameras offer the performance and flexibility needed to create lasting memories.