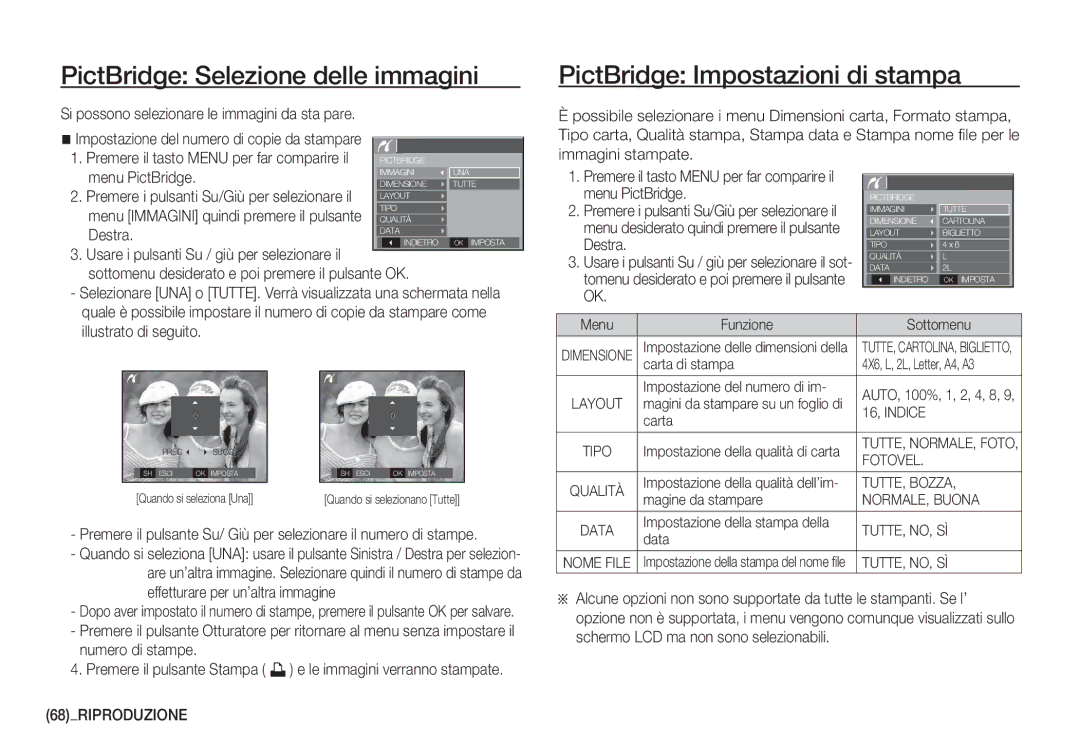
PictBridge: Selezione delle immagini

Si possono selezionare le immagini da sta pare.

Impostazione del numero di copie da stampare

PictBridge: Impostazioni di stampa

Èpossibile selezionare i menu Dimensioni carta, Formato stampa, Tipo carta, Qualità stampa, Stampa data e Stampa nome file per le

1. Premere il tasto MENU per far comparire il

PICTBRIDGE


menu PictBridge.


IMMAGINI


UNA


DIMENSIONE


TUTTE

2. Premere i pulsanti Su/Giù per selezionare il


LAYOUT


menu [IMMAGINI] quindi premere il pulsante


TIPO


QUALITÀ


Destra.


DATA


INDIETRO


OK IMPOSTA


3.Usare i pulsanti Su / giù per selezionare il sottomenu desiderato e poi premere il pulsante OK.

- Selezionare [UNA] o [TUTTE]. Verrà visualizzata una schermata nella

quale è possibile impostare il numero di copie da stampare come

immagini stampate.

1.Premere il tasto MENU per far comparire il menu PictBridge.

2.Premere i pulsanti Su/Giù per selezionare il menu desiderato quindi premere il pulsante Destra.

3.Usare i pulsanti Su / giù per selezionare il sot- tomenu desiderato e poi premere il pulsante OK.

PICTBRIDGE IMMAGINI DIMENSIONE LAYOUT TIPO QUALITÀ DATA

INDIETRO

TUTTE

CARTOLINA BIGLIETTO 4 x 6

L 2L

OK IMPOSTA

illustrato di seguito.

Menu

Funzione

Sottomenu

DIMENSIONE

Impostazione delle dimensioni della

TUTTE, CARTOLINA, BIGLIETTO,


carta di stampa

4X6, L, 2L, Letter, A4, A3


Impostazione del numero di im-

AUTO, 100%, 1, 2, 4, 8, 9,

LAYOUT

magini da stampare su un foglio di

16, INDICE

0

PREC SUCC

SH ESCI

OK IMPOSTA

[Quando si seleziona [Una]]

0

SH ESCI

OK IMPOSTA

[Quando si selezionano [Tutte]]


carta


TIPO

Impostazione della qualità di carta

TUTTE, NORMALE, FOTO,

FOTOVEL.


QUALITÀ

Impostazione della qualità dell’im-

TUTTE, BOZZA,

magine da stampare

NORMALE, BUONA


Impostazione della stampa della


-Premere il pulsante Su/ Giù per selezionare il numero di stampe.

-Quando si seleziona [UNA]: usare il pulsante Sinistra / Destra per selezion- are un’altra immagine. Selezionare quindi il numero di stampe da effetturare per un’altra immagine

-Dopo aver impostato il numero di stampe, premere il pulsante OK per salvare.

-Premere il pulsante Otturatore per ritornare al menu senza impostare il numero di stampe.

4. Premere il pulsante Stampa ( ») e le immagini verranno stampate.

(68)_RIPRODUZIONE

DATA

data

TUTTE, NO, SÌ


NOME FILE Impostazione della stampa del nome file

TUTTE, NO, SÌ

ÄAlcune opzioni non sono supportate da tutte le stampanti. Se l’ opzione non è supportata, i menu vengono comunque visualizzati sullo schermo LCD ma non sono selezionabili.

Page 69
Image 69
Samsung EC-S1060SBA/IT manual PictBridge Selezione delle immagini, PictBridge Impostazioni di stampa, Menu PictBridge

EC-S1050BDA/DE, EC-S1060BBB/E1, EC-S1050BBA/IT, EC-S1060BDA/E3, EC-S1060BBA/IT specifications

The Samsung EC-S1050 series, including models EC-S1050SBA/E1, EC-S1050BDB/AS, EC-S1050SBC/AS, EC-S1050BBA/E1, and EC-S1050SDA/DE, represents a range of compact digital cameras designed for both casual and photography enthusiasts. These models are part of Samsung's commitment to providing user-friendly cameras that incorporate advanced technologies to enhance the photographic experience.

One of the standout features of the EC-S1050 series is its 10.0-megapixel sensor, which captures high-resolution images with remarkable clarity and detail. This resolution is ideal for both everyday snapshots and more artistic endeavors. The cameras also come equipped with a powerful 5x optical zoom lens, enabling users to get closer to the subject without sacrificing image quality. This feature is particularly useful for capturing distant landscapes, candid shots, or wildlife photography.

The EC-S1050 series is built with a compact and stylish design, making it a portable option suitable for users on the go. The lightweight build ensures that it can easily fit into a bag or pocket, allowing photographers to take it along for travel or events. Additionally, the intuitive user interface includes a large LCD screen that makes framing shots and reviewing images effortless.

Samsung has integrated several technologies to enhance image quality. The Smart Auto mode intelligently analyzes the shooting environment and automatically adjusts settings for optimal results. This feature is particularly beneficial for novice photographers who may not be familiar with all the intricacies of manual settings. Furthermore, the cameras often include image stabilization technology to reduce the effects of camera shake, ensuring sharper images even in challenging lighting conditions.

Additional features of the EC-S1050 models include various scene modes, such as portrait, landscape, and night, which help users achieve the desired effect in different situations. A built-in flash also assists in low-light scenarios, ensuring that users can take quality photos regardless of lighting conditions.

Overall, the Samsung EC-S1050 series stands out as an excellent option for those seeking a compact and easy-to-use digital camera. With its combination of high-resolution imaging, optical zoom capabilities, and advanced technologies, it fulfills the needs of both casual users and budding photographers alike. Whether capturing everyday moments or special events, these cameras offer versatility and quality in a sleek design.