User
Manual
SAMSUNG 20-50mm F3.5-5.6 ED II
ENG / LIT / EST
This User Manual has been specially designed to guide you through the basic functions and features of your device. Please read the User Manual carefully to ensure safe and correct use.
A7
B 

 C
C
D E F
English
Before Using This Device
Thank you for purchasing the Samsung Lens. The illustrations used in this manual may differ from the actual items. Some functions described in this manual may not be available depending on the camera model. Update the firmware of the camera body and lens. Visit www.samsung.com to download the firmware.
Unpacking
Lens, Lens cap, Lens mount cover, User manual
• Optional Item: Filter, Case
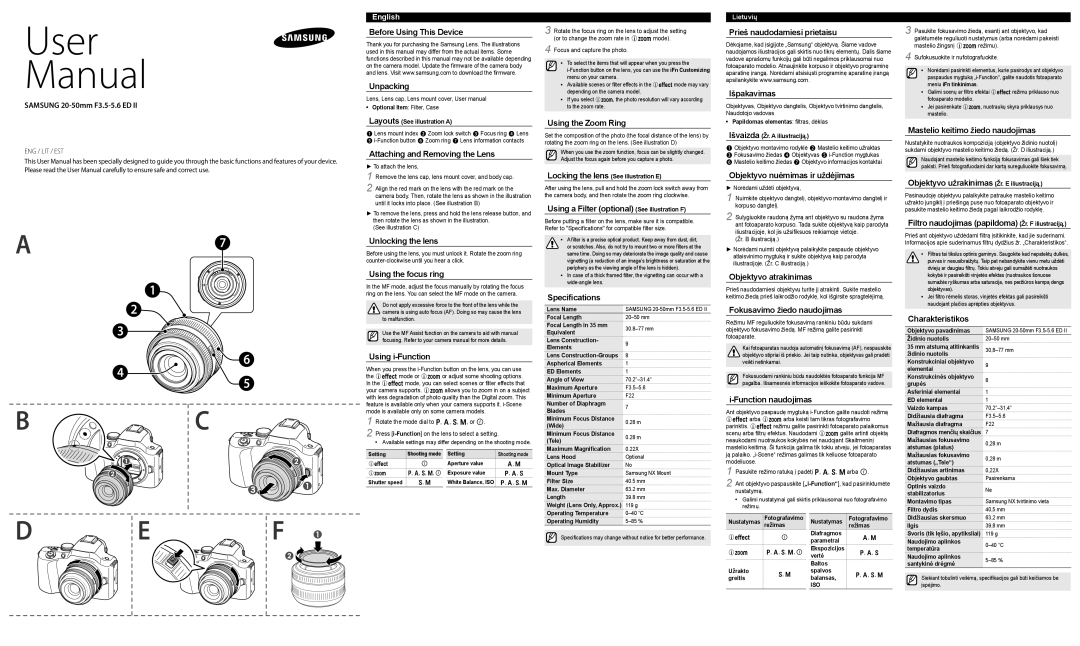
Layouts (See illustration A)
1 Lens mount index 2 Zoom lock switch 3 Focus ring 4 Lens 5 i-Function button 6 Zoom ring 7 Lens information contacts
Attaching and Removing the Lens
► To attach the lens,
1 Remove the lens cap, lens mount cover, and body cap.
2 Align the red mark on the lens with the red mark on the camera body. Then, rotate the lens as shown in the illustration until it locks into place. (See illustration B)
►To remove the lens, press and hold the lens release button, and then rotate the lens as shown in the illustration.
(See illustration C)
Unlocking the lens
Before using the lens, you must unlock it. Rotate the zoom ring counter-clockwise until you hear a click.
Using the focus ring
In the MF mode, adjust the focus manually by rotating the focus ring on the lens. You can select the MF mode on the camera.
Do not apply excessive force to the front of the lens while the camera is using auto focus (AF). Doing so may cause the lens to malfunction.
Use the MF Assist function on the camera to aid with manual focusing. Refer to your camera manual for more details.
Using i-Function
When you press the i-Function button on the lens, you can use the Emode or Zor adjust some shooting options. In the Emode, you can select scenes or filter effects that your camera supports. Zallows you to zoom in on a subject with less degradation of photo quality than the Digital zoom. This feature is available only when your camera supports it. i-Scene mode is available only on some camera models.
1 Rotate the mode dial to P, A, S, M, or i.
2 Press [i-Function] on the lens to select a setting.
•Available settings may differ depending on the shooting mode.
Setting | Shooting mode | | Setting | Shooting mode |
E | i | | Aperture value | A, M |
Z | P, A, S, M, i | | Exposure value | P, A, S |
Shutter speed | S, M | | White Balance, ISO | P, A, S, M |
3 Rotate the focus ring on the lens to adjust the setting (or to change the zoom rate in Zmode).
4 Focus and capture the photo.
•To select the items that will appear when you press the i-Function button on the lens, you can use the iFn Customizing menu on your camera.
•Available scenes or filter effects in the Emode may vary depending on the camera model.
•If you select Z, the photo resolution will vary according to the zoom rate.
Using the Zoom Ring
Set the composition of the photo (the focal distance of the lens) by rotating the zoom ring on the lens. (See illustration D)
When you use the zoom function, focus can be slightly changed. Adjust the focus again before you capture a photo.
Locking the lens (See illustration E)
After using the lens, pull and hold the zoom lock switch away from the camera body, and then rotate the zoom ring clockwise.
Using a Filter (optional) (See illustration F)
Before putting a filter on the lens, make sure it is compatible. Refer to "Specifications" for compatible filter size.
•A filter is a precise optical product. Keep away from dust, dirt,
or scratches. Also, do not try to mount two or more filters at the same time. Doing so may deteriorate the image quality and cause vignetting (a reduction of an image’s brightness or saturation at the periphery as the viewing angle of the lens is hidden).
•In case of a thick framed filter, the vignetting can occur with a wide-angle lens.
Specifications
| Lens Name | SAMSUNG 20-50mm F3.5-5.6 ED II |
| Focal Length | 20–50 mm |
| Focal Length in 35 mm | 30.8–77 mm |
| Equivalent |
| |
| Lens Construction- | 9 |
| Elements |
| |
| Lens Construction-Groups | 8 |
| Aspherical Elements | 1 |
| ED Elements | 1 |
| Angle of View | 70.2°–31.4° |
| Maximum Aperture | F3.5–5.6 |
| Minimum Aperture | F22 |
| Number of Diaphragm | 7 |
| Blades |
| |
| Minimum Focus Distance | 0.28 m |
| (Wide) |
| |
| Minimum Focus Distance | 0.28 m |
| (Tele) |
| |
| Maximum Magnification | 0.22X |
| Lens Hood | Optional |
| Optical Image Stabilizer | No |
| Mount Type | Samsung NX Mount |
| Filter Size | 40.5 mm |
| Max. Diameter | 63.2 mm |
| Length | 39.8 mm |
| Weight (Lens Only, Approx.) | 119 g |
| Operating Temperature | 0–40 °C |
| Operating Humidity | 5–85 % |
Specifications may change without notice for better performance.
Lietuvių
Prieš naudodamiesi prietaisu
Dėkojame, kad įsigijote „Samsung“ objektyvą. Šiame vadove naudojamos iliustracijos gali skirtis nuo tikrų elementų. Dalis šiame vadove aprašomų funkcijų gali būti negalimos priklausomai nuo fotoaparato modelio. Atnaujinkite korpuso ir objektyvo programinę aparatinę įrangą. Norėdami atsisiųsti programinę aparatinę įrangą apsilankykite www.samsung.com.
Išpakavimas
Objektyvas, Objektyvo dangtelis, Objektyvo tvirtinimo dangtelis, Naudotojo vadovas
• Papildomas elementas: filtras, dėklas
Išvaizda (Žr. A iliustraciją.)
1 Objektyvo montavimo rodyklė 2 Mastelio keitimo užraktas 3 Fokusavimo žiedas 4 Objektyvas 5 i-Function mygtukas 6 Mastelio keitimo žiedas 7 Objektyvo informacijos kontaktai
Objektyvo nuėmimas ir uždėjimas
► Norėdami uždėti objektyvą,
1 Nuimkite objektyvo dangtelį, objektyvo montavimo dangtelį ir korpuso dangtelį.
2 Sulygiuokite raudoną žymą ant objektyvo su raudona žyma ant fotoaparato korpuso. Tada sukite objektyvą kaip parodyta iliustracijoje, kol jis užsifiksuos reikiamoje vietoje.
(Žr. B iliustraciją.)
►Norėdami nuimti objektyvą palaikykite paspaudę objektyvo atlaisvinimo mygtuką ir sukite objektyvą kaip parodyta iliustracijoje. (Žr. C iliustraciją.)
Objektyvo atrakinimas
Prieš naudodamiesi objektyvu turite jį atrakinti. Sukite mastelio keitimo žiedą prieš laikrodžio rodyklę, kol išgirsite spragtelėjimą.
Fokusavimo žiedo naudojimas
Režimu MF reguliuokite fokusavimą rankiniu būdu sukdami objektyvo fokusavimo žiedą. MF režimą galite pasirinkti fotoaparate.
Kai fotoaparatas naudoja automatinį fokusavimą (AF), nespauskite objektyvo stipriai iš priekio. Jei taip nutinka, objektyvas gali pradėti veikti netinkamai.
Fokusuodami rankiniu būdu naudokitės fotoaparato funkcija MF pagalba. Išsamesnės informacijos ieškokite fotoaparato vadove.
i-Function naudojimas
Ant objektyvo paspaudę mygtuką i-Function galite naudoti režimą Earba Zarba keisti tam tikras fotografavimo parinktis. Erežimu galite pasirinkti fotoaparato palaikomus scenų arba filtrų efektus. Naudodami Zgalite artinti objektą neaukodami nuotraukos kokybės nei naudojant Skaitmeninį mastelio keitimą. Ši funkcija galima tik tokiu atveju, jei fotoaparatas ją palaiko. „i-Scene“ režimas galimas tik keliuose fotoaparato modeliuose.
1 Pasukite režimo ratuką į padėtį P, A, S, Marba i.
2 Ant objektyvo paspauskite [„i-Function“], kad pasirinktumėte nustatymą.
•Galimi nustatymai gali skirtis priklausomai nuo fotografavimo režimų.
Nustatymas | Fotografavimo | | Nustatymas | Fotografavimo |
režimas | | režimas |
E | i | | Diafragmos | A, M |
| parametrai |
| | | |
Z P, A, S, M, i | | Ekspozicijos | P, A, S |
| vertė |
| | | Baltos | |
Užrakto | S, M | | spalvos | P, A, S, M |
greitis | | balansas, |
| | |
ISO
3 Pasukite fokusavimo žiedą, esantį ant objektyvo, kad galėtumėte reguliuoti nustatymus (arba norėdami pakeisti mastelio žingsnį Zrežimu).
4 Sufokusuokite ir nufotografuokite.
•Norėdami pasirinkti elementus, kurie pasirodys ant objektyvo paspaudus mygtuką „i-Function“, galite naudotis fotoaparato meniu iFn tinkinimas.
•Galimi scenų ar filtro efektai Erežimu priklauso nuo fotoaparato modelio.
•Jei pasirenkate Z, nuotraukų skyra priklausys nuo mastelio.
Mastelio keitimo žiedo naudojimas
Nustatykite nuotraukos kompoziciją (objektyvo židinio nuotolį) sukdami objektyvo mastelio keitimo žiedą. (Žr. D iliustraciją.)
Naudojant mastelio keitimo funkciją fokusavimas gali šiek tiek pakisti. Prieš fotografuodami dar kartą sureguliuokite fokusavimą.
Objektyvo užrakinimas (Žr. E iliustraciją.)
Pasinaudoję objektyvu palaikykite patraukę mastelio keitimo užrakto jungiklį į priešingą pusę nuo fotoaparato objektyvo ir pasukite mastelio keitimo žiedą pagal laikrodžio rodyklę.
Filtro naudojimas (papildoma) (Žr. F iliustraciją.)
Prieš ant objektyvo uždėdami filtrą įsitikinkite, kad jie suderinami. Informacijos apie suderinamus filtrų dydžius žr. „Charakteristikos“.
•Filtras tai tikslus optinis gaminys. Saugokite kad nepatektų dulkės,
purvas ir nesusibraižytų. Taip pat nebandykite vienu metu uždėti dviejų ar daugiau filtrų. Tokiu atveju gali sumažėti nuotraukos kokybė ir pasireikšti vinjetės efektas (nuotraukos šonuose sumažės ryškumas arba saturacija, nes peržiūros kampą dengs objektyvas).
•Jei filtro rėmelis storas, vinjetės efektas gali pasireikšti naudojant plačios aprėpties objektyvus.
Charakteristikos
| Objektyvo pavadinimas | SAMSUNG 20-50mm F3.5-5.6 ED II |
| Židinio nuotolis | 20–50 mm |
| 35 mm atstumą atitinkantis | 30,8–77 mm |
| židinio nuotolis | |
| Konstrukciniai objektyvo | 9 |
| elementai |
| |
| Konstrukcinės objektyvo | 8 |
| grupės |
| |
| Asferiniai elementai | 1 |
| ED elementai | 1 |
| Vaizdo kampas | 70,2°–31,4° |
| Didžiausia diafragma | F3.5–5.6 |
| Mažiausia diafragma | F22 |
| Diafragmos menčių skaičius | 7 |
| Mažiausias fokusavimo | 0,28 m |
| atstumas (platus) |
| |
| Mažiausias fokusavimo | 0,28 m |
| atstumas („Tele“) |
| |
| Didžiausias artinimas | 0,22X |
| Objektyvo gaubtas | Pasirenkama |
| Optinis vaizdo | Ne |
| stabilizatorius |
| |
| Montavimo tipas | Samsung NX tvirtinimo vieta |
| Filtro dydis | 40,5 mm |
| Didžiausias skersmuo | 63,2 mm |
| Ilgis | 39,8 mm |
| Svoris (tik lęšio, apytiksliai) | 119 g |
| Naudojimo aplinkos | |
| temperatūra | 0–40 °C |
| |
| Naudojimo aplinkos | 5–85 % |
| santykinė drėgmė |
| |
Siekiant tobulinti veikimą, specifikacijos gali būti keičiamos be įspėjimo.