Samsung GT-P1000CWDOMN Inserimanto della scheda SIM o Usim, Per installare la scheda SIM o Usim

Models: GT-P1000CWAHUI GT-P1000CWAFWB GT-P1000CWDOMN GT-P1000CWACOS GT-P1000CWAVOM GT-P1000CWAOMN GT-P1000CWASMO GT-P1000CWAWIN GT-P1000CWDITV GT-P1000CWAITV GT-P1000CWATIM GT-P1000MSATIM GT-P1000CWDFWB

1 80
Download 80 pages 57.54 Kb
Page 9
Image 9

2 Collegate l'alimentatore a una presa di corrente standard AC 220V.

Durante il caricamento potete utilizzare il dispositivo, ma occorrerà più tempo per la ricarica completa della batteria.

Mentre il dispositivo è in carica, il touch screen e tasti a sfioramento potrebbero non funzionare a causa di un alimentazione instabile. Se ciò accade, scollegate l'adattatore di alimentazione USB dalla presa elettrica o scollegate il cavo dati per PC dal dispositivo.

Durante la ricarica il dispositivo può surriscaldarsi. Ciò è normale e non dovrebbe influire sulla durata o sulle prestazioni del dispositivo.

Se il dispositivo non si ricarica correttamente, portate il dispositivo e il caricabatteria presso un centro di assistenza Samsung.

3 Quando la batteria è completamente carica (l'icona della batteria non è più in movimento), scollegate il cavo dati dal dispositivo e l'alimentatore USB dalla presa di corrente standard AC 200V.

Per risparmiare energia, scollegate il caricabatteria quando non è in uso. Il caricabatteria non è dotato di interruttore di corrente, pertanto dovete scollegarlo dalla presa di corrente per interrompere il passaggio di elettricità. Durante l’uso, il caricabatteria dovrebbe rimanere vicino alla presa di corrente.

Inserimanto della scheda SIM o USIM.

Alla sottoscrizione di un abbonamento a un servizio di telefonia mobile, riceverete una scheda SIM (Subscriber Identity Module) e i dettagli dell'abbonamento, come il numero di identificazione personale (PIN) e i servizi opzionali. Per utilizzare i servizi UMTS o HSDPA, potete acquistare una scheda USIM (Universal Subscriber Identity Module).

Per installare la scheda SIM o USIM,

1 Rimuovete il coperchio dello slot della scheda SIM sul lato del dispositivo.

2 Inserite la scheda SIM o USIM come raffigurato di seguito.

Inserite la scheda SIM o USIM nel dispositivo con i contatti dorati rivolti verso il basso.

Non inserite una scheda di memoria nello slot della scheda SIM.

3 Chiudete il coperchio dello slot della scheda SIM.

Installazione di una scheda di memoria

Per archiviare altri file, è necessario inserire una scheda di memoria. Il dispositivo supporta schede di memoria microSDo microSDHCfino a massimo 32 GB (in base al produttore e al tipo di scheda di memoria).

Samsung utilizza standard industriali approvati per schede di memoria, ma alcune marche potrebbero non essere completamente compatibili con il dispositivo. L'utilizzo di una scheda di memoria incompatibile potrebbe danneggiare il dispositivo o la scheda di memoria e danneggiare i dati memorizzati sulla scheda.

Assemblaggio 9

Page 9
Image 9
Samsung GT-P1000CWDOMN, GT-P1000MSATIM manual Inserimanto della scheda SIM o Usim, Installazione di una scheda di memoria

GT-P1000CWAHUI, GT-P1000CWAFWB, GT-P1000CWDOMN, GT-P1000CWACOS, GT-P1000CWAVOM specifications

The Samsung GT-P1000, commonly known as the Galaxy Tab, marked a significant milestone in the evolution of mobile computing when it was released. This tablet was part of Samsung's pioneering efforts to create a versatile device that combined the best features of smartphones and laptops, catering to a growing market for portable entertainment and productivity solutions.

One of the main features of the GT-P1000 is its sleek and lightweight design, which makes it extremely portable. Weighing just over 380 grams, the Galaxy Tab can easily be carried in a bag or held in one hand, allowing users to enjoy media consumption, browsing, and communication on the go. The device boasts a 7-inch TFT capacitive touchscreen display with a resolution of 1024 x 600 pixels, providing vibrant colors and decent viewing angles for enjoying videos, games, and ebooks.

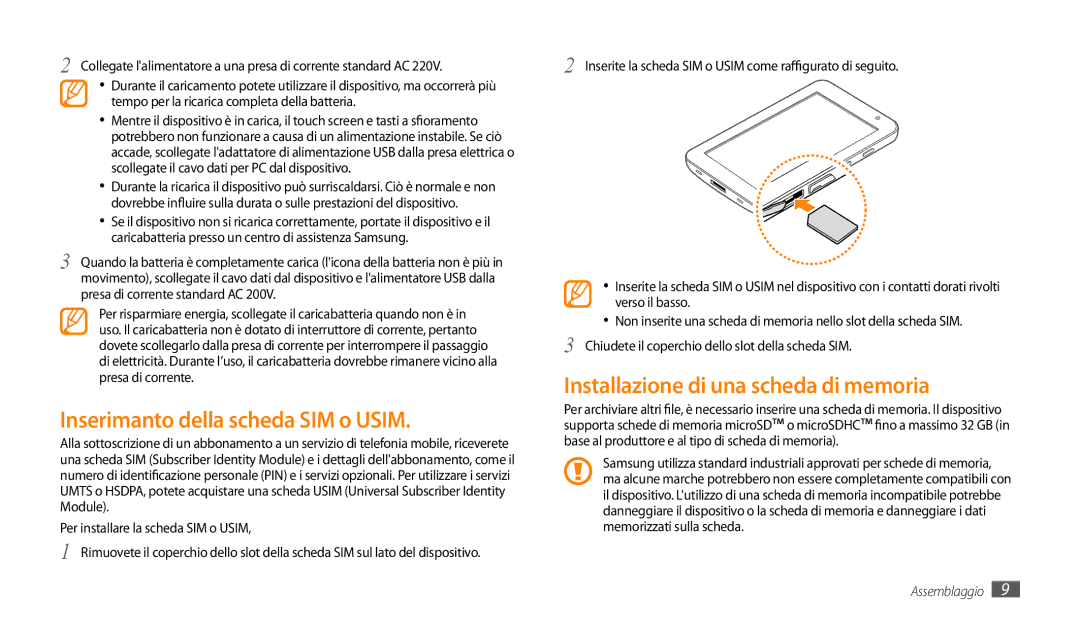
Powering the GT-P1000 is a 1 GHz ARM Cortex-A8 processor, coupled with 512 MB of RAM, which ensures smooth performance for a variety of applications. This tablet runs on Android 2.2 Froyo, allowing users to access the Google Play Store and download a wide array of apps tailored for various purposes, including productivity tools, games, and social media platforms.

In terms of connectivity, the Galaxy Tab offers multiple options, including Wi-Fi and optional 3G support, facilitating seamless internet access whether at home or on the move. The integration of Bluetooth technology also enables quick file transfers and connections with other devices, such as headphones or speakers.

The tablet features a front-facing camera for video calls and a rear camera for capturing moments on the go, though the megapixel counts are modest by today’s standards. Storage options include 16GB, 32GB, and the possibility of expansion via a microSD card slot, allowing users to manage their media library effectively.

Battery life is another strong point of the GT-P1000, with a 4000 mAh Lithium-ion battery providing ample usage time for daily tasks, entertainment, and browsing. Overall, the Samsung GT-P1000 laid the groundwork for future tablets, integrating essential features that balanced performance, portability, and connectivity in a user-friendly device.