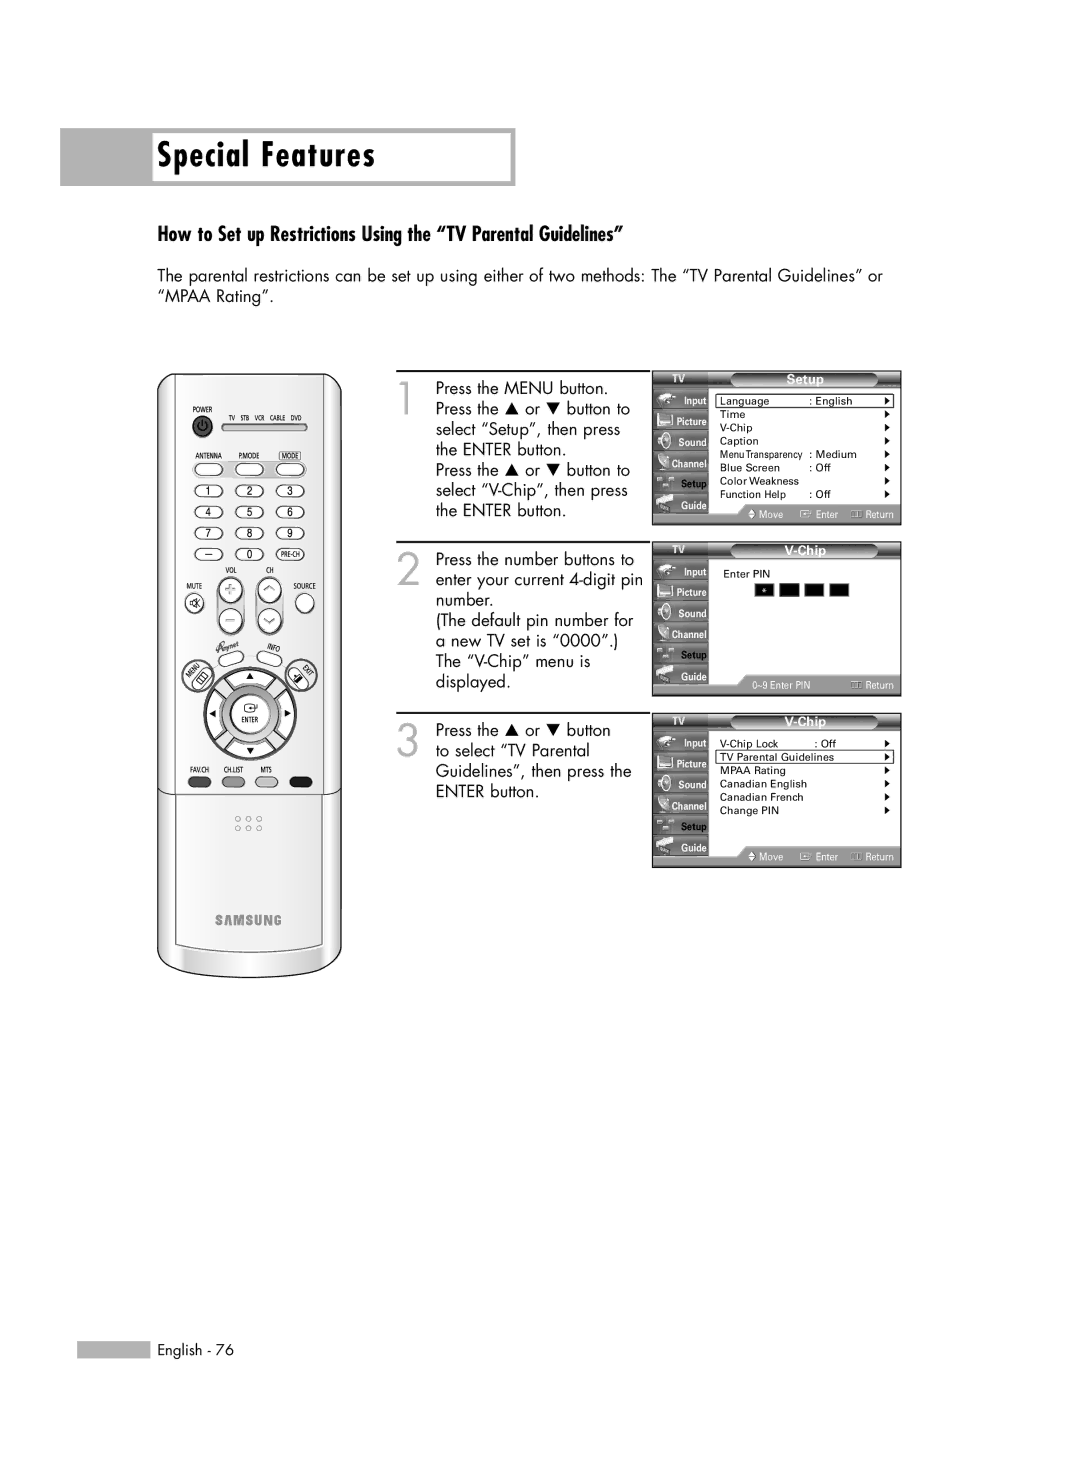
Main
A Guide to Digital TV
Digital Television Services
Q&A
Table of Contents
Your New Wide TV...................................................................................8
Page
Page
Page
Viewing Position
List of Features
Checking Accessories
Right side buttons
Side Panel Jacks
Front Panel LED Indicators
Indicator Light Key
Rear Panel Jacks
Remote Control
Page
Page
Connecting VHF and UHF Antennas
1
Antennas with 75-ohm Round Leads
Connecting Cable TV
1
Cable without a Cable Box
2
1
Cable with a Cable Box that Descrambles All Channels
Cable with a Cable Box that Descrambles Some (But Not All) Channels
2
5
4
3
Connecting a VCR
1
Connecting a VCR to the Video or S-Video/Audio jack
Connecting a Camcorder
2
3
Connecting a DVD Player
2
Connecting to Y, PB, PR
2
Connecting to Audio and Video Jacks
Connecting a DTV Set-Top Box
2
Connecting to Y, PB, PR
2
Connecting to DVI (Digital Visual Interface)
Connecting to HDMI (High Definition Multimedia Interface)
1
Connecting a Digital Audio System
1
Connecting to an Analog Amplifier
1
Page
Turning the TV On and Off
Viewing the Menus and On-Screen Displays
Viewing the Menus
3
Viewing the Display
English - 27
BP68-00524A-00(026~047) 6/3/05 3:18 PM Page 27
Selecting a Menu Language
select Setup, then press the
select Language.
select English, Espaol or Franais, then press the
Setup
Memorizing the Channels
Selecting the Video Signal Source
4
5
Adding and Erasing Channels
3
Changing Channels
Using the Channel Buttons
Using the Number Buttons
Using the -
Button
1 2
3 4
6
5
Page
Setting the Clock
3
4
5
Option 1: Setting the Clock Manually
Option 2: Setting the Clock Automatically
1
2
5
4
3
1
2
Setting the Sleep Timer
1
4
Viewing an External Signal Source
Setting the Signal Source
Assigning Names to External Input Mode
Page
Page
Selecting Your Favorite Channels
To Store Your Favorite Channels:
To View Your Favorite Channels:
Labeling the Channels
1
2
4
Fine Tuning Analog Channels
Analog
1
3
5
4
Checking the Digital-Signal Strength
English - 46
BP68-00524A-00(026~047) 6/3/05 3:18 PM Page 46
LNA (Low Noise Amplifier)
select Channel, then press
4
Page
Picture Control
2
Changing the Picture Standard
3
1
3
Customizing the Picture Settings
5
6
Resetting the Picture Settings to the Factory Defaults
7
Changing the Picture Size
2
English - 52
BP68-00524A-00(048~061) 6/3/05 3:26 PM Page 52
Digital Noise Reduction
select Picture, then press
select Digital NR, then
Viewing the DNIe Demonstration
Setting the My Color Control Mode
1
Using the Easy Control Menu
Custom Settings
1
Resetting the My Color Control Colors to the Factory Defaults
4
Using the Color Weakness Enhancement Feature
English - 57
BP68-00524A-00(048~061) 6/3/05 3:26 PM Page 57
Setting the Film Mode
Film mode is supported in 480i only.
select Picture, then press
select Film Mode, then
Page
English - 59
BP68-00524A-00(048~061) 6/3/05 3:26 PM Page 59
Setting the Blue Screen Mode
select Setup, then press
select Blue Screen, then
select On or Off, then
Page
Page
Sound Control
Adjusting the Volume
Using the MUTE Button
Customizing the Sound
3
Using Automatic Sound Settings
2
1
English - 64
Auto Volume
select Sound, then press
select Auto Volume, then
press the ENTER button.
Page
Choosing a Multi-Channel Sound (MTS) track
Analog
3
Choosing a Digital Sound Format
Selecting the Internal Mute
Setting the On/Off Melody
English - 70
BP68-00524A-00(062~071) 6/3/05 3:28 PM Page 70
Setting up DNSe (Digital Natural Sound engine)
DNSe enhances the sound quality, automatically controls output, and prevents sound distortion.
select Sound, then press
select DNSe, then press
Pressing the or button will alternate between On and Off.
Page
English - 72
BP68-00524A-00(072~095) 6/3/05 3:29 PM Page 72
Setting the Function Help
Displays Help on the menu functions.
select Setup, then press
select Function Help, then
English - 73
Menu Transparency Level
Adjusts the transparency of the menu screen.
select Setup, then press
select Menu Transparency, then press the ENTER button.
select level, then press the
4
How to Change Your Password
How to Enable/Disable the Rating Controls
3
How to Set up Restrictions Using the TV Parental Guidelines
4
How to Set up Restrictions Using the MPAA Rating
4
Important Notes About Parental Locks
TV (FCC) Age-Based Ratings
TV (FCC) Content Category
MPAA Rating System (Movies)
How to Set up Restrictions Using Canadian English
4
How to Set up Restrictions Using Canadian French
4
English - 84
BP68-00524A-00(072~095) 6/3/05 3:29 PM Page 84
Viewing Closed Captions (On-Screen Text Messages)
Analog
select Setup, then press
select Caption, then press
select Caption.
4
Viewing Closed Captions (On-Screen Text Messages)
5
6
Using the Guide
Adding and Erasing Channels
Using Game Mode
Restrictions on Game Mode (Caution)
Page
Appendix
Replacing the Lamp
Page
Appendix
Troubleshooting
Possible Solution
Problem
Cleaning and Maintaining Your TV
Placement
Liquids
Cabinet
Temperature