Operation

Turning the TV On and Off

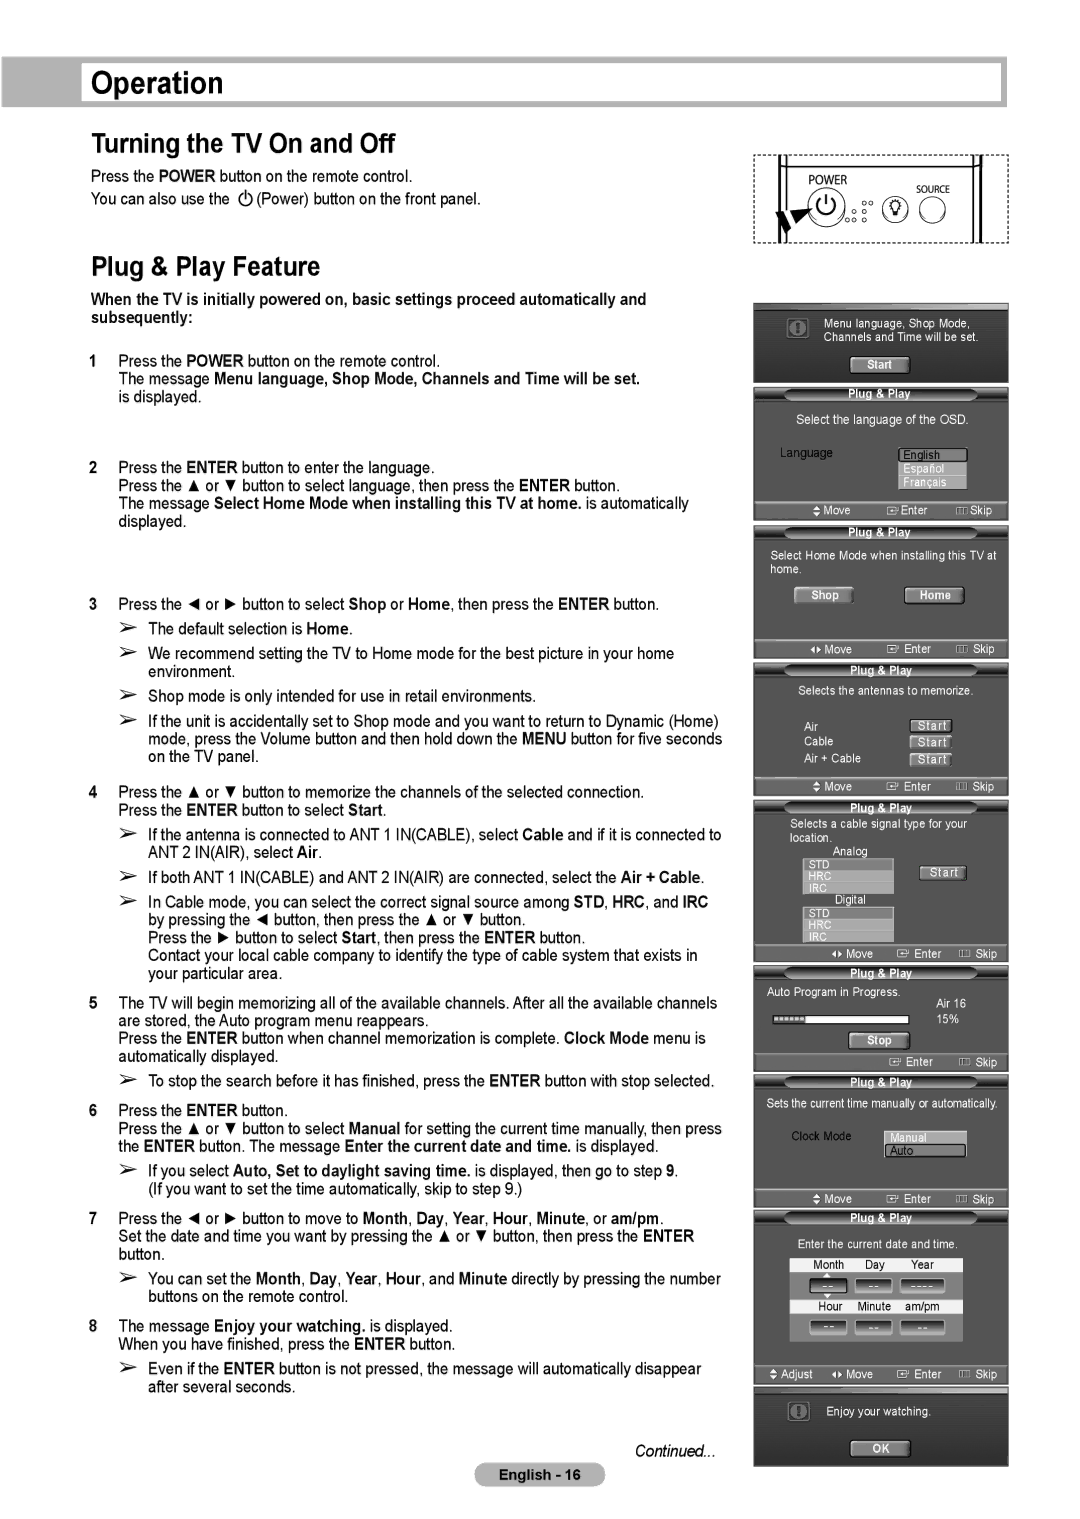
Press the POWER button on the remote control.

You can also use the (Power) button on the front panel.

Plug & Play Feature

When the TV is initially powered on, basic settings proceed automatically and subsequently:

1Press the POWER button on the remote control.

The message Menu language, Shop Mode, Channels and Time will be set. is displayed.

2Press the ENTER button to enter the language.

Press the ▲ or ▼ button to select language, then press the ENTER button.

The message Select Home Mode when installing this TV at home. is automatically displayed.

3Press the ◄ or ► button to select Shop or Home, then press the ENTER button.

The default selection is Home.

We recommend setting the TV to Home mode for the best picture in your home environment.

Shop mode is only intended for use in retail environments.

If the unit is accidentally set to Shop mode and you want to return to Dynamic (Home) mode, press the Volume button and then hold down the MENU button for five seconds on the TV panel.

4Press the ▲ or ▼ button to memorize the channels of the selected connection. Press the ENTER button to select Start.

If the antenna is connected to ANT 1 IN(CABLE), select Cable and if it is connected to ANT 2 IN(AIR), select Air.

If both ANT 1 IN(CABLE) and ANT 2 IN(AIR) are connected, select the Air + Cable.

In Cable mode, you can select the correct signal source among STD, HRC, and IRC by pressing the ◄ button, then press the ▲ or ▼ button.

Press the ► button to select Start, then press the ENTER button.

Contact your local cable company to identify the type of cable system that exists in your particular area.

5The TV will begin memorizing all of the available channels. After all the available channels are stored, the Auto program menu reappears.

Press the ENTER button when channel memorization is complete. Clock Mode menu is automatically displayed.

To stop the search before it has finished, press the ENTER button with stop selected.

6Press the ENTER button.

Press the ▲ or ▼ button to select Manual for setting the current time manually, then press the ENTER button. The message Enter the current date and time. is displayed.

If you select Auto, Set to daylight saving time. is displayed, then go to step 9. (If you want to set the time automatically, skip to step 9.)

7Press the ◄ or ► button to move to Month, Day, Year, Hour, Minute, or am/pm. Set the date and time you want by pressing the ▲ or ▼ button, then press the ENTER button.

You can set the Month, Day, Year, Hour, and Minute directly by pressing the number buttons on the remote control.

8The message Enjoy your watching. is displayed. When you have finished, press the ENTER button.

Even if the ENTER button is not pressed, the message will automatically disappear after several seconds.

Continued...

Menu language, Shop Mode,


Channels and Time will be set.


Start


Plug & Play


Select the language of the OSD.


Language


English


Español


Français


Move


Enter

Skip


Plug & Play


Select Home Mode when installing this TV at

home.


Shop


Home


Move


Enter

Skip


Plug & Play


Selects the antennas to memorize.

Air


Start


Cable


Start


Air + Cable


Start


Move


Enter

Skip


Plug & Play


Selects a cable signal type for your


location.


Analog


STD


Start


HRC


IRC

Digital


STD


HRC


IRC


Move


Enter

Skip


Plug & Play


Auto Program in Progress.

Air 16


15%


Stop


Enter

Skip


Plug & Play


Sets the current time manually or automatically.

Clock Mode

Manual


Auto


Move


Enter

Skip


Plug & Play


Enter the current date and time.


Month

Day


Year


--


--


----


Hour

Minute


am/pm


--


--


--


Adjust


Move


Enter

Skip

Enjoy your watching.


OK


English - 16

Page 16
Image 16
Samsung HL-T5075S Operation, Turning the TV On and Off, Plug & Play Feature, Press the Power button on the remote control

HL-T5075S, HL-T5675S specifications

The Samsung HLT4675S, HL-T5675S, and HL-T5075S represent a class of DLP (Digital Light Processing) TVs launched as part of Samsung’s innovative line of rear-projection televisions. These models showcase Samsung’s commitment to high-quality visuals and advanced technology, making them notable choices for home entertainment enthusiasts.

One of the standout features of these Samsung models is their use of DLP technology, which employs a digital micromirror device (DMD) to project images with impressive clarity and vibrancy. This technology allows for deeper blacks and brighter colors, contributing to an immersive viewing experience. The TVs are equipped with a 1080p resolution, ensuring that viewers can enjoy high-definition content with stunning detail.

The HLT4675S boasts a 46-inch screen, while the HL-T5675S offers a larger 56-inch display, catering to different room sizes and viewer preferences. The HL-T5075S sits in between with a 50-inch screen, providing options for various home setups. All models come with a sleek design that fits well into modern living spaces, featuring a slim bezel that maximizes the screen area.

Another significant characteristic across these models is their incorporation of Samsung’s sophisticated color technology. The ColorWheel technology optimally distributes colors for rich, vibrant visuals, enhancing the overall viewing experience. Additionally, these models feature an impressive contrast ratio, allowing for sharp distinctions between light and dark scenes.

These televisions are equipped with multiple connectivity options, including HDMI and component inputs, making it easy to connect various devices such as Blu-ray players, gaming consoles, and streaming devices. Integrated speakers provide decent audio quality, although many users may opt for external sound systems to enhance their audio experience.

Samsung integrates its intuitive user interface, providing easy navigation through various features and settings. The TVs also support various aspect ratios, allowing for flexibility in viewing content from different sources.

Overall, the Samsung HLT4675S, HL-T5675S, and HL-T5075S series exemplify superior DLP technology, offering high-definition resolution, vibrant colors, and robust connectivity options. With these features and an elegant design, they remain a popular choice for dedicated home theater setups, delivering a fulfilling entertainment experience for movie lovers and gamers alike.