System setup

Setting the CloCK

Choose your time zone

eng

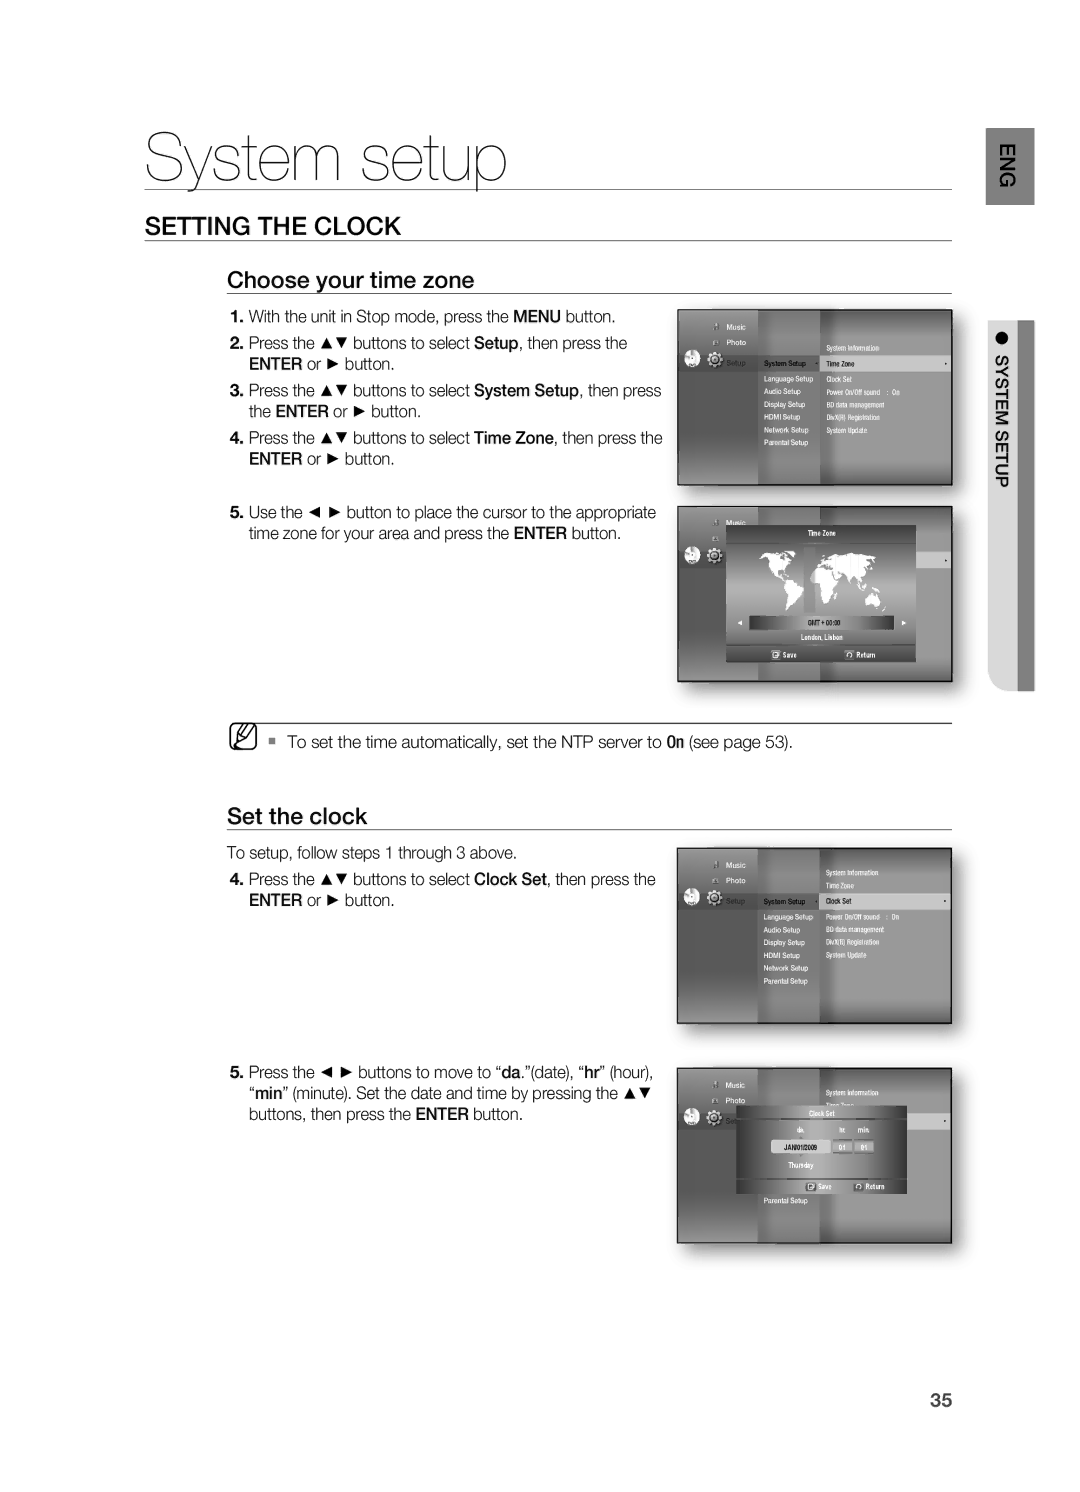
1.With the unit in Stop mode, press the Menu button.

2.Press the ▲▼ buttons to select Setup, then press the enteR or ► button.

3.Press the ▲▼ buttons to select System Setup, then press the enteR or ► button.

4.Press the ▲▼ buttons to select time Zone, then press the enteR or ► button.

5.Use the ◄ ► button to place the cursor to the appropriate time zone for your area and press the enteR button.


Music


Photo


System Information


dVd


Setup

System Setup

Time Zone


Language Setup


Clock Set


Audio Setup


Power On/Off sound

: On


Display Setup


BD data management


HDMI Setup


DivX(R) Registration


Network Setup


System Update


Parental Setup


Music

Time Zone


Photo


System Information


Setup

System Setup

Time Zone


dVd


Language Setup


Clock Set


Audio Setup


Power On/Off sound

: On


Display Setup


Touch Key Sound

: On


HDMI Setup


BD Data Management


GMT + 00:00


Network Setup


System Update


Parental SetupLondon, Lisbon


Save


Return


● SySteM Setup

M To set the time automatically, set the NTP server to On (see page 53).

Set the clock

To setup, follow steps 1 through 3 above.

4.Press the ▲▼ buttons to select Clock Set, then press the enteR or ► button.

Music


Photo


System Information


Time Zone


System Setup


Clock Set


dVd

Setup


Language Setup


Power On/Off sound : On


Audio Setup


BD data management


Display Setup


DivX(R) Registration


HDMI Setup


System Update


Network Setup


Parental Setup


5.Press the ◄ ► buttons to move to “da.”(date), “hr” (hour), “min” (minute). Set the date and time by pressing the ▲▼ buttons, then press the enteR button.


Music


System Information


Photo


Time Zone


Clock Set


dVd


Setup

System Setup

Clock Set


da.

hr.

min.

: On


Language Setup

Power On/Off sound


JAN/01/2009

01

01

: On


Audio Setup

Touch Key Sound


Display Setup

BD Data Management


Thursday

System Update


HDMI Setup


Network Setup

Save

Return


Parental Setup

35

Page 35
Image 35
Samsung HT-BD7200R/EDC, HT-BD7200R/XEF manual System setup, Setting the CloCK, Choose your time zone, Set the clock

HT-BD7200R/XEE, HT-BD7200R/XET, HT-BD7200T/XAA, HT-BD7200R/EDC, HT-BD7200R/XEF specifications

The Samsung HT-BD7200R/XEF is a powerful and compact home theater system designed to enhance your audio and visual experience. With its sleek design and advanced technology, this system provides a perfect blend of style and performance.

One of the most notable features of the HT-BD7200R/XEF is its capability to play Blu-ray discs. This system supports Full HD 1080p playback, ensuring that you enjoy stunning picture quality with vibrant colors and sharp details. The built-in Blu-ray player not only plays Blu-ray discs but also supports various formats, including DVD and CD, offering versatility for your entertainment needs.

Audio performance is equally impressive with the HT-BD7200R/XEF. It is equipped with a 5.1 channel surround sound system, delivering immersive sound that fills the room. The system includes powerful speakers that are optimized for high fidelity, ensuring that dialogues are crystal clear while action sequences come alive with dynamic bass.

The HT-BD7200R/XEF also features Dolby TrueHD and DTS-HD Master Audio technologies. These advanced audio codecs provide lossless sound quality, allowing you to enjoy the movie soundtracks the way the filmmakers intended. The result is a cinematic experience that transports you straight into the action.

Connectivity options abound with this system. It comes with HDMI outputs, enabling direct connection to your HD TV for a hassle-free setup, and also supports upscaling standard definition content to near-HD quality. Additionally, the system includes USB ports, allowing for easy playback of MP3 and JPEG files from compatible devices.

Another great feature of the HT-BD7200R/XEF is its compatibility with various digital content services. Users can access popular streaming services right from their home theater system, expanding their viewing options to include movies, shows, and music at the touch of a button.

The sleek, compact design of the HT-BD7200R/XEF fits seamlessly into any home decor. Its understated elegance and ease of use make it a popular choice for anyone seeking an all-in-one home entertainment solution.

Overall, the Samsung HT-BD7200R/XEF is an excellent choice for anyone looking to elevate their home entertainment experience with high-quality audio and stunning visuals, all housed within a stylish and user-friendly package.