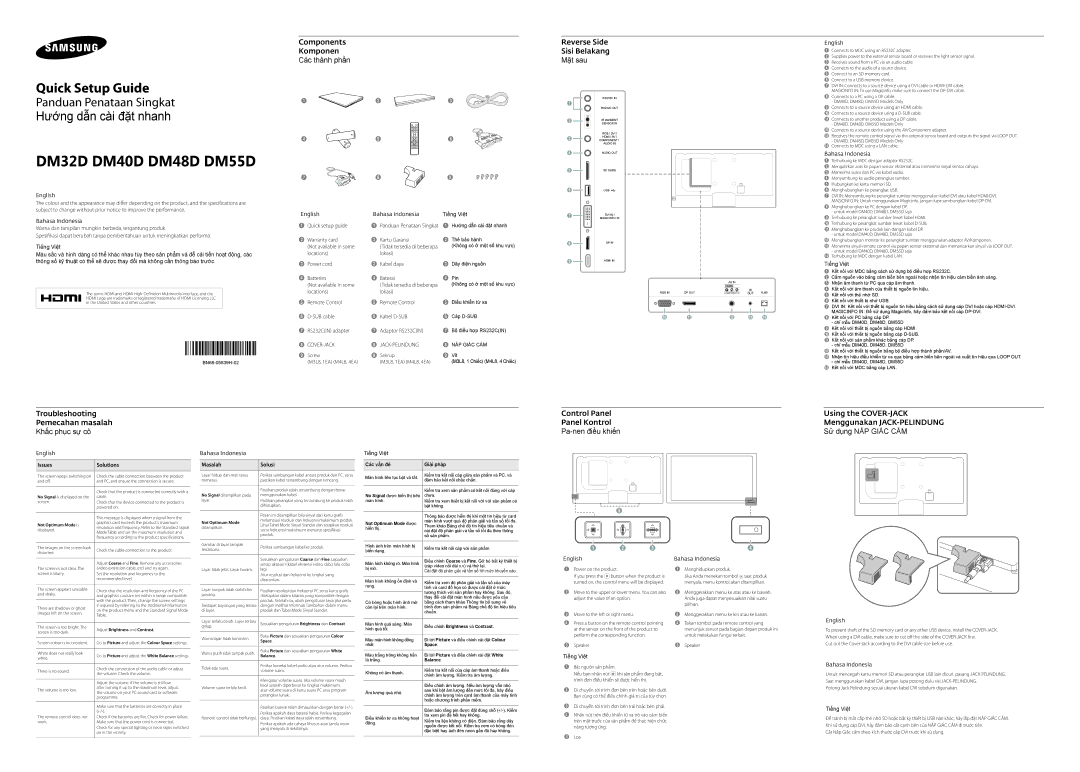
Components | Reverse Side |
Komponen | Sisi Belakang |
Các thành phần | Mặt sau |
English
1 Connects to MDC using an RS232C adapter. |
2 Supplies power to the external sensor board or receives the light sensor signal. |
3 Receives sound from a PC via an audio cable. |
4 Connects to the audio of a source device. |
5 Connect to an SD memory card. |
Quick Setup Guide
Panduan Penataan Singkat
Hướng dẫn cài đặt nhanh
DM32D DM40D DM48D DM55D
English
The colour and the appearance may differ depending on the product, and the specifications are subject to change without prior notice to improve the performance.
Bahasa Indonesia
Warna dan tampilan mungkin berbeda, tergantung produk.
Spesifikasi dapat berubah tanpa pemberitahuan untuk meningkatkan performa.
Tiếng Việt
Màu sắc và hình dáng có thể khác nhau tùy theo sản phẩm và để cải tiến hoạt động, các thông số kỹ thuật có thể sẽ được thay đổi mà không cần thông báo trước.
The terms HDMI and HDMI
1 |
| 2 | 3 | 1 |
|
|
|
| |
|
|
|
| 2 |
| - |
|
|
|
4 | + | 5 | 6 | 3 |
- | ||||
| + |
|
|
|
|
|
|
| 4 |
|
|
|
| 5 |
7 |
| 8 | 9 |
|
|
|
|
| 6 |
English | Bahasa Indonesia | Tiếng Việt | 7 | |
1 Quick setup guide | 1 Panduan Penataan Singkat | 1 Hướng dẫn cài đặt nhanh |
| |
2 Warranty card | 2 Kartu Garansi | 2 Thẻ bảo hành | 8 | |
| (Not available in some | (Tidak tersedia di beberapa | (Không có ở một số khu vực) | |
|
| |||
| locations) | lokasi) |
|
|
3 Power cord | 3 Kabel daya | 3 Dây điện nguồn | 9 | |
| ||||
4 Batteries | 4 Baterai | 4 Pin |
| |
| (Not available in some | (Tidak tersedia di beberapa | (Không có ở một số khu vực) |
|
| locations) | lokasi) |
|
|
5 Remote Control | 5 Remote Control | 5 Điều khiển từ xa |
| |
6 | 6 Kabel | 6 Cáp |
| |
7 RS232C(IN) adapter | 7 Adaptor RS232C(IN) | 7 Bộ điều hợp RS232C(IN) |
| |
8 | 8 | 8 NẮP GIẮC CẮM |
| |
9 Screw | 9 Sekrup | 9 Vít |
| |
| (M3L8, 1EA) (M4L8, 4EA) | (M3L8, 1EA) (M4L8, 4EA) | (M3L8, 1 Chiếc) (M4L8, 4 Chiếc) |
|
RS232C IN
RS232C OUT
IR /AMBIENT
SENSOR IN
RGB / DVI /
HDMI / AV /
COMPONENT /
AUDIO IN
AUDIO OUT
SD CARD
POWER
USB ![]()
DVI IN /
MAGICINFO IN
DP IN
HDMI IN
RGB IN | DP OUT | COMPONENT IN | IR | RJ45 |
OUT | ||||
|
|
|
|
|
0 ! @ # $
6 Connect to a USB memory device. |
7 DVI IN: Connects to a source device using a DVI cable or |
MAGICINFO IN: To use MagicInfo, make sure to connect the |
8 Connects to a PC using a DP cable. |
- DM40D, DM48D, DM55D Models Only |
9 Connects to a source device using an HDMI cable. |
0Connects to a source device using a
-DM40D, DM48D, DM55D Models Only
@Connects to a source device using the AV/Component adapter.
#Receives the remote control signal via the external sensor board and outputs the signal via LOOP OUT.
-DM40D, DM48D, DM55D Models Only $ Connects to MDC using a LAN cable.
Bahasa Indonesia
1Terhubung ke MDC dengan adaptor RS232C.
2Mengalirkan arus ke papan sensor eksternal atau menerima sinyal sensor cahaya.
3Menerima suara dari PC via kabel audio.
4Menyambung ke audio perangkat sumber.
5Hubungkan ke kartu memori SD.
6Menghubungkan ke perangkat USB.
7DVI IN: Menyambung ke perangkat sumber menggunakan kabel DVI atau kabel
MAGICINFO IN: Untuk menggunakan Magicinfo, jangan lupa sambungkan kabel
8Menghubungkan ke PC dengan kabel DP.
- untuk model DM40D, DM48D, DM55D saja
9Terhubung ke perangkat sumber lewat kabel HDMI.
0Terhubung ke perangkat sumber lewat kabel
-untuk model DM40D, DM48D, DM55D saja
@Menghubungkan monitor ke perangkat sumber menggunakan adaptor AV/Komponen.
#Menerima sinyal remote control via papan sensor eksternal dan memancarkan sinyal via LOOP OUT.
-untuk model DM40D, DM48D, DM55D saja $ Terhubung ke MDC dengan kabel LAN.
Tiếng Việt
1Kết nối với MDC bằng cách sử dụng bộ điều hợp RS232C.
2Cắm nguồn vào bảng cảm biến bên ngoài hoặc nhận tín hiệu cảm biến ánh sáng.
3Nhận âm thanh từ PC qua cáp âm thanh.
4Kết nối với âm thanh của thiết bị nguồn tín hiệu.
5Kết nối với thẻ nhớ SD.
6Kết nối với thiết bị nhớ USB.
7DVI IN: Kết nối với thiết bị nguồn tín hiệu bằng cách sử dụng cáp DVI hoặc cáp
MAGICINFO IN: Để sử dụng MagicInfo, hãy đảm bảo kết nối cáp
8Kết nối với PC bằng cáp DP.
- chỉ mẫu DM40D, DM48D, DM55D
9Kết nối với thiết bị nguồn bằng cáp HDMI.
0Kết nối với thiết bị nguồn bằng cáp
-chỉ mẫu DM40D, DM48D, DM55D
@Kết nối với thiết bị nguồn bằng bộ điều hợp thành phần/AV.
#Nhận tín hiệu điều khiển từ xa qua bảng cảm biến bên ngoài và xuất tín hiệu qua LOOP OUT. - chỉ mẫu DM40D, DM48D, DM55D
$ Kết nối với MDC bằng cáp LAN.
Troubleshooting
Pemecahan masalah
Khắc phục sự cô
English
Issues | Solutions |
|
|
The screen keeps switching on | Check the cable connection between the product |
and off. | and PC, and ensure the connection is secure. |
|
|
| Check that the product is connected correctly with a |
No Signal is displayed on the | cable. |
Bahasa Indonesia
Masalah | Solusi |
|
|
Layar hidup dan mati terus | Periksa sambungan kabel antara produk dan PC, serta |
menerus. | pastikan kabel tersambung dengan kencang. |
|
|
| Pastikan produk telah tersambung dengan benar |
No Signal ditampilkan pada | menggunakan kabel. |
Tiếng Việt
Các vấn đê | Giải pháp | |
|
| |
Màn hình liên tục bật và tắt. | Kiểm tra kết nối cáp giữa sản phẩm và PC, và | |
đảm bảo kết nối chắc chắn. | ||
| ||
|
| |
| Kiểm tra xem sản phẩm có kết nối đúng với cáp | |
No Signal được hiển thị trên | chưa. |
Control Panel Panel Kontrol Pa-nen điều khiển
POWER
Using the
POWER
screen. | Check that the device connected to the product is | |
| powered on. | |
|
| |
| This message is displayed when a signal from the | |
Not Optimum Mode is | graphics card exceeds the product’s maximum | |
resolution and frequency. Refer to the Standard Signal | ||
displayed. | ||
Mode Table and set the maximum resolution and | ||
| ||
| frequency according to the product specifications. | |
|
| |
The images on the screen look | Check the cable connection to the product. | |
distorted. | ||
| ||
|
| |
| Adjust Coarse and Fine. Remove any accessories | |
The screen is not clear. The | (video extension cable, etc) and try again. | |
screen is blurry. | Set the resolution and frequency to the | |
| recommended level. | |
|
| |
The screen appears unstable | Check that the resolution and frequency of the PC | |
and shaky. | ||
and graphics card are set within a range compatible | ||
| ||
| with the product. Then, change the screen settings | |
| ||
There are shadows or ghost | if required by referring to the Additional Information | |
on the product menu and the Standard Signal Mode | ||
images left on the screen. | ||
Table. | ||
| ||
|
| |
The screen is too bright. The | Adjust Brightness and Contrast. | |
screen is too dark. | ||
| ||
|
| |
Screen colour is inconsistent. | Go to Picture and adjust the Colour Space settings. | |
|
| |
White does not really look | Go to Picture and adjust the White Balance settings. | |
white. | ||
| ||
|
| |
There is no sound. | Check the connection of the audio cable or adjust | |
the volume. Check the volume. | ||
| ||
|
| |
| Adjust the volume. If the volume is still low | |
The volume is too low. | after turning it up to the maximum level, adjust | |
the volume on your PC sound card or software | ||
| ||
| programme. | |
|
| |
| Make sure that the batteries are correctly in place | |
| ||
The remote control does not | Check if the batteries are flat. Check for power failure. | |
work. | Make sure that the power cord is connected. | |
| Check for any special lighting or neon signs switched | |
| on in the vicinity. |
layar. | Pastikan perangkat yang tersambung ke produk telah | |
| dihidupkan. | |
|
| |
| Pesan ini ditampilkan bila sinyal dari kartu grafis | |
Not Optimum Mode | melampaui resolusi dan frekuensi maksimum produk. | |
Lihat Tabel Mode Sinyal Standar dan tetapkan resolusi | ||
ditampilkan. | ||
serta frekuensi maksimum menurut spesifikasi | ||
| ||
| produk. | |
|
| |
Gambar di layar tampak | Periksa sambungan kabel ke produk. | |
terdistorsi. | ||
| ||
|
| |
| Sesuaikan pengaturan Coarse dan Fine. Lepaskan | |
| setiap aksesori (kabel ekstensi video, dsb.), lalu coba | |
Layar tidak jelas. Layar buram. | lagi. | |
| Atur resolusi dan frekuensi ke tingkat yang | |
| disarankan. | |
|
| |
Layar tampak tidak stabil dan | Pastikan resolusi dan frekuensi PC serta kartu grafis | |
goyang. | ditetapkan dalam kisaran yang kompatibel dengan | |
| produk. Setelah itu, ubah pengaturan layar jika perlu | |
| ||
Terdapat bayangan yang tersisa | dengan melihat Informasi Tambahan dalam menu | |
di layar. | produk dan Tabel Mode Sinyal Standar. | |
|
| |
Layar terlalu cerah. Layar terlalu | Sesuaikan pengaturan Brightness dan Contrast. | |
gelap. | ||
| ||
|
| |
Warna layar tidak konsisten. | Buka Picture dan sesuaikan pengaturan Colour | |
Space. | ||
| ||
|
| |
Warna putih tidak tampak putih. | Buka Picture dan sesuaikan pengaturan White | |
Balance. | ||
| ||
|
| |
Tidak ada suara. | Periksa koneksi kabel audio atau atur volume. Periksa | |
volume suara. | ||
| ||
|
| |
| Mengatur volume suara. Jika volume suara masih | |
Volume suara terlalu kecil. | kecil setelah diperbesar ke tingkat maksimum, | |
atur volume suara di kartu suara PC atau program | ||
| ||
| perangkat lunak. | |
|
| |
| Pastikan baterai telah dimasukkan dengan benar | |
Remote control tidak berfungsi. | Periksa apakah daya baterai habis. Periksa kegagalan | |
daya. Pastikan kabel daya telah tersambung. | ||
| Periksa apakah ada cahaya khusus atau tanda neon | |
| yang menyala di sekitarnya. |
màn hình. | Kiểm tra xem thiết bị kết nối với với sản phẩm có | |
| bật không. | |
|
| |
| Thông báo được hiển thị khi một tín hiệu từ card | |
Not Optimum Mode được | màn hình vượt quá độ phân giải và tần số tối đa. | |
Tham khảo Bảng chế độ tín hiệu tiêu chuẩn và | ||
hiển thị. | ||
cài đặt độ phân giải và tần số tối đa theo thông | ||
| ||
| số sản phẩm. | |
|
| |
Hình ảnh trên màn hình bị | Kiểm tra kết nối cáp với sản phẩm | |
biến dạng. | ||
| ||
|
| |
Màn hình không rõ. Màn hình | Điều chỉnh Coarse và Fine. Gỡ bỏ bất kỳ thiết bị | |
(cáp video nối dài v.v) và thử lại. | ||
bị mờ. | ||
Cài đặt độ phân giải và tần số tới mức khuyến cáo. | ||
| ||
|
| |
Màn hình không ổn định và | Kiểm tra xem độ phân giải và tần số của máy | |
rung. | ||
tính và card đồ họa có được cài đặt ở mức | ||
| tương thích với sản phẩm hay không. Sau đó, | |
| ||
| thay đổi cài đặt màn hình nếu được yêu cầu | |
Có bóng hoặc hình ảnh mờ | bằng cách tham khảo Thông tin bổ sung về | |
còn lại trên màn hình. | trình đơn sản phẩm và Bảng chế độ tín hiệu tiêu | |
| chuẩn. | |
|
| |
Màn hình quá sáng. Màn | Điều chỉnh Brightness và Contrast. | |
hình quá tối. | ||
| ||
|
| |
Màu màn hình không đồng | Đi tới Picture và điều chỉnh cài đặt Colour | |
nhất. | Space. | |
|
| |
Màu trắng trông không hẳn | Đi tới Picture và điều chỉnh cài đặt White | |
là trắng. | Balance. | |
|
| |
Không có âm thanh. | Kiểm tra kết nối của cáp âm thanh hoặc điều | |
chỉnh âm lượng. Kiểm tra âm lượng. | ||
| ||
|
| |
| Điều chỉnh âm lượng. Nếu âm lượng vẫn nhỏ | |
Âm lượng quá nhỏ. | sau khi bật âm lượng đến mức tối đa, hãy điều | |
chỉnh âm lượng trên card âm thanh của máy tính | ||
| ||
| hoặc chương trình phần mềm. | |
|
| |
| Đảm bảo rằng pin được đặt đúng chỗ | |
Điều khiển từ xa không hoạt | tra xem pin đã hết hay không. | |
Kiểm tra liệu không có điện. Đảm bảo rằng dây | ||
động. | ||
nguồn được kết nối. Kiểm tra xem có bóng đèn | ||
| ||
| đặc biệt hay ánh đèn neon gần đó hay không. |
5
English
1Power on the product.
If you press the ![]() button when the product is turned on, the control menu will be displayed.
button when the product is turned on, the control menu will be displayed.
2Move to the upper or lower menu. You can also adjust the value of an option.
3Move to the left or right menu.
4Press a button on the remote control pointing at the sensor on the front of the product to perform the corresponding function.
5Speaker
Tiếng Việt
1Bật nguồn sản phẩm.
Nếu bạn nhấn nút ![]() khi sản phẩm đang bật, trình đơn điều khiển sẽ được hiển thị.
khi sản phẩm đang bật, trình đơn điều khiển sẽ được hiển thị.
2Di chuyển tới trình đơn bên trên hoặc bên dưới. Bạn cũng có thể điều chỉnh giá trị của tùy chọn.
3Di chuyển tới trình đơn bên trái hoặc bên phải.
4Nhấn nút trên điều khiển từ xa trỏ vào cảm biến trên mặt trước của sản phẩm để thực hiện chức năng tương ứng.
5Loa
Bahasa Indonesia
1Menghidupkan produk.
Jika Anda menekan tombol ![]() saat produk menyala, menu kontrol akan ditampilkan.
saat produk menyala, menu kontrol akan ditampilkan.
2Menggerakkan menu ke atas atau ke bawah. Anda juga dapat menyesuaikan nilai suatu pilihan.
3Menggerakkan menu ke kiri atau ke kanan.
4Tekan tombol pada remote control yang menunjuk sensor pada bagian depan produk ini untuk melakukan fungsi terkait.
5Speaker
English
To prevent theft of the SD memory card or any other USB device, install the
Cut out the
Bahasa Indonesia
Untuk mencegah kartu memori SD atau perangkat USB lain dicuri, pasang JACK PELINDUNG. Saat menggunakan kabel DVI, jangan lupa potong dulu sisi
Potong Jack Pelindung sesuai ukuran kabel DVI sebelum digunakan.
Tiếng Việt
Để tránh bị mất cắp thẻ nhớ SD hoặc bất kỳ thiết bị USB nào khác, hãy lắp đặt NẮP GIẮC CẮM. Khi sử dụng cáp DVI, hãy đảm bảo cắt cạnh bên của NẮP GIẮC CẮM đi trước tiên.
Cắt Nắp Giắc cắm theo kích thước cáp DVI trước khi sử dụng.