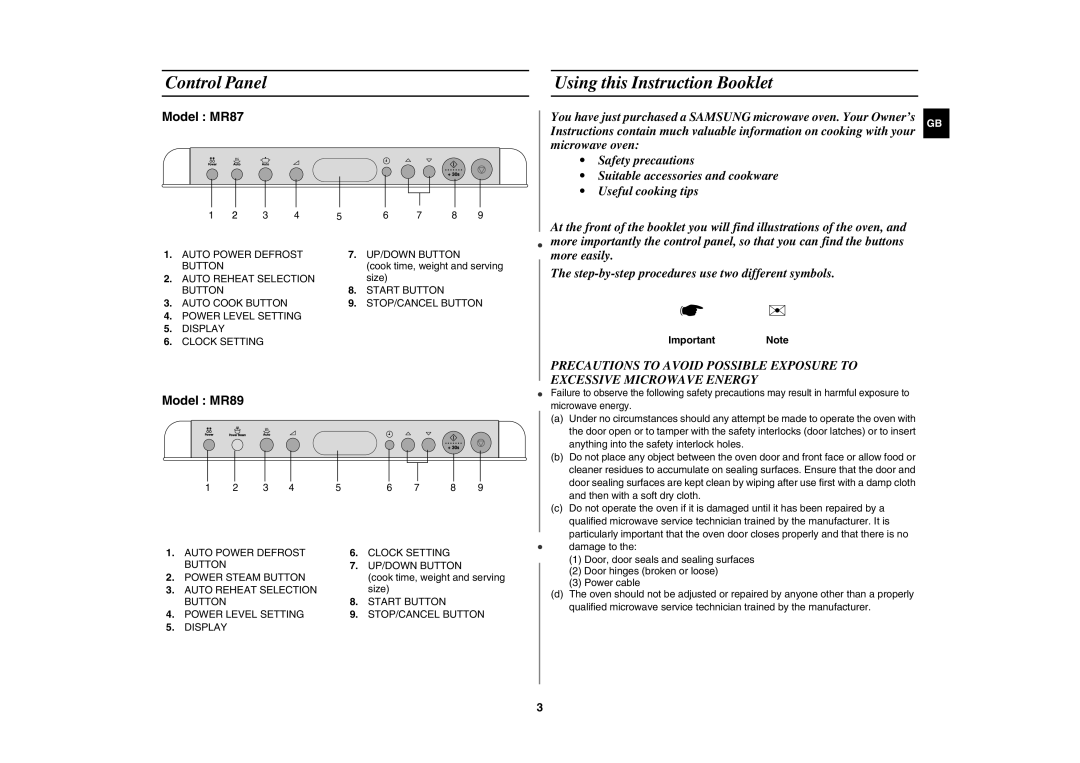
Control Panel
Model : MR87
1 2 3 4 5 6 7 8 9
1. | AUTO POWER DEFROST | 7. | UP/DOWN BUTTON |
| BUTTON |
| (cook time, weight and serving |
2. | AUTO REHEAT SELECTION | 8. | size) |
| BUTTON | START BUTTON | |
3. | AUTO COOK BUTTON | 9. | STOP/CANCEL BUTTON |
4.POWER LEVEL SETTING
5.DISPLAY
6.CLOCK SETTING
Model : MR89
1 | 2 | 3 | 4 | 5 | 6 | 7 | 8 | 9 |
Using this Instruction Booklet
You have just purchased a SAMSUNG microwave oven. Your Owner’s | GB | |
Instructions contain much valuable information on cooking with your |
| |
microwave oven: |
| |
• | Safety precautions |
|
• Suitable accessories and cookware |
| |
• | Useful cooking tips |
|
At the front of the booklet you will find illustrations of the oven, and more importantly the control panel, so that you can find the buttons more easily.
The
☛ ✉
Important Note
PRECAUTIONS TO AVOID POSSIBLE EXPOSURE TO EXCESSIVE MICROWAVE ENERGY
Failure to observe the following safety precautions may result in harmful exposure to microwave energy.
(a) | Under no circumstances should any attempt be made to operate the oven with |
| the door open or to tamper with the safety interlocks (door latches) or to insert |
| anything into the safety interlock holes. |
(b) | Do not place any object between the oven door and front face or allow food or |
| cleaner residues to accumulate on sealing surfaces. Ensure that the door and |
| door sealing surfaces are kept clean by wiping after use first with a damp cloth |
| and then with a soft dry cloth. |
(c) | Do not operate the oven if it is damaged until it has been repaired by a |
| qualified microwave service technician trained by the manufacturer. It is |
| particularly important that the oven door closes properly and that there is no |
| damage to the: |
1.AUTO POWER DEFROST BUTTON
2.POWER STEAM BUTTON
3.AUTO REHEAT SELECTION BUTTON
4.POWER LEVEL SETTING
5.DISPLAY
6.CLOCK SETTING
7.UP/DOWN BUTTON
(cook time, weight and serving size)
8.START BUTTON
9.STOP/CANCEL BUTTON
(1) | Door, door seals and sealing surfaces |
(2) | Door hinges (broken or loose) |
(3) | Power cable |
(d) The oven should not be adjusted or repaired by anyone other than a properly | |
qualified microwave service technician trained by the manufacturer. | |
3
