ALARM SET |
|
|
| ALARM PRIORITY SET |
|
| ALARM1 1~4 | ||
|
|
|
| ||||||
|
|
|
|
|
|
|
| ALARM2 1~4 | |
|
|
|
|
|
|
|
| ||
|
|
|
|
|
|
|
| ALARM3 1~4 | |
|
|
|
|
|
|
|
| ||
|
|
|
|
|
|
|
| ALARM4 1~4 | |
|
|
|
|
|
|
|
| ||
|
|
|
|
|
|
|
| EXIT | QUIT/SAVE |
|
|
|
|
|
|
|
| ||
|
|
|
| ALARM IN SET |
|
|
| ALARM1 NO/NC/OFF | |
|
|
|
|
|
|
| |||
|
|
|
|
|
|
|
| ALARM2 NO/NC/OFF | |
|
|
|
|
|
|
|
| ||
|
|
|
|
|
|
|
| ALARM3 NO/NC/OFF | |
|
|
|
|
|
|
|
| ||
|
|
|
|
|
|
|
| ALARM4 NO/NC/OFF | |
|
|
|
|
|
|
|
| ||
❈If the power is turned off after PRESET, AUTO PAN, SCAN, PATTERN function is activated and no other control is made, camera will do the same function after the power is turned on.
❈Menu setting is available only when tilt position is under 90°. When tilt position is over 90° and
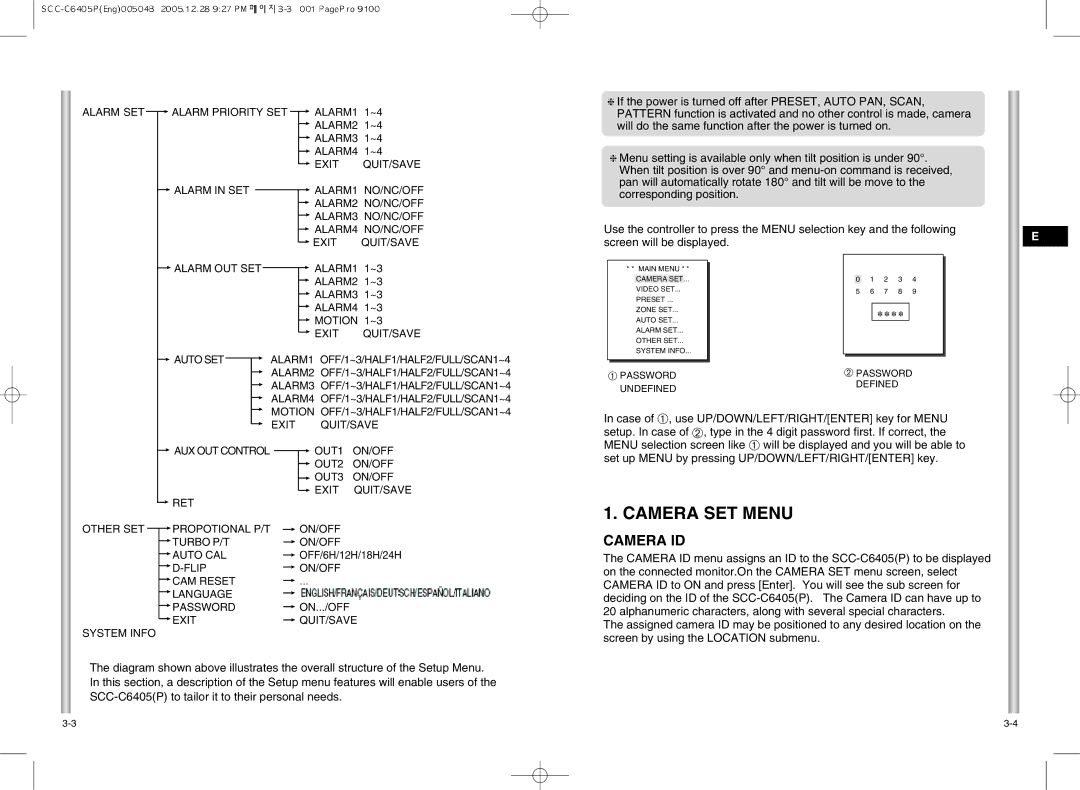
Use the controller to press the MENU selection key and the following
E
|
|
|
|
| EXIT | QUIT/SAVE |
|
|
|
|
| ||
ALARM OUT SET |
|
| ALARM1 1~3 | |||
|
| |||||
|
|
|
|
| ALARM2 1~3 | |
|
|
|
|
| ||
|
|
|
|
| ALARM3 1~3 | |
|
|
|
|
| ||
|
|
|
|
| ALARM4 1~3 | |
|
|
|
|
| ||
|
|
|
|
| MOTION 1~3 | |
|
|
|
|
| ||
|
|
|
|
| EXIT | QUIT/SAVE |
|
|
|
|
| ||
AUTO SET |
|
| ALARM1 OFF/1~3/HALF1/HALF2/FULL/SCAN1~4 | |||
| ||||||
screen will be displayed.
* * MAIN MENU * *
CAMERA SET...
VIDEO SET...
PRESET ...
ZONE SET...
AUTO SET...
ALARM SET...
OTHER SET...
SYSTEM INFO...
0 1 2 3 4
5 6 7 8 9
✽ ✽ ✽ ✽
|
| ALARM2 | OFF/1~3/HALF1/HALF2/FULL/SCAN1~4 | |||||
|
| |||||||
|
| ALARM3 | OFF/1~3/HALF1/HALF2/FULL/SCAN1~4 | |||||
|
| |||||||
|
| ALARM4 | OFF/1~3/HALF1/HALF2/FULL/SCAN1~4 | |||||
|
| |||||||
|
| MOTION | OFF/1~3/HALF1/HALF2/FULL/SCAN1~4 | |||||
|
| |||||||
|
| EXIT | QUIT/SAVE | |||||
|
| |||||||
AUX OUT CONTROL |
|
|
| OUT1 | ON/OFF | |||
|
| |||||||
|
|
|
|
|
| OUT2 | ON/OFF | |
|
|
|
|
|
| |||
|
|
|
|
|
| OUT3 | ON/OFF | |
|
|
|
|
|
| |||
|
|
|
|
|
| EXIT | QUIT/SAVE | |
RET | ||||||||
|
| |||||||
➀ PASSWORD | ➁ PASSWORD | |
DEFINED | ||
UNDEFINED | ||
|
In case of ➀, use UP/DOWN/LEFT/RIGHT/[ENTER] key for MENU setup. In case of ➁, type in the 4 digit password first. If correct, the MENU selection screen like ➀ will be displayed and you will be able to set up MENU by pressing UP/DOWN/LEFT/RIGHT/[ENTER] key.
1. CAMERA SET MENU
OTHER SET
SYSTEM INFO
PROPOTIONAL P/T |
|
|
| ON/OFF |
|
| |||
TURBO P/T |
|
|
| ON/OFF |
|
|
| ||
AUTO CAL |
|
|
| OFF/6H/12H/18H/24H |
|
|
| ||
|
|
| ON/OFF | |
|
|
| ||
CAM RESET |
|
| ... | |
| ||||
LANGUAGE |
|
|
|
|
|
|
|
| |
PASSWORD |
|
|
| ON.../OFF |
|
|
| ||
EXIT |
|
|
| QUIT/SAVE |
|
|
| ||
CAMERA ID
The CAMERA ID menu assigns an ID to the
The assigned camera ID may be positioned to any desired location on the screen by using the LOCATION submenu.
The diagram shown above illustrates the overall structure of the Setup Menu. In this section, a description of the Setup menu features will enable users of the
