Merci d’avoir choisi un produit Samsung
Canaux
Caractéristiques
Présentation
Présentation
Consignes DE Sécurité Importantes
Pile
Avant LE Démarrage
Manuel d’utilisation
Télécommande Souris
Piles télécommande taille AAA Supports pour rack
Contenu
Table DES Matières
Français
Noms DES Composants ET Fonctions Avant
Audio
Alarm
REC
Mode
6080/6082 6160/6162/6163/6164
Noms DES Composants ET Fonctions Arrière
USB
Video OUT
Audio OUT
VGA
Canaux
Télécommande
Magnétoscope numérique DVR
Utilisation des boutons du pavé numérique
Écran
Modification de l’ID de la télécommande
Immédiat entre 0C ~ 40C, tel qu’illustré dans la fi gure
Vérification DE Lenvironnement DE L’INSTALLATION
Poussière et les corps étrangers
Ajout DE Disque DUR
Installation DU Rack
Installation
Retirez les supports supérieur et inférieur
Ajout d’un disque dur
Ajout de disque dur sur les modèles SHR-6080, 6160 et
Reportez-vous à « Périphérique de stockage Carte DD »
Ajout de disque dur sur les modèles SHR-6082, 6162 et
Couvercle et fi xez-le à laide de vis
Connexion à Internet via Ethernet 10/100/1000BaseT
Connexion DE LA VIDÉO, DE Laudio ET DE L’ÉCRAN
Connexion Réseau
Connexion à Internet via l’ADSL
Connexion USB
Connexion D’UN Périphérique POS
Connexion DES ENTRÉE/SORTIE DE L’ALARME
Ex DVRTX+/- SCC-C6433,35RX+ DVRTX+/- SCC-C6403,07TX+
Connexion DU Périphérique RS-485
’écran Live Direct apparaît avec un bip sonore
Informations Préalables
Démarrage du système
Arrêt du système
Verrouillage de tous les boutons
Connex
Icônes de l’Écran Live Direct
Configuration DE L’ÉCRAN Live Direct
Menu Écran Live Direct
Menu Mode partagé
Menu Mode partagé
Info erreur
Zoom
Menu Mode Unique
PTZ
Afficher le menu Lanceur
Séquence auto
Mode Live
Changement du mode écran
Basculement en mode partagé
Ex en basculant du canal CH 1 au canal CH
Réglage de canal
Basculement manuel
Canaux CH 9~12 Canaux CH 13~16
Menu multicanaux Live
Sélection d’un mode Sortie principale
Basculement en mode Unique
Sortie Principale
GEL
ACTIVATION/DÉSACTIVATION Audio en Mode Unique
Zoom
ACTIVATION/DÉSACTIVATION Audio
Ceci s’applique également à l’écran de Sortie principale
Suivi D’ÉVÉNEMENT
’événement survient Secondes
Fus. hor. règle le fuseau horaire dans votre région en
Configuration DU Système
Date/Heure/Langue
Réglage de Date/Heure/Langue
Vous verrez s’affi cher l’écran « Régl.jours fériés »
Réglage des jours fériés
Utilisation du calendrier
Sélectionnez Férié
Gestion des droits d’accès
Réglages de l’administrateur
Gestion des droits d’accès
Utilisation du clavier virtuel
Réglages de l’utilisateur
Réglages du groupe
Gestion système
Gestion système
Réglages des droits d’accès
Vérification des informations système
FormatM. niv. syst
Appuyez sur OK dans la fenêtre « M. niv. syst. »
Sélectionnez Réglages
Informations journal
Réglages
Journal système
Des Sauvegardes
Journal événements
Le menu de réglage de périphérique est sélectionné
Réglage DU Périphérique
Caméra
Réglage de la caméra
Lorsque la confi guration PTZ est terminée, appuyez sur OK
Réglages PTZ
ID réglez l’ID de la caméra reliée à chaque canal
Formatage
Périphérique de stockage
Vérification des périphériques
Lorsque le formatage est terminé, appuyez sur OK
Alarme disque dur
Sélectionnez Format en bas de l’écran
Ne seront pas sauvegardés
Périphériques distants
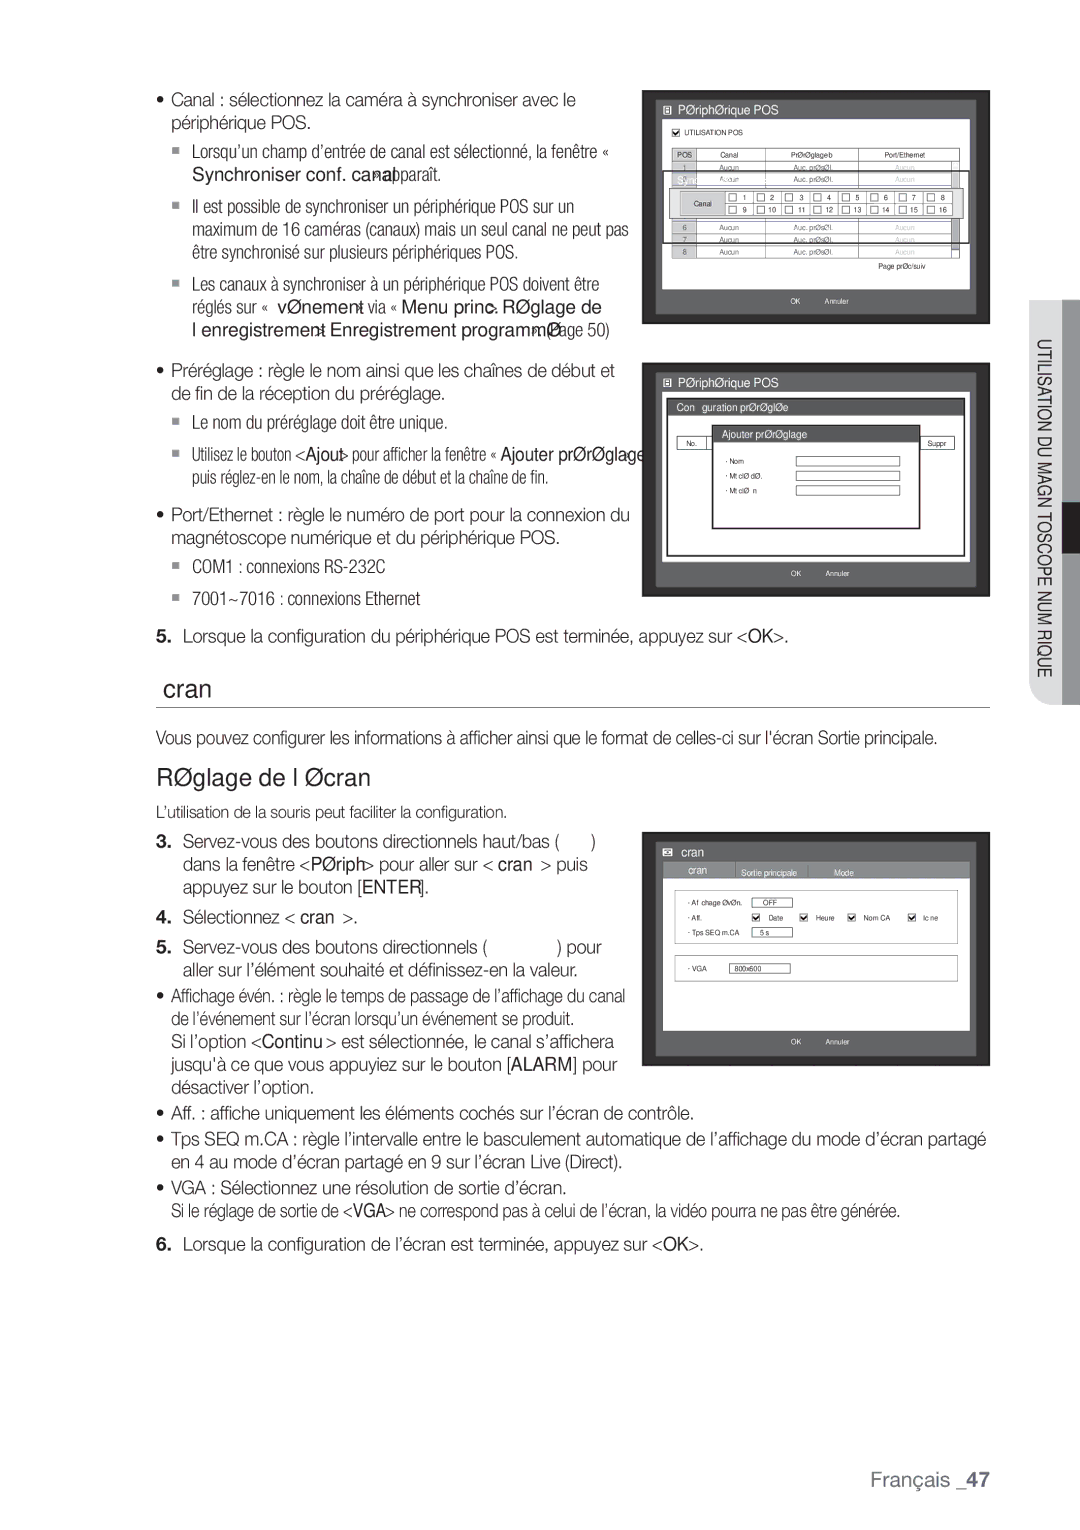
Périphérique POS
Si vous changez les réglages du périphérique puis appuyez
Écran
Écran
Réglage de l’écran
COM1 connexions RS-232C 7001~7016 connexions Ethernet
Réglage de la Sortie principale
Configuration de lécran
Sont inclus par défaut
Réglage du Mode Écran
Dans la fenêtre Périph pour aller sur Écran puis
Appuyez sur le bouton Enter
Enreg
Réglage DE L’ENREGISTREMENT
Enregistrement programmé
Le menu Enreg. est sélectionné
Réglage des propriétés d’enregistrement standard
Qualité/Résolution
Durée de l’enregistrement de l’événement
Enregistrement des étiquettes de couleur
Réglage des propriétés d’enregistrement d’événement
Résolution
Option denregistrement
Le menu de réglage d’événement est sélectionné
État règle le mode de fonctionnement des senseurs
Réglage DE Lévénement
Détection capteur
Réglage de la zone de détection de mouvement
Détection de mouvement
Détection perte vidéo
Alarme programmée
Alarme programmée
Détection perte vidéo
Sauveg
Sauvegarde
Réglage de la sauvegarde
Le menu de sauvegarde est sélectionné
Réglage de la connexion
Configuration Réseau
Mode connexion
Sélectionnez Protocole
Réglage du protocole
IP, Passerelle, Masq ss-rés, DNS
Reportez-vous à Réglage Ddns .
Mode IP dynamique Dhcp
Connexion et réglage du réseau
En l’absence de routeur
Routeur, le port TCP pourra être différent
En cas dutilisation de routeur
Dans PortTCP via le menu Protocole du
Magnétoscope numérique relié
La fenêtre Transfert en direct apparaît
Transfert en directr
Réglage Ddns
Ddns est labréviation de Dynamic Domain Naming System
Réglage d’événement
Serv. publiposta
Réglage Smtp
Enter
Réglage de groupe
Réglage de destinataire
Utilisation de la caméra PTZ
Commande D’UN Périphérique PTZ
Périphérique PTZ
Mise en route de la caméra PTZ
Réglage de la caméra
Préréglage
Cette option n’apparaît pas dans Recherche par sauvegarde
Recherche
Recherche par heure
Don. chevauch. cette option apparaît uniquement en cas de
Recherche ET Lecture
Recherche par événement
Recherche par sauvegarde
Recherche par mouvement
Recherche POS
Lecture
Lecture
Lecture
Recherche
Qu’est-ce que Web Viewer ?
Présentation DE WEB Viewer
WEB Viewer
Connexion DE WEB Viewer
Web viewer
Utilisation DE Live Viewer
Affichage À L’ÉCRAN OSD
Mode Unique Mode Quadruple Mode EN Neuf
Intervalle préréglé 10 secondes
Le nombre de connexions simultanées est limité à
Magnétoscope numérique 16 canaux
Enregistrement DE L’ÉCRAN EN Direct SUR L’ORDINATEUR
Modification DU Canal DE L’ÉCRAN EN Direct
Web viewer
Utilisation DE Search Viewer
Mode Unique
Enregistrement DE L’ÉCRAN EN Direct SUR L’ORDINATEUR
Recherche DE LA Vidéo Enregistrée Dans LE Calendrier
Date/Heure/Langue
Configuration DU Visionneur
Système
Gestion des droits d’accès
Férié
Gestion système
Réglez lID et le protocole
Périphérique
Caméra
Périphérique de stockage
Écran
Périphérique distant
Périphérique POS
Enregistrement programmé
Enregistrement
Option denregistrement
Événement
Durée enreg. de l’évén
Qualité & résol. enreg
Détection perte vidéo
Alarme programmée
Détection de mouv
Cette fonction vous permet de vérifi er les réglages Ddns
Réseau
Connexion
Transfert en direct
Smtp
Service publipostage
Cliquez sur a propos
Propos
Configuration minimum requise
Visionneur DE Sauvegarde AU Format SEC
Visionneur DE Sauvegarde
Ntsc PAL
Caractéristiques DU Produit
ANNEXES
Cifs
RS-232C POS
Mode Affichage Unique/partage en 4, 9, 13 et 16 parties
RS-485 Commande de périphérique PTZ Télécommande
Lecture Unique/partage en 4, 9, 13 parties
SHR-6164
VUE DU Produit
Stockage
Default Setting
Mouvement
’évén
Publipostage
Dépannage FAQ
Affichés
Recherche Mode dextension
Complément d’informations
Barre chronologique
We protect your rights with two steps
Open Source License Report on the Product
Preamble
On the Program is not required to print an announcement
No Warranty
END of Terms and Conditions
How to Apply These Terms to Your New Programs
Terms and Conditions
Annexes
Français
Additional Terms
Annexes
Patents
No Surrender of Others Freedom
END of Terms and Conditions
Revised Versions of this License
Limitation of Liability
Interpretation of Sections 15
Français
Is included without limitation in the term modifi cation
Français
Promoting the sharing and reuse of software generally
Copyright C year name of author
How to Apply These Terms to Your New Libraries
Loss of USE, DATA, or Profits or Business Interruption
OpenSSL License
This Software is Provided by Eric Young ‘‘AS IS’’
Elimination des batteries de ce produit