Kanals/16 kanals DVR
Oversigt
Funktioner
Vigtige Sikkerhedsinstruktioner
Oversigt
FØR Start
Batteri
Standard Godkendelser
Pakkens indhold
Indhold
SPOT-UDGANG
Dansk
Navne PÅ DE Enkelte Dele OG Deres Funktion Front
Alarm
REC
Mode
Audio
8080/8082 Bag 8160/8162 Bag
Navne PÅ DE Enkelte Dele OG Deres Funktion BAG
7080/7082 Bag
Video OUT
Audio OUT
VGA
Hdmi
Fjernbetjening
Brug af taltasterne
Kanal
Tryk på tasterne mellem 1 og
Ændring af fjernbetjeningens ID
Tryk på en vilkårlig tast mellem 1 og
Kontrol MED Installationsmiljøet
Harddiske og avancerede kredsløb inden
Installation AF Rack
Installation
Tilføjelse AF Harddiske
Forholdsregler ved tilføjelse af en harddisk
For SHR-7082/7162/8082/8162 modeller, se følgende side
Tilføjelse af en harddisk
Hvis der tilføjes harddiske i SHR-7080, 7160, 8080
Hvis der tilføjes harddiske til SHR-7082, 7162, 8082
Fastgør det med skruer
Tilslutning TIL VIDEO, LYD OG Skærm
Tilslutning TIL Netværket
Tilslutning internettet via Ethernet 10/100/1000 BaseT
Tilslutning TIL Andre
Tilslutning til internettet via Adsl
Tilslutning TIL USB
Tilslutning AF Ekstern Sata Harddisk
Tilslutning TIL Andre Enheder
Tilslutning AF ALARMINDGANGE/UDGANGE
Tilslutning AF POS-ENHED
DVRTX+
Tilslutning TIL RS-485-ENHEDEN
Tilslut RS-485-enheden via det bageste stik
KOM Godt I Gang
Start af systemet
Lukning af systemet
Live-skærmen vises med et bip
Log på
Live Skærmkonfiguration
Ikoner på Live-skærmen
Fejlinfo
Live skærmmenuen
Menuen Opdelt tilstand
Menuen Opdelt tilstand
Menuen Enkelt-tilstand
Zoom
Vis menuen Starter
PTZ
LIVE-TILSTAND
Skift af skærmtilstanden
Skift af opdelt tilstand
Autom. sekvens
Eks. hvis du skifter CH 1 til CH
Kanalindstilling
Manuelt Skift
Skift til Enkelt-tilstand
SPOT-UDGANG
Vælg en Spot-udgangstilstand
Zoom
LYD TIL/FRA
Frys
LYD TIL/FRA i enkelt-tilstand
Overvågning AF Begivenhed
Begivenhedsforekomst
Indstilling af Dato/Tid/Sprog
Systemopsætning
Dato/Tid/Sprog
Indstilling af ferie
Brug af kalenderen
Brug AF DVR’EN
Opsætning af tidssynkronisering
Administration af tilladelser
Indstilling af Administrator
Admin af tilladelser
Brug af Virtuelt tastatur
Indstilling af gruppe
Indstilling af bruger
Brug AF
DVR’EN
Systemadministration
Indstilling af tilladelser
Kontrol af systeminformationer
Afkrydset Begrænset Ikke afkrydset Tilgængelig
Opdatering af software
Knappen Opgrader aktiveres kun, hvis den aktuelle
Systeminformationer Indstillinger
Softwareopgradering
Log-oplysninger
Indstillinger
Systemlog
Du kan gennemse logs vedrørende systemet og begivenheder
Indstilling AF Enhed
Kamera
Begivenhedslog
Indstilling af kamera
Indstilling af PTZ
Tryk på Init for at initialisere indstillingerne tilbage til
Formatering
Lagringsenhed
Bekræftelse af enheder
HDD-alarm
Fjernenheder
POS-enheder
Det er uafhængigt af opsætningen af fjernenheden
Fjernenhed
Monitor
Indstilling af skærmen
Monitor
Tilføj ind
Indstilling af SPOT-OUT
Indstilling af skærmtilstand
Brug
Du kan konfi gurere Live-skærmen og opdelte skærme
Indstilling AF Optagelse
Planlagt optagelse
Optaglse
Planlagt optagelse
Varighed optag. af begiv
Kvalitet / Opløsning
Optagelse af farvetags
Indstilling af standard optagelsesegenskaber
Opløsning
Optageindstilling
Indstilling af egenskaber for begivenhedsoptagelse
Indstilling AF Begivenhed
Sensordetektering
Brug op/ned knapperne til at fl ytte til
Normalt lukket Sensor er lukket
Bevægelsesdetektering
Indstilling af bevægelsesdetekteringsområde
Planlægning af alarm
Detektering af videotab
Backup
Backup
Indstilling af backup
Netværkskonfiguration
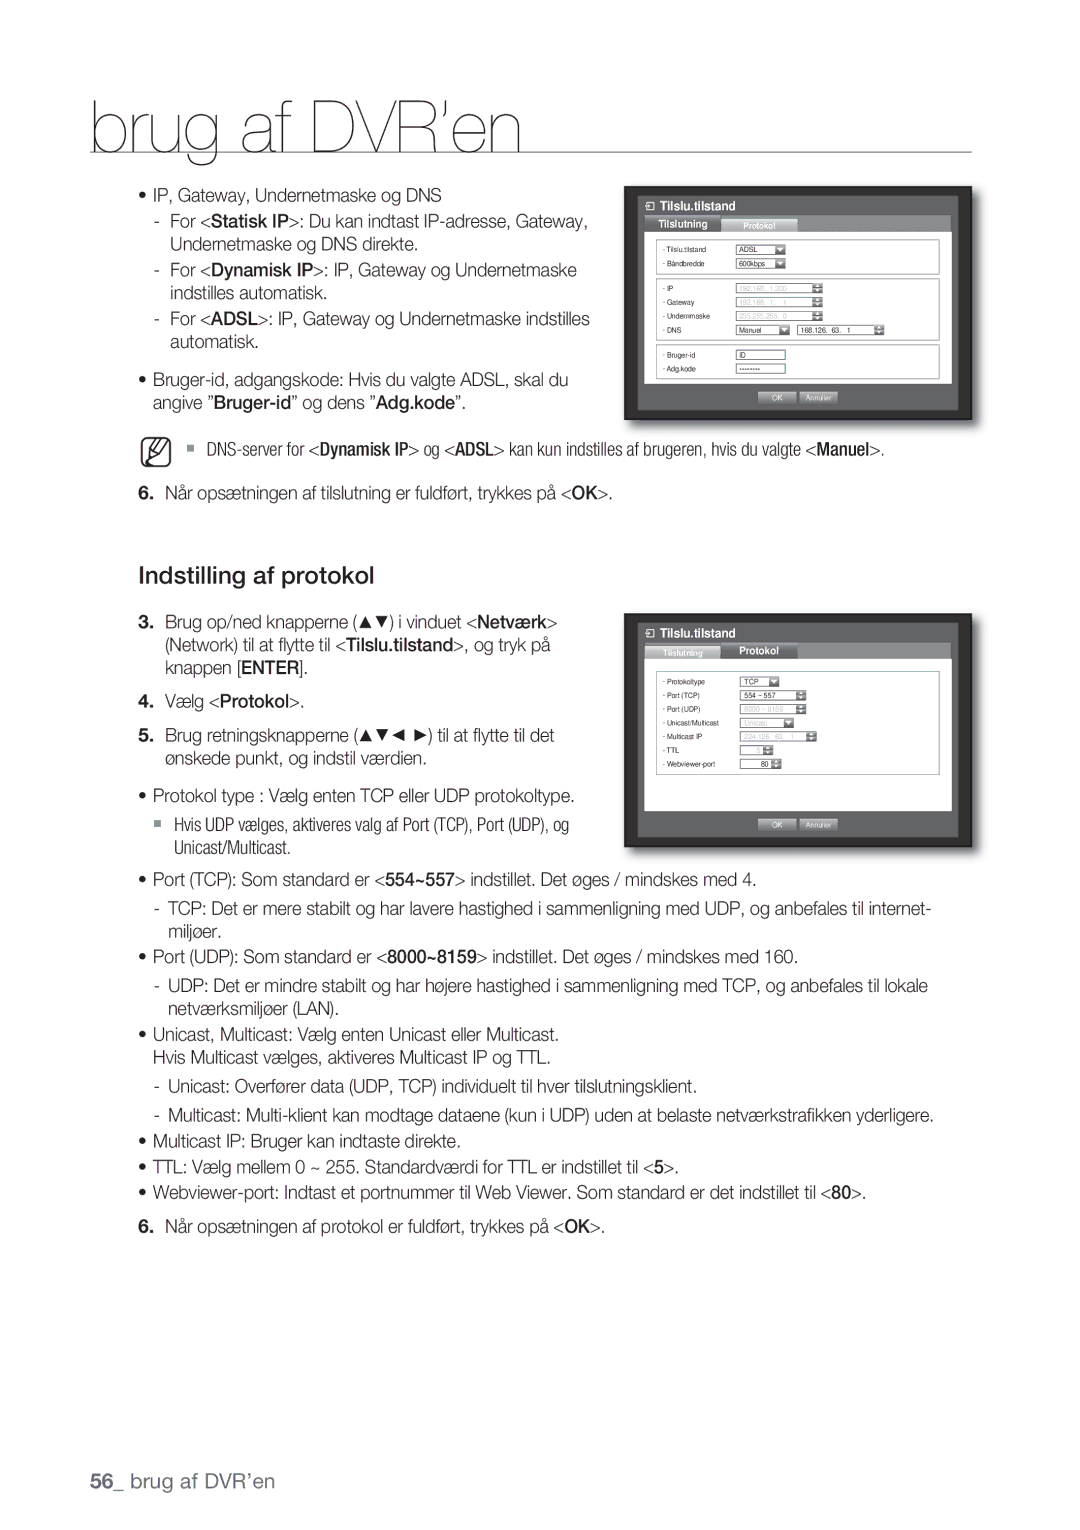
Tilslutningstilstand
Indstilling af tilslutning
Du kan indstille netværksforbindelses-routen og protokollen
Protokol
Indstilling af protokol
Hvis UDP vælges, aktiveres valg af Port TCP, Port UDP, og
Tilslutning og opsætning af netværk
Når der ikke anvendes router
Når der anvendes router
Hvis der er tilsluttet mere end én DVR til routeren, kan
TCP-porten være en anden
Internt portområde Indstil det samme til det Eksterne
Live overførsel
Live overførsel
Indstilling af Ddns
Begivenhedsindstilling
Mail-service
Indstilling af Smtp
Indstilling af modtager
Gruppe
Kontrol AF EN PTZ-ENHED
PTZ-enhed
Kom i gang med PTZ
Brug af PTZ-kameraet
Foruddefineret indstilling
Indstilling af kamera
SØG
Tidssøgning
Du kan søge efter data optaget på det ønskede tidspunkt
Vælg en dato, der skal søges Se Brug af kalenderen. Side
OG Afspil
Backupsøgning
Begivenhedssøgning
POS-søgning
Bevægelsessøgning
Afspil
Backupinterval
Afspilning
Introduktion AF WEB Viewer
Hvad er Web Viewer?
Tilslutning TIL WEB Viewer
WEB Viewer
Web viewer
Brug AF Live Viewer
Enkelttilstand Tilstand
Enkelttilstand
Tilsluttet DVR
CH1 til CH4 CH5 til CH8 CH9 til CH12
Kanals DVR
Ændring AF Live SKÆRM-KANALEN
Web viewer
Brug AF Search Viewer
ENKELTTILSTAND4-TILSTAND
Lagring AF LIVE-SKÆRMEN PÅ PC
Søgning Efter Optaget Video I Kalenderen
Dato/Tid/Sprog
Opsætning AF Viewer
System
Administration af tilladelser
Ferie
Systemadministration
Lagringsenhed
Enhed
Kamera
Fjernenhed
POS-enhed
Overvåger
Overvåger
Optagelse
Planlagt optagelse
Begivenhed
Varighed optag. af begiv
OPT. kvalitet og opløsning
Optageindstilling
Planlægning af alarm
Du kan planlægge alarm-output i henhold til ugedag og tid
Bevægelsesdetektering
Detektering af videotab
Netværk
Tilslutning
Live overførsel
Se Netværkskonfiguration for yderligere oplysninger. Side
Mail-service
Smtp
Dansk
SEC Backup Viewer
Anbefalede systemkrav
Backup Viewer
Produktspecifikation
Ntsc PAL
Cifs
Appendiks
RAM 2 GB
SATA-HARDDISK-MAX
RS-232C POS
Produktvisning
SHR-8162
Standardindstilling
Tilladelser
Begiv
Sek
Smtp
Fejlfinding
Kontrolleret af servicepersonalet
Tidslinjen vises ikke i tilstanden Søgning
Tidslinjen
Ikonet Ingen harddisk no HDD og en
We protect your rights with two steps
Open Source License Report on the Product
Preamble
On the Program is not required to print an announcement
No Warranty
How to Apply These Terms to Your New Programs
END of Terms and Conditions
Terms and Conditions
Earlier work or a work based on the earlier work
Appendiks
Dansk
Additional Terms
Patents
No Surrender of Others Freedom
END of Terms and Conditions
Revised Versions of this License
Limitation of Liability
Dansk
Is included without limitation in the term modifi cation
Dansk
Promoting the sharing and reuse of software generally
How to Apply These Terms to Your New Libraries
Copyright C year name of author
OpenSSL License
Loss of USE, DATA, or Profits or Business Interruption
This Software is Provided by Eric Young ‘‘AS IS’’
Korrekt bortskaffelse af batterierne i dette produkt