ST90/ST91
Keep your camera away from small children and pets
Health and safety information
Do not disassemble or attempt to repair your camera
Do not handle your camera with wet hands
Do not use batteries for unintended purposes
Health and safety information
Disconnect chargers from power sources when not in use
Do not touch the flash while it fires
Check that the camera is operating properly before use
Never use a damaged charger, battery, or memory card
Keep cards with magnetic strips away from the camera case
This may cause your camera to malfunction
Refer to error messages, specifications, Maintenance tips
How to record a video or voice memo
Learn how to play back photos, videos, or voice
Copyright information
Icons used in this manual
Shooting mode icons
Indications used in this manual
Abbreviations used in this manual
Subject, background, and composition
Expressions used in this manual
Pressing the shutter
Exposure Brightness
Basic troubleshooting
Quick reference
Taking photos of people
Contents
Contents
Setting the display and sound … …………………………
Performing the initial setup … ……………………………
Tips for getting a clearer photo ……………………………
Optional accessories
Unpacking
Speaker
Shutter button Power button Flash Smart button
Camera layout
Microphone
Camera layout
Icon Mode Description
Button Description
Removing the battery and memory card
Inserting the battery and memory card
Push the lock up to release the battery
Insert the battery with the Samsung logo facing down
Turning on your camera in Playback mode
Charging the battery and turning your camera on
Charging the battery
Turning on your camera
Performing the initial setup
Press
Information
Learning icons
Icons on the left
Icon Description
Menu
Selecting options
Shooting mode, press
Going back to the previous menu
Press or to scroll to a White Balance option
Example Selecting a White Balance option in the P mode
Selecting options
Press
Changing the display type
Setting the display and sound
Setting the sound
Press repeatedly to change a display type
Align your subject in the frame Half-press Shutter to focus
Taking photos
Press Shutter to take a photo
Digital zoom
Zooming
Taking photos
Zoom
Intelli zoom
Setting Intelli zoom
Photo resolution when Intelli zoom is on Optical range
Intelli range
Reducing camera shake DIS
Select Shooting → DIS → an option
Half-pressing the shutter button
When is displayed
Holding your camera correctly
Reducing camera shake
Preventing your subject from being out of focus
Use the focus lock
Extended functions
Recording voice memos … ………………………………
Shooting modes
Using the Smart Auto mode
Shooting mode, press Select Smart Auto
Shooting modes
Using the Scene mode
Take a photo with options preset for a specific scene
Half-press Shutter to focus Press Shutter to take the photo
Select Scene → Magic Frame
Using the Magic Frame mode
Select Shooting → Frame → an option
Facial imperfections, press
Using the Beauty Shot mode
Only, press
Select Shooting → Face Tone → an option
Shooting mode, press Select Scene → Object Highlight
Using the Object Highlight mode
Select an option to adjust Blur or Tone
Displayed on the screen
Shooting mode, press Select Scene → Night
Using the Night mode
Adjusting the exposure in the Night mode
Select an option
Shooting mode, press Select Program Set options
Using the Program mode
Recording a video
Press Select Movie → Frame Rate → a frame rate
Select Movie → Sound Alive → a sound option
To pause recording
Option Description
Recording a voice memo
Recording voice memos
Adding a voice memo to a photo
Improving your photos … ……………………
Adjusting brightness and color ………………
Using face detection … ………………………
Changing the camera’s focus … ……………
When recording a video
Selecting a resolution and quality
Selecting a resolution
Selecting image quality
Press Shutter to start the timer
Using the timer
Learn how to set the timer to delay shooting
Preventing red-eye
Using the flash
Shooting in the dark
Off Flash does not fire
Red-eye Fix
Adjusting the ISO speed
Shooting in the dark
Select Shooting → ISO → an option
Learn how to adjust the cameras focus
Using macro
Using auto focus
Changing the camera’s focus
Using tracking auto focus
Changing the camera’s focus
Adjusting the focus area
Select Shooting → Focus Area → an option
Detecting faces
Using face detection
Select Shooting → Face Detection → Normal
Taking a self-portrait shot
Using face detection
When you hear a beep, press Shutter
Taking a smile shot
Detection
Using smart face recognition
Detecting eye blinking
Recognition
Registering faces as your favorites My Star
Press Shutter to register the face
Viewing your favorite faces
Compensating for backlighting ACB
Adjusting brightness and color
Adjusting the exposure manually EV
Select Shooting or Movie → EV
Selecting a light source White balance
Adjusting brightness and color
Changing the metering option
Select Shooting or Movie → Metering → an option
Press Shutter
Option
Aim the lens at a piece of white paper
Defining your own white balance
Using burst modes
Select Shooting → Drive → an option
Applying smart filter effects
Available filters in Program mode
Improving your photos
Select an effect
Available filters in Movie mode
Improving your photos
Defining your own RGB tone
Custom RGB Select a color R Red, G Green, B Blue
Select Shooting or Movie → Smart Filter →
Select a value to adjust the selected item
Adjusting your photos
Contrast Sharpness Saturation
Editing a photo ………………………………
Viewing files on a TV … ………………………
Playing back
Starting Playback mode
Display in Playback mode
Press or to scroll through files
Playback mode, press
Canceling your favorite faces
Playing back
Ranking your favorite faces
Viewing files by category in Smart Album
Playback mode, rotate Zoom left Press Select a category
Press and hold to scroll through files quickly
Delete files
Then press Press
Scroll through files
Then select Yes
Select File Options → Delete → All → Yes
Select Multiple Delete
Press Select Yes
Select Yes to copy files
Enlarging a photo
Viewing photos
Starting a slide show
Skip to to start a slide show with no effects
Select Start → Play
Playing a video
Set the slide show effect
Use the following buttons to control playback
Image Press
Playing voice memos
Playback mode, select a photo that includes a voice
Rotating a photo
Editing a photo
Resizing photos
Select to save the photo as a start image. p
Editing a photo
Select Edit → Smart Filter Select an effect
Adjusting ACB Auto Contrast Balance
Correcting exposure problems
Adjust the amount of the selected color. less or + more
Defining your own RGB tone
Hiding facial imperfections
Select a value to adjust the selected item. less or + more
Adjusting brightness/contrast/saturation
As the number increases, the face becomes clearer
Print the selected photos
Reset to the default settings
Creating a print order Dpof
Print all photos
View photos or play videos using the buttons on your camera
Viewing files on a TV
Requirements for Intelli-studio
Transferring files to your Windows computer
Requirements
Transferring files using Intelli-studio
Transferring files to your Windows computer
Using Intelli-studio
Icon
Connect the camera to your computer as a removable disk
Remove the USB cable
Disconnecting the camera for Windows XP
Screen Click the pop-up message
Computer recognizes the camera automatically
Transferring files to your Mac computer
With the USB cable Turn on your camera
Select Settings → USB Select Printer
Printing photos with a PictBridge photo printer
Press Or to select a photo
Settings
Select an option and save your settings
Camera settings menu
Accessing the settings menu
Shooting or Playback mode, press
Sound
Camera settings menu
Display
Yes, No
Settings
Power Save
Format
File No
Specify how to name files
Auto Power
Imprint
Places. Off, On
Select Mode Select a USB mode when you
AF Lamp
Camera to a computer or printer via USB
Camera maintenance ………………………………………
Appendixes
Error messages
Error message Suggested remedies
Camera lens and display
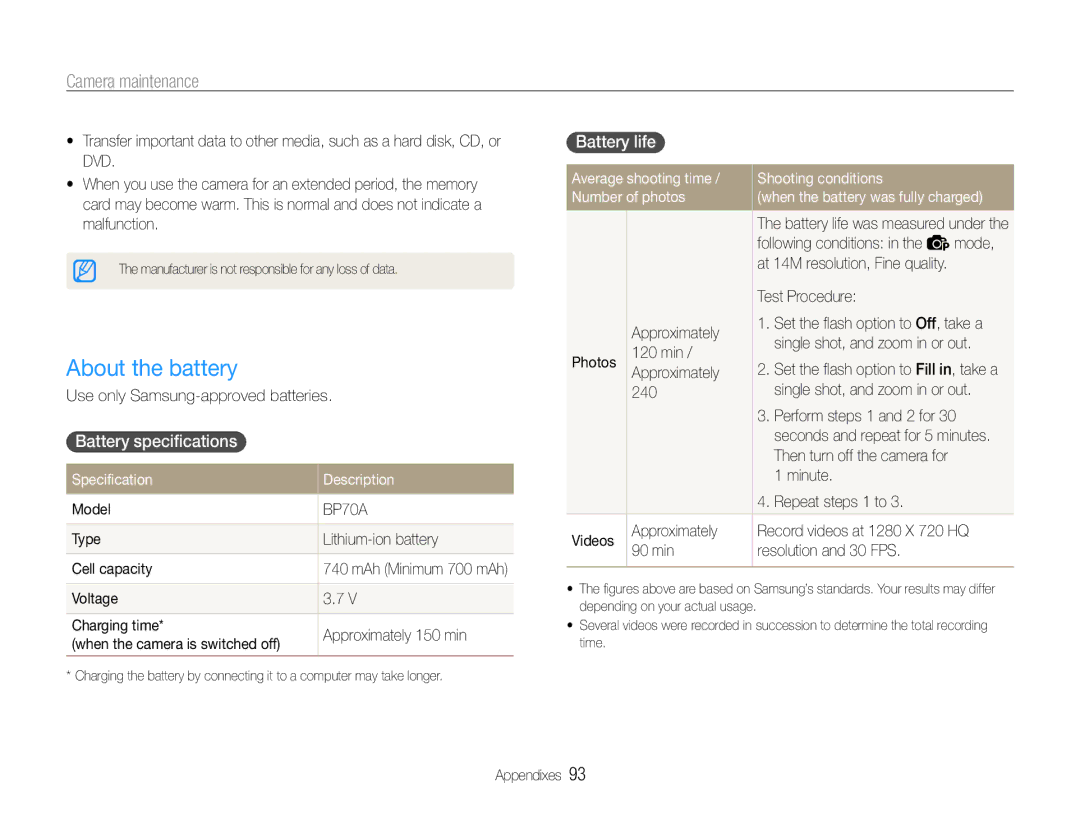
Camera maintenance
Cleaning your camera
Camera body
Using or storing the camera
Camera maintenance
Other cautions
About memory cards
Supported memory cards
Size
Memory card capacity
Fine Normal 30 FPS 15 FPS
Battery life
About the battery
Battery specifications
Specification Description
Low battery message
Handle and dispose of batteries and chargers with care
Camera maintenance
Before contacting a service center
Situation Suggested remedies
Before contacting a service center
Macintosh computers
Play videos
You cannot use Intelli-studio on
Computer
Camera specifications
Camera specifications
File format PictBridge Video AVI Mjpeg Audio WAV
Interface Digital output USB Connector Audio output
Image size
Pin USB/AV out
Glossary
Glossary
Mjpeg Motion Jpeg
Resolution
Metering
Noise
Correct disposal of batteries in this product
Address
FCC notice
Model No Samsung ST90
Telephone No Samsung
Index
Index
Movie Program Scene Smart Auto
Shooting mode
Accessing Camera Display Sound
For Windows