3WAY COMBINATION TELEVISION
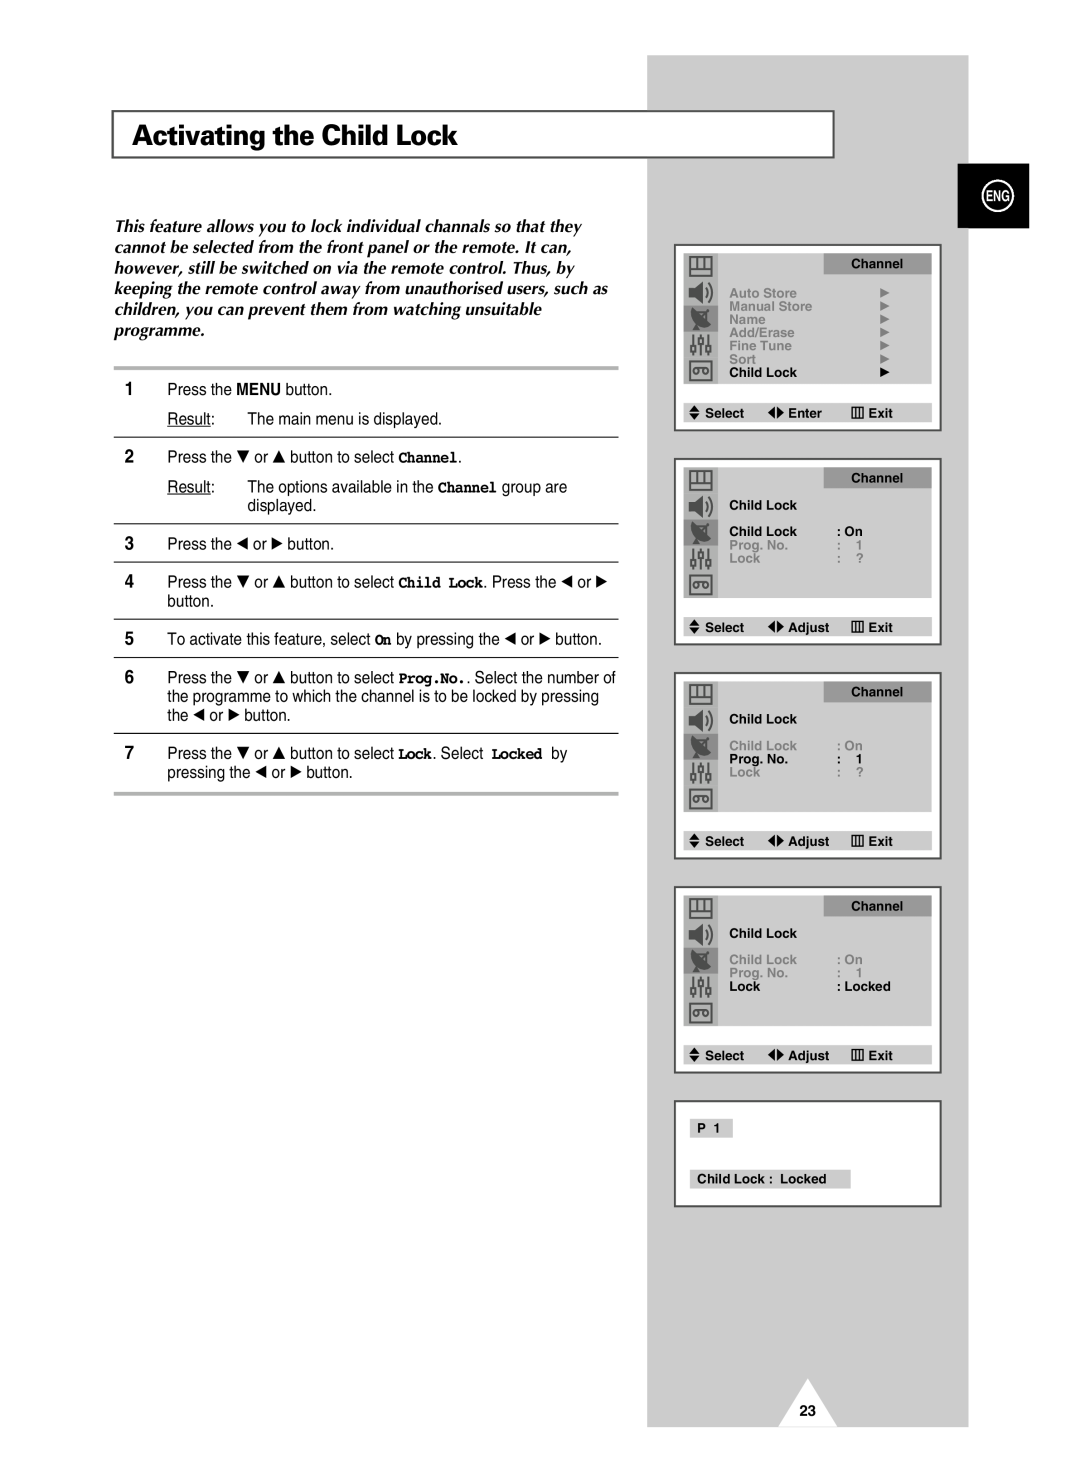
REMOTE CONTROL ON-SCREEN MENUS
TELETEXT FUNCTION depending on the model
Owner’s Instructions
Do not expose the television to any liquids
Safety Instructions
Do not step on or twist the power cord
Do not drop the remote control
RISK OF ELECTRIC SHOCK DO NOT OPEN
Press
Symbols
Contentscontinued
USING THE TELETEXT FUNCTION
Contents
USING THE VCR FUNCTION
USING THE DVD FUNCTION
Disc Tray
Power
View of Your Television
Control Panels
Control Panels continued
” Remote Control Sensor
Video Input Headphone Connector
View of Your Television continued
Infrared Remote Control Television and Teletext Functions
Infrared Remote Control VCR and DVD Functions
Purchase the television
Inserting the Batteries in the Remote Control
Connecting to an Aerial or Cable Television Network
Find that the remote control is no longer operating correctly
Front of the TV
Switching Your Television On and Off
Placing Your Television in Standby Mode
The mains lead is attached to the rear of your television
Automatic Degaussing to Remove Colour Patches
Set up the television using the on-screen menu system
Becoming Familiar with the Remote Control
The remote control is used mainly to
Change channels and adjust the volume
Plug and Play Feature
Choosing Your Language
Plug and Play Feature continued
If you want to reset this feature
Storing Channels Automatically
AUTO - PAL - SECAM - NTSC4.43
When storing channels manually, you can choose
Storing ChannelsManually
Whether or not to store each of the channels found
Storing ChannelsManually continued
Channel mode
Assigning Names to Channels
Skipping Unwanted Channels
Fine Tuning Channel Reception
Sorting the Stored Channels
Activating the Child Lock
Dynamic - Standard - Movie - Custom
Displaying Information
Changing the Picture Standard
Normal - Warm 1 - Warm 2 - Cool 2 - Cool
Adjusting the Picture Settings
Wide - Panorama - Zoom1 - Zoom2 Normal - Zoom
Selecting the Picture Size depending on the model
Activating/Deactivating the Digital Noise Reduction Feature
Using the Tilt Control Feature depending on the model
Viewing Pictures From External Sources
Setting the Blue Screen
Standard - Music - Movie - Speech - Custom
Adjusting the Sound Settings
Changing the Sound Standard
Pseudo Stereo / Virtual Surround
Extra Sound Settings
Auto Volume
Melody
Stereo
Selecting the Sound Mode depending on the model
Type of broadcast
On-screen indication
Setting the Current Date and Time
Switch off automatically at the time you select
Switching the Television On and Off Automatically
You can set the On/Off timers so that the television will
Locking the Front Panel
Setting the Sleep Timer
You can also record a cassette at two different speeds
SP Standard Play LP Long Play - option In Long Play mode
Cassette Types and Recording Speeds Option
Protecting a Recorded Cassette
You can specify any length between 1 minute and 59 minutes
This function enables you to play back The whole cassette
Repeating Playback of a Sequence or Cassette
A specific sequence on the cassette
Normal for a standard picture Sharp for a crisper picture
Adjusting the Picture Contours
Selecting the Type of Cassette Tape
Auto
Selecting the Video System depending on the model
You can record or listen to a program in HiFi stereo
Selecting the HiFi Mode depending on the model
To play back any pre-recorded cassette, proceed as follows
When playing back a cassette, you cannot watch a television programme
Playing a Cassette
The tape counter
Using the Tape Counter to Search for a Sequence
Is reset when a cassette is inserted in the VCR unit
Enables you to find the beginning of a sequence easily
Picture stability can be adjusted more easily in the Pause and Slow
Using the Crystal PlayBack
Adjusting the Picture Quality during Playback
This feature activates only when a tape is being played
of the tape is reached
The cassette is rewound automatically when the end
Rewinding and Fast-forwarding a Cassette
Then press the
You can play a cassette in slow motion
Playing a Cassette in Slow Motion
STOP
Recording a Programme Directly
PLAY/PAUSE
The VCR unit stops automatically after the requested length of time
This function enables you to record up to four hours of programmes
Recording a Programme with Automatic Stop
Up to six programmes can be preset
Using the Feature depending on the model
Before presetting your VCR unit
Using the Feature continued
Up to six programmes can be preset
Using the
TM Feature UK Only
Before presetting your VCR unit
Using the
TM Feature UK Only continued
Programme number Recording speed LP option Start time End time Date
Setting the VCR Unit to Record a Programme Automatically
Recording mode once, daily, weekly Optional use of a decoder
Before presetting your VCR
Setting the VCR Unit to Record a Programme Automaticallycontinued
RESUME function
Pausing Play
Playing a Disc
Play
Do not try recording copyright protected MP3 files
When playing CD-R/MP3 discs, please follow the recommendations below
Playing a Disc MP3/WMA
Your MP3 files should be ISO 9660 or JOLIET format
Playing a Disc MPG
Viewing the Album Screen
Playing a Disc Picture CD
Rotating and Reversing the picture
Slide Show
Skipping Tracks
Using the Search and Skip Functions
Searching through a Chapter or Track
Press ENTER key for DiscMenu
Using the Disc Menu
Using the Title Menu
1 Press the DVD MENU button during the play of a DVD. Result
Info
Displaying the Disc Information
The “ ” mark is displayed
Using the Zoom Function DVD/VCD
Clearing a Bookmark
Using the Bookmark Function DVD/VCD
Recalling a Marked Scene
A-B Repeat
Repeat Play
VCD/CD
SCREEN FIT
Using the EZ View
Wide, Normal/LB, Normal/PS
Program
Program Play CD
Changing the Camera Angle
Disc Menu
Setting up the Language Features
a movie
Player Menu
a movie
Setting up the Audio Options
Digital Output Off, Bitstream, PCM
Dynamic Compression
169 Wide
Setting up the TV Aspect
43 Letter Box
43 Pan Scan
NTSC Disc Output
Setting up the Display Options
Screen Messages On or Off
Black Level On or Off
7 About the Rating Level
Setting up the Parental Control
8 About the Change Password
Result The Re-enter New Password is displayed
Television programme times News bulletins and weather forecasts
Teletext Feature
This information is divided into numbered pages see diagram
Contents
You can display Teletext information at any time on your television
Displaying the Teletext Information
Press the
Selecting Display Options
To display
Selecting a Teletext Page
Storing Teletext Pages
” is used for the equipment with an RGB output, such as video
Connecting to the External Input/Output
Connecting to the Digital Audio Outputs
Rear of the TV
Side of the TV
Connecting to the Audio/Video Input
Connecting Headphones
You can connect a set of headphones to your television
Signal
SCART Connector Wiring
Cleaning the Video Heads
Disc Types
Disc Type and Characteristics
Characteristics
Disk Markings
Technical Specifications
When the PLAY/PAUSE
Troubleshooting Before Contacting Service Personnel
Audio Setup menu
Troubleshooting Before Contacting Service Personnel continued
BLUE - NEUTRAL BROWN - LIVE
Wiring the Mains Power Supply Plug UK Only
IMPORTANT NOTICE
Memo
Product Safety
AFTER SALES SERVICE
European Notice
EN61000-3-21995 Power Line Harmonics