Part Names and Functions

Laser Pointer Function

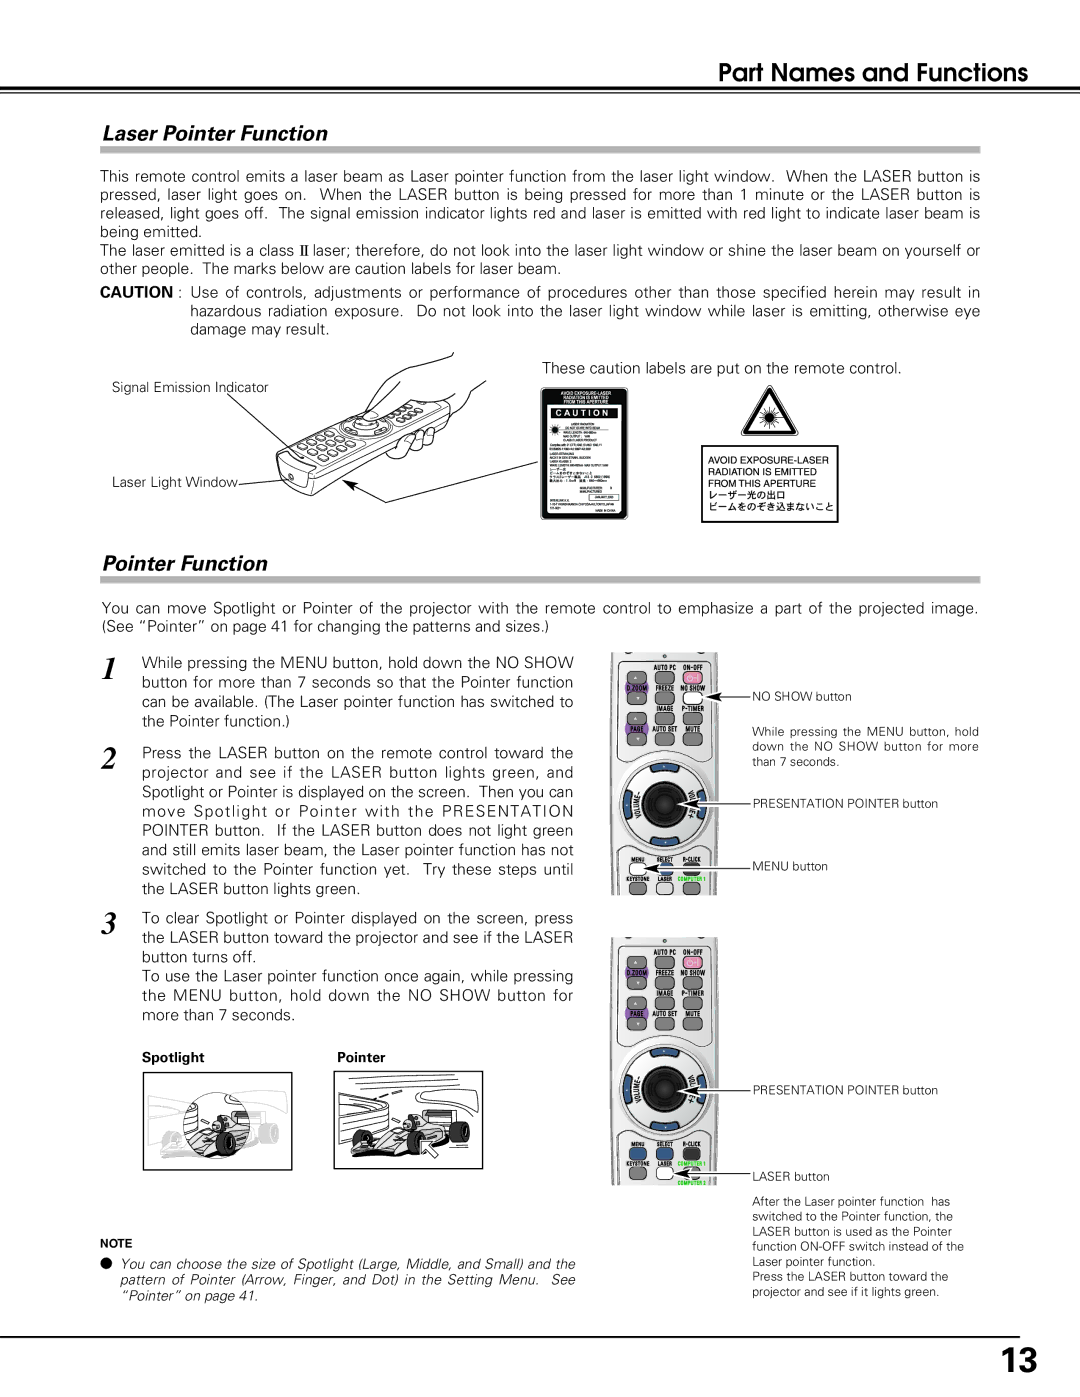
This remote control emits a laser beam as Laser pointer function from the laser light window. When the LASER button is pressed, laser light goes on. When the LASER button is being pressed for more than 1 minute or the LASER button is released, light goes off. The signal emission indicator lights red and laser is emitted with red light to indicate laser beam is being emitted.

The laser emitted is a class II laser; therefore, do not look into the laser light window or shine the laser beam on yourself or other people. The marks below are caution labels for laser beam.

CAUTION : Use of controls, adjustments or performance of procedures other than those specified herein may result in hazardous radiation exposure. Do not look into the laser light window while laser is emitting, otherwise eye damage may result.

These caution labels are put on the remote control.

Signal Emission Indicator

Laser Light Window

Pointer Function

You can move Spotlight or Pointer of the projector with the remote control to emphasize a part of the projected image. (See “Pointer” on page 41 for changing the patterns and sizes.)

1

While pressing the MENU button, hold down the NO SHOW


button for more than 7 seconds so that the Pointer function


can be available. (The Laser pointer function has switched to


the Pointer function.)

2

Press the LASER button on the remote control toward the


projector and see if the LASER button lights green, and


Spotlight or Pointer is displayed on the screen. Then you can


move Spotlight or Pointer with the PRESENTATION


POINTER button. If the LASER button does not light green


and still emits laser beam, the Laser pointer function has not


switched to the Pointer function yet. Try these steps until


the LASER button lights green.

3

To clear Spotlight or Pointer displayed on the screen, press


the LASER button toward the projector and see if the LASER

button turns off.

To use the Laser pointer function once again, while pressing the MENU button, hold down the NO SHOW button for more than 7 seconds.

Spotlight

Pointer

NOTE

You can choose the size of Spotlight (Large, Middle, and Small) and the pattern of Pointer (Arrow, Finger, and Dot) in the Setting Menu. See “Pointer” on page 41.

AUTO PC

ON-OFF


D. ZOOM FREEZE

NO SHOW

P-TIMER

IMAGE


PAGE AUTO SET

MU TE


-


V


E


O


M


U


O


E


L


+


V


MENU

SELECT

R-CLICK

K E YSTONE

L ASER

COMPUTER 1


AUTO PC

ON-OFF


D. ZOOM

FREEZE

NO SHOW


P-TIMER


IMAGE


PAGE

AUTO SET

MU TE


-


V


E


L


M


O


U


L


+


O


V


MENU

SELECT

R-CLICK

K E YSTONE

L ASER

COMPUTER 1


COMPUTER 2

NO SHOW button

While pressing the MENU button, hold down the NO SHOW button for more than 7 seconds.

PRESENTATION POINTER button

MENU button

PRESENTATION POINTER button

LASER button

After the Laser pointer function has switched to the Pointer function, the LASER button is used as the Pointer function ON-OFF switch instead of the Laser pointer function.

Press the LASER button toward the projector and see if it lights green.

13

Page 13
Image 13
Sanyo PLC-SU60, PLC-XU60 owner manual Laser Pointer Function

PLC-XU60, PLC-SU60 specifications

The Sanyo PLC-SU60 and PLC-XU60 are projectors that embody cutting-edge technology and innovative features, catering to a variety of presentation needs in educational and corporate environments.

The PLC-SU60, a high-performance model, boasts a native resolution of 1024 x 768 pixels, providing clear and crisp images. It utilizes a 3LCD system, which enhances color accuracy and brightness. With a brightness of 6000 lumens, this projector is particularly well-suited for large venues with ambient light, ensuring that presentations remain vibrant and legible even in well-lit rooms. The model also incorporates advanced lens shift and zoom capabilities, allowing for flexible installation options without compromising image quality.

On the other hand, the PLC-XU60 targets a similar audience but emphasizes portability alongside performance. This projector features a native XGA resolution with a brightness of 5000 lumens. It, too, utilizes the 3LCD technology, ensuring bright and colorful images. The lightweight design of the PLC-XU60 makes it an ideal choice for on-the-go presenters who need a reliable device that can easily transition from one location to another.

Both models are equipped with multiple connectivity options, including HDMI, VGA, and component inputs, which make them compatible with a wide array of devices from laptops to Blu-ray players. The easy-to-navigate user interface simplifies operation, providing users with instant access to settings suitable for different environments.

A noteworthy characteristic of Sanyo projectors is their commitment to minimizing noise during operation. The PLC-SU60 and PLC-XU60 operate at whisper-quiet levels, allowing for uninterrupted presentations. Additionally, both projectors come with a long lamp life, which reduces maintenance costs and extends usage time.

In summary, the Sanyo PLC-SU60 and PLC-XU60 are designed for those who need reliable, high-quality projection solutions. With their impressive brightness, outstanding color accuracy, and versatile connectivity, these projectors cater to the diverse requirements of modern-day presentations. Whether in an educational setting or a business environment, these models ensure that visuals are portrayed vividly and effectively, reinforcing the importance of investing in robust projection technology.