Instrucciones de instalación

Installation Instructions

Notice d'installation

P515-361

BA360/362 Deadbolt


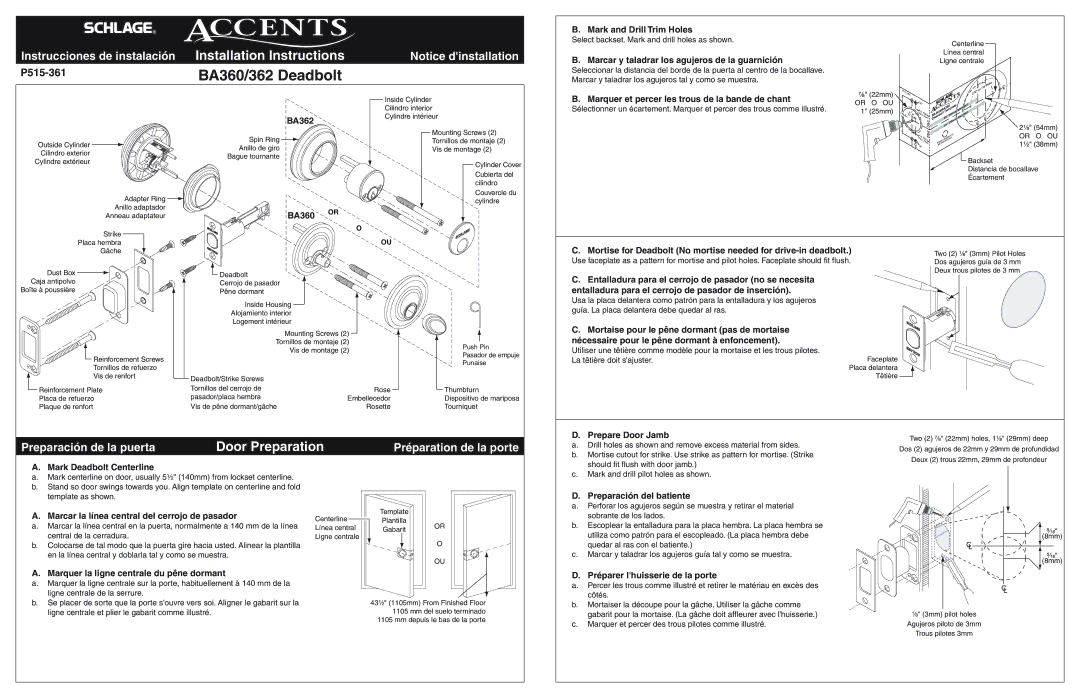
B. Mark and Drill Trim Holes

Select backset. Mark and drill holes as shown.

B.Marcar y taladrar los agujeros de la guarnición

Seleccionar la distancia del borde de la puerta al centro de la bocallave. Marcar y taladrar los agujeros tal y como se muestra.

Centerline Línea central Ligne centrale

⁷⁄₈" (22mm)

P515-365


"H

o

le


"

o

r

1¹⁄₂


2¹⁄₈


Outside Cylinder

Cilindro exterior

Cylindre extérieur

Adapter Ring

Anillo adaptador

Anneau adaptateur

Strike

Placa hembra

BA362

Spin Ring

Anillo de giro

Bague tournante

BA360 OR

O

Inside Cylinder

Cilindro interior

Cylindre intérieur

Mounting Screws (2)

Tornillos de montaje (2)

Vis de montage (2)

Cylinder Cover Cubierta del cilindro Couvercle du cylindre

OU

B. Marquer et percer les trous de la bande de chant

OR O OU

Sélectionner un écartement. Marquer et percer des trous comme illustré.

1" (25mm)

¹⁄₈"

1⁵⁄₈"

1"

For 1

"

⁷⁄₈" or

Thick


Hole


³⁄₈


Door


FOLD

For

FOLD

Thick1³⁄₄"

¹⁄₈"

Door


362


KSET


60/BA


BAC

BA3


(60mm)

KSET


"

2³⁄₈


BAC


2³⁄₄

"

(70mm)


2¹⁄₈" (54mm)


for


OR O OU


templatedoo

r.


Rotate-handed


1¹⁄₂" (38mm)


left


Backset

Distancia de bocallave Écartement

Gâche

Dust Box Caja antipolvo

Boîte à poussière

Deadbolt Cerrojo de pasador Pêne dormant

C. Mortise for Deadbolt (No mortise needed for drive-in deadbolt.)

Two (2) ¹⁄₈" (3mm) Pilot Holes

Use faceplate as a pattern for mortise and pilot holes. Faceplate should fit flush.

Dos agujeros guía de 3 mm


Deux trous pilotes de 3 mm

C. Entalladura para el cerrojo de pasador (no se necesita

entalladura para el cerrojo de pasador de inserción).

Usa la placa delantera como patrón para la entalladura y los agujeros

Reinforcement Screws

Tornillos de refuerzo

Vis de renfort

Reinforcement Plate

Placa de refuerzo

Plaque de renfort

Inside Housing

Alojamiento interior

Logement intérieur

Mounting Screws (2)

Tornillos de montaje (2)

Vis de montage (2)

Deadbolt/Strike Screws


Tornillos del cerrojo de

Rose

pasador/placa hembra

Embellecedor

Vis de pêne dormant/gâche

Rosette

Push Pin

Pasador de empuje Punaise

Thumbturn

Dispositivo de mariposa Tourniquet

guía. La placa delantera debe quedar al ras.

C.Mortaise pour le pêne dormant (pas de mortaise nécessaire pour le pêne dormant à enfoncement).

Utiliser une têtière comme modèle pour la mortaise et les trous pilotes. La têtière doit s'ajuster.

Faceplate Placa delantera Têtière

Preparación de la puerta

Door Preparation

Préparation de la porte

D. Prepare Door Jamb

Two (2)

⁷⁄₈" (22mm) holes, 1¹⁄₈" (29mm) deep

a. Drill holes as shown and remove excess material from sides.

Dos (2) agujeros de 22mm y 29mm de profundidad

b. Mortise cutout for strike. Use strike as pattern for mortise. (Strike

Deux (2) trous 22mm, 29mm de profondeur


A. Mark Deadbolt Centerline

a. Mark centerline on door, usually 5¹⁄₂" (140mm) from lockset centerline.

b. Stand so door swings towards you. Align template on centerline and fold

should fit flush with door jamb.)

c. Mark and drill pilot holes as shown.

template as shown.

A. Marcar la línea central del cerrojo de pasador

a.Marcar la línea central en la puerta, normalmente a 140 mm de la línea central de la cerradura.

b.Colocarse de tal modo que la puerta gire hacia usted. Alinear la plantilla en la línea central y doblarla tal y como se muestra.

A. Marquer la ligne centrale du pêne dormant

a.Marquer la ligne centrale sur la porte, habituellement à 140 mm de la ligne centrale de la serrure.

b.Se placer de sorte que la porte s'ouvre vers soi. Aligner le gabarit sur la ligne centrale et plier le gabarit comme illustré.

Centerline

Template


Plantilla

OR

Línea central

Gabarit

Ligne centrale


O


OU

43¹⁄₂" (1105mm) From Finished Floor

1105 mm del suelo terminado

1105 mm depuis le bas de la porte

D. Preparación del batiente

a.Perforar los agujeros según se muestra y retirar el material sobrante de los lados.

b.Escoplear la entalladura para la placa hembra. La placa hembra se utiliza como patrón para el escopleado. (La placa hembra debe quedar al ras con el batiente.)

c.Marcar y taladrar los agujeros guía tal y como se muestra.

D. Préparer l'huisserie de la porte

a.Percer les trous comme illustré et retirer le matériau en excès des côtés.

b.Mortaiser la découpe pour la gâche. Utiliser la gâche comme gabarit pour la mortaise. (La gâche doit affleurer avec l'huisserie.)

c.Marquer et percer des trous pilotes comme illustré.

C

L

C

L

¹⁄₈" (3mm) pilot holes

Agujeros piloto de 3mm

Trous pilotes 3mm

⁵⁄₁₆"

(8mm)

⁵⁄₁₆"

(8mm)

Page 1
Image 1
Schlage BA-362 installation instructions Mark and Drill Trim Holes, Marcar y taladrar los agujeros de la guarnición, BA362

BA360, BA-362 specifications

The Schlage BA-362 and BA-360 are two of the most reliable and innovative electronic deadbolts on the market, designed for secure residential access while providing advanced features to enhance user convenience. Schlage, a reputable name in the security industry, has consistently produced high-quality locking systems, and these two models are no exception.

One of the standout features of the BA-362 and BA-360 is their keyless entry system, which allows homeowners to unlock their doors using personalized codes instead of traditional keys. This technology eliminates worries about lost or stolen keys and provides the added benefit of being able to share access codes with family members, friends, or service providers. The ease of reprogramming the codes means you can easily change permissions as needed.

Both models are equipped with Schlage’s built-in alarm technology, which offers an additional layer of security. These alarms will sound if someone attempts to tamper with the lock or if incorrect codes are entered multiple times. This feature provides peace of mind, especially when you are away from home.

In terms of design, the BA-362 and BA-360 seamlessly blend functionality with aesthetics. Available in various finishes, including sleek satin nickel and elegant oil-rubbed bronze, they can complement any home décor style. The touchscreen interface on the BA-362 model is particularly noteworthy, offering a modern look while ensuring durability and usability, even in low-light conditions.

Another significant characteristic is their robust construction. Both models are built with high-grade materials to withstand forced entry and are tested to meet the highest industry standards. With a grade 2 security rating, they provide reliable protection against unauthorized access.

Installation is straightforward thanks to the adjustable fit, accommodating most standard door preparations without the need for extensive modifications. Additionally, both models are powered by batteries, which can last up to two years, making routine maintenance effortless.

In summary, the Schlage BA-362 and BA-360 electronic deadbolts represent a perfect combination of security, style, and user-friendly technology. Their robust features, including keyless entry, alarm systems, aesthetic designs, and solid construction, make them highly sought-after solutions for increasing home security. With Schlage, homeowners can enjoy convenience without compromising on safety.