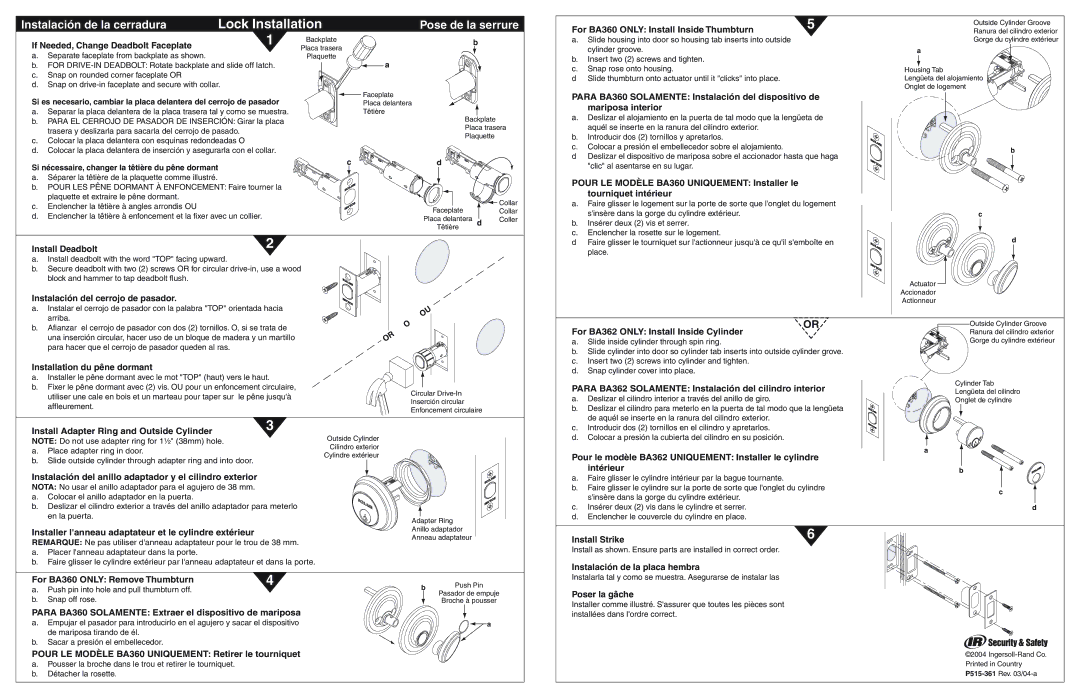
If Needed, Change Deadbolt Faceplate | 1 |
|
a.Separate faceplate from backplate as shown.
b.FOR DRIVE-IN DEADBOLT: Rotate backplate and slide off latch.
c.Snap on rounded corner faceplate OR
d.Snap on drive-in faceplate and secure with collar.
Si es necesario, cambiar la placa delantera del cerrojo de pasador
a.Separar la placa delantera de la placa trasera tal y como se muestra.
b.PARA EL CERROJO DE PASADOR DE INSERCIÓN: Girar la placa trasera y deslizarla para sacarla del cerrojo de pasado.
c.Colocar la placa delantera con esquinas redondeadas O
d.Colocar la placa delantera de inserción y asegurarla con el collar.
Si nécessaire, changer la têtière du pêne dormant
a.Séparer la têtière de la plaquette comme illustré.
b.POUR LES PÊNE DORMANT À ENFONCEMENT: Faire tourner la plaquette et extraire le pêne dormant.
c.Enclencher la têtière à angles arrondis OU
d.Enclencher la têtière à enfoncement et la fixer avec un collier.
Backplate
Placa trasera
Plaquette
a
 Faceplate
Placa delantera
Têtière
c
b
Backplate
Placa trasera
Plaquette
d
 Collar
Faceplate Collar
Placa delantera d Coller Têtière
a.Slide housing into door so housing tab inserts into outside cylinder groove.
b.Insert two (2) screws and tighten.
c.Snap rose onto housing.
d Slide thumbturn onto actuator until it "clicks" into place.
PARA BA360 SOLAMENTE: Instalación del dispositivo de mariposa interior
a.Deslizar el alojamiento en la puerta de tal modo que la lengüeta de aquél se inserte en la ranura del cilindro exterior.
b.Introducir dos (2) tornillos y apretarlos.
c.Colocar a presión el embellecedor sobre el alojamiento.
dDeslizar el dispositivo de mariposa sobre el accionador hasta que haga "clic" al asentarse en su lugar.
POUR LE MODÈLE BA360 UNIQUEMENT: Installer le tourniquet intérieur
a.Faire glisser le logement sur la porte de sorte que l'onglet du logement s'insère dans la gorge du cylindre extérieur.
b.Insérer deux (2) vis et serrer.
c.Enclencher la rosette sur le logement.
Gorge du cylindre extérieur
a
Housing Tab
Lengüeta del alojamiento
Onglet de logement
b
c
a.Instalar el cerrojo de pasador con la palabra "TOP" orientada hacia arriba.
b.Afianzar el cerrojo de pasador con dos (2) tornillos. O, si se trata de una inserción circular, hacer uso de un bloque de madera y un martillo para hacer que el cerrojo de pasador queden al ras.
Installation du pêne dormant
a.Installer le pêne dormant avec le mot "TOP" (haut) vers le haut.
b.Fixer le pêne dormant avec (2) vis. OU pour un enfoncement circulaire, utiliser une cale en bois et un marteau pour taper sur le pêne jusqu'à affleurement.
Circular Drive-In Inserción circular Enfoncement circulaire
OR
For BA362 ONLY: Install Inside Cylinder
a.Slide inside cylinder through spin ring.
b.Slide cylinder into door so cylinder tab inserts into outside cylinder grove.
c.Insert two (2) screws into cylinder and tighten.
d.Snap cylinder cover into place.
PARA BA362 SOLAMENTE: Instalación del cilindro interior
a. Deslizar el cilindro interior a través del anillo de giro. |
b. Deslizar el cilindro para meterlo en la puerta de tal modo que la lengüeta |
de aquél se inserte en la ranura del cilindro exterior. |
Outside Cylinder Groove  Ranura del cilindro exterior
  Gorge du cylindre extérieur
Cylinder Tab
Lengüeta del cilindro
Onglet de cylindre
Install Adapter Ring and Outside Cylinder | 3 |
|
NOTE: Do not use adapter ring for 1¹⁄₂" (38mm) hole.
a.Place adapter ring in door.
b.Slide outside cylinder through adapter ring and into door.
Instalación del anillo adaptador y el cilindro exterior
NOTA: No usar el anillo adaptador para el agujero de 38 mm.
a.Colocar el anillo adaptador en la puerta.
b.Deslizar el cilindro exterior a través del anillo adaptador para meterlo en la puerta.
Outside Cylinder Cilindro exterior Cylindre extérieur
c. | Introducir dos (2) tornillos en el cilindro y apretarlos. |
d. | Colocar a presión la cubierta del cilindro en su posición. |
Pour le modèle BA362 UNIQUEMENT: Installer le cylindre intérieur
a.Faire glisser le cylindre intérieur par la bague tournante.
b.Faire glisser le cylindre sur la porte de sorte que l'onglet du cylindre s'insère dans la gorge du cylindre extérieur.
c.Insérer deux (2) vis dans le cylindre et serrer.
d.Enclencher le couvercle du cylindre en place.
a
b
c
d
Installer l'anneau adaptateur et le cylindre extérieur
REMARQUE: Ne pas utiliser d'anneau adaptateur pour le trou de 38 mm.
a.Placer l'anneau adaptateur dans la porte.
b.Faire glisser le cylindre extérieur par l'anneau adaptateur et dans la porte.
Anillo adaptador Anneau adaptateur
Install Strike
Install as shown. Ensure parts are installed in correct order.
Instalación de la placa hembra
For BA360 ONLY: Remove Thumbturn | 4 |
a.Push pin into hole and pull thumbturn off.
b.Snap off rose.
PARA BA360 SOLAMENTE: Extraer el dispositivo de mariposa
a.Empujar el pasador para introducirlo en el agujero y sacar el dispositivo de mariposa tirando de él.
b.Sacar a presión el embellecedor.
bPush Pin
Pasador de empuje Broche à pousser

 a
a
Instalarla tal y como se muestra. Asegurarse de instalar las
Poser la gâche
Installer comme illustré. S'assurer que toutes les pièces sont installées dans l'ordre correct.

