• An ATA interface cable. For optimum performance use an 80-conductor |
Ultra ATA/100 cable which has blue, gray, and black connectors. |
Ultra ATA/100 requirements
The drive can be configured to support a default maximum transfer rate. This drive can support transfer rates up to 100 Mbytes per second (UDMA 5) in Ultra ATA/100 mode. Using a software utility, you can set the default transfer rate to the best capability of your system. For your drive to run in this mode, you need the following:
•A computer that supports UDMA mode 5
•A 40-pin, 80-conductor cable (available from your computer dealer)
•Windows XP, Windows 2000, Mac OS X, Linux, or other operating system that supports Ultra ATA 100.
Large disc requirements (for capacities over 137 Gbytes)
To realize the full capacity of these drives:
•Use an operating system that supports 48-bit addressing:
-Microsoft Windows XP with Service Pack 1 (or later)
-Windows 2000 with Service Pack 3 (or later)
-Mac OS X10.2 (or later)
-Mac OS 9.2.2 (or later)
-Linux kernel v2.4.16 (or later)
•Use a 48-bit compatible Ultra ATA/133 PCI host adapter card or connector.
•Go to http://support.seagate.com for additional information.
Handling precautions/electrostatic discharge protection
•Disc drives are fragile. Do not drop or jar the drive. Handle the drive only by the edges or frame.
•Drive electronics are extremely sensitive to static electricity. While install- ing the drive, wear a wrist strap and cable connected to ground.
•Turn off the power to the host system during installation.
•Do not disassemble the drive; doing so voids the warranty. Return the entire drive for depot service if any part is defective.
•Do not apply pressure or attach labels to the drive.
Setting the jumpers
Refer to the jumper settings illustration below or on your drive label to config- ure the drive for your system. Jumper settings can also be accessed online from our web site at www.seagate.com.
•Master or single drive: When this jumper is used (connecting pins 7 and 8), the drive is configured as master or single drive.
•Drive is slave: To configure the drive as a slave or second drive on the cable, remove all the jumpers from
pins 5-8.
•Master with non-ATA compatible
slave: Use this setting if the slave
drive is not recognized. Configure the master drive with a jumper set on pins 5 and 6 and pins 7 and 8 to enable this option.
• Cable select: Computers that use
cable select determine the master and slave drives on the interface bus. To enable cable select, set a jumper on pins 5 and 6 (and make sure the
“Master or single drive” jumper is not installed).
• Alternate capacity jumper: When this jumper is used, capacity is lim-
ited to 32 Gbytes. Use this jumper only if you have a legacy system with a BIOS that does not support large capacity disc drives. When using the alternate capacity jumper, DiscWizard® Starter Edition software is required to achieve the drive’s full capacity.
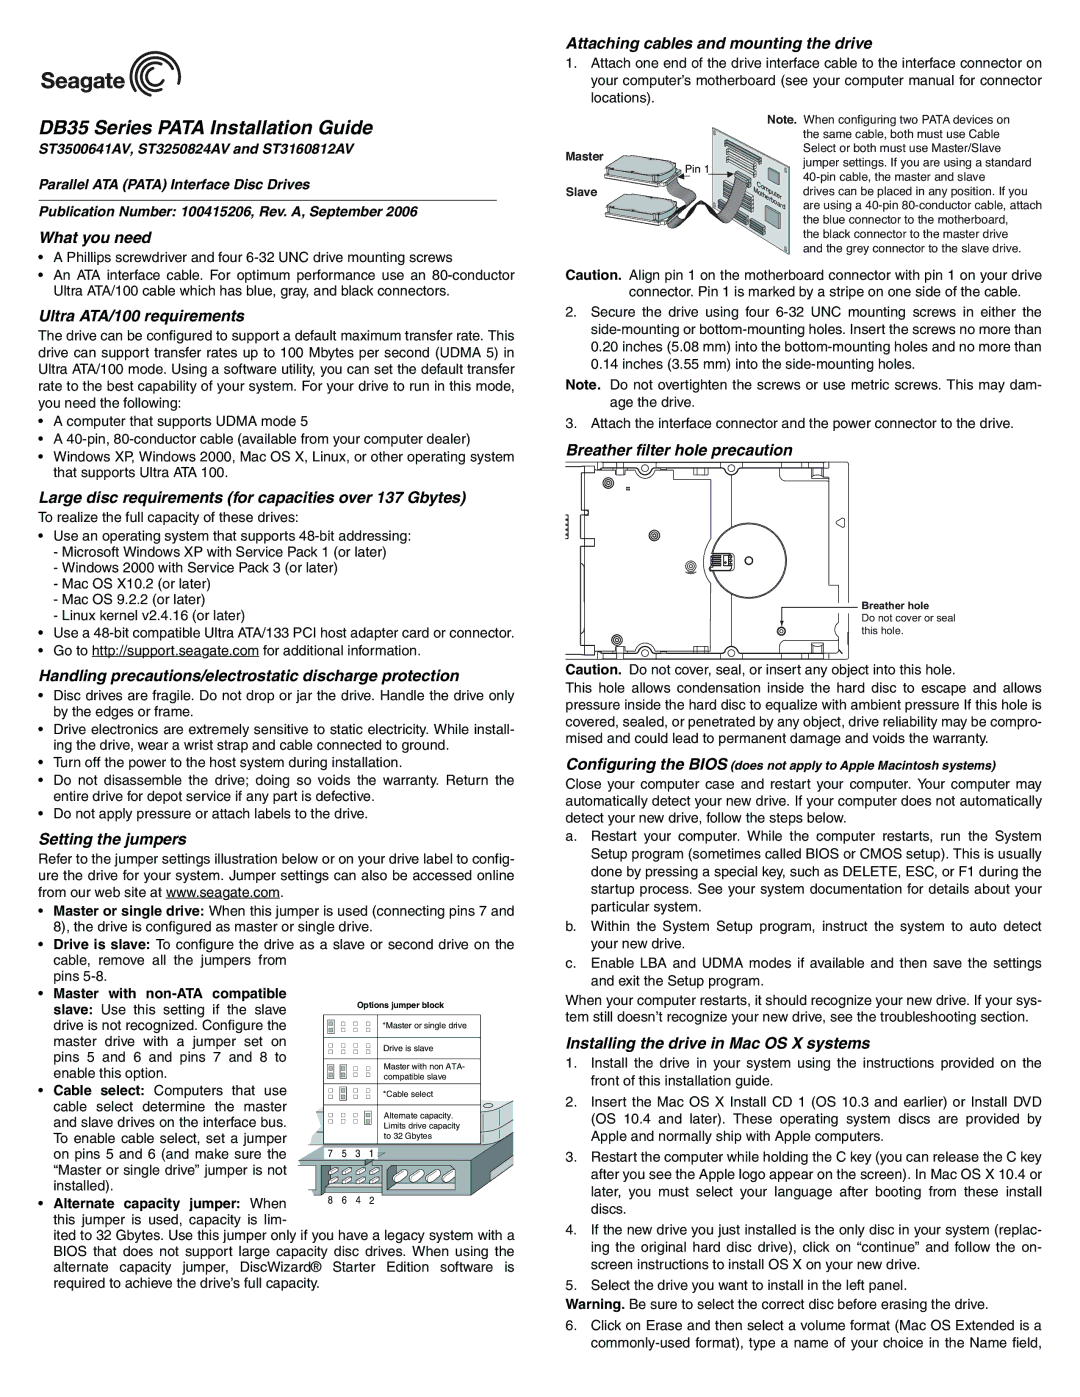
Caution. Align pin 1 on the motherboard connector with pin 1 on your drive connector. Pin 1 is marked by a stripe on one side of the cable.
2.Secure the drive using four 6-32 UNC mounting screws in either the side-mounting or bottom-mounting holes. Insert the screws no more than
0.20inches (5.08 mm) into the bottom-mounting holes and no more than
0.14inches (3.55 mm) into the side-mounting holes.
Note. Do not overtighten the screws or use metric screws. This may dam- age the drive.
3. Attach the interface connector and the power connector to the drive.
Breather filter hole precaution
Breather hole
Do not cover or seal this hole.
Caution. Do not cover, seal, or insert any object into this hole.
This hole allows condensation inside the hard disc to escape and allows pressure inside the hard disc to equalize with ambient pressure If this hole is covered, sealed, or penetrated by any object, drive reliability may be compro- mised and could lead to permanent damage and voids the warranty.
Configuring the BIOS (does not apply to Apple Macintosh systems)
Close your computer case and restart your computer. Your computer may automatically detect your new drive. If your computer does not automatically detect your new drive, follow the steps below.
a.Restart your computer. While the computer restarts, run the System Setup program (sometimes called BIOS or CMOS setup). This is usually done by pressing a special key, such as DELETE, ESC, or F1 during the startup process. See your system documentation for details about your particular system.
b.Within the System Setup program, instruct the system to auto detect your new drive.
c.Enable LBA and UDMA modes if available and then save the settings and exit the Setup program.
When your computer restarts, it should recognize your new drive. If your sys- tem still doesn’t recognize your new drive, see the troubleshooting section.
Installing the drive in Mac OS X systems
1.Install the drive in your system using the instructions provided on the front of this installation guide.
2.Insert the Mac OS X Install CD 1 (OS 10.3 and earlier) or Install DVD (OS 10.4 and later). These operating system discs are provided by Apple and normally ship with Apple computers.
3.Restart the computer while holding the C key (you can release the C key after you see the Apple logo appear on the screen). In Mac OS X 10.4 or later, you must select your language after booting from these install discs.
4.If the new drive you just installed is the only disc in your system (replac- ing the original hard disc drive), click on “continue” and follow the on- screen instructions to install OS X on your new drive.
5.Select the drive you want to install in the left panel.
Warning. Be sure to select the correct disc before erasing the drive.
6.Click on Erase and then select a volume format (Mac OS Extended is a commonly-used format), type a name of your choice in the Name field,