_.5" Minimum

Clearance

O

-Drill (3)

Top

Holes

1/8" Dia.

Humidifier


- Cut

Plenum--->

Opening


Level Line

o

& Bottom of

Humidifier


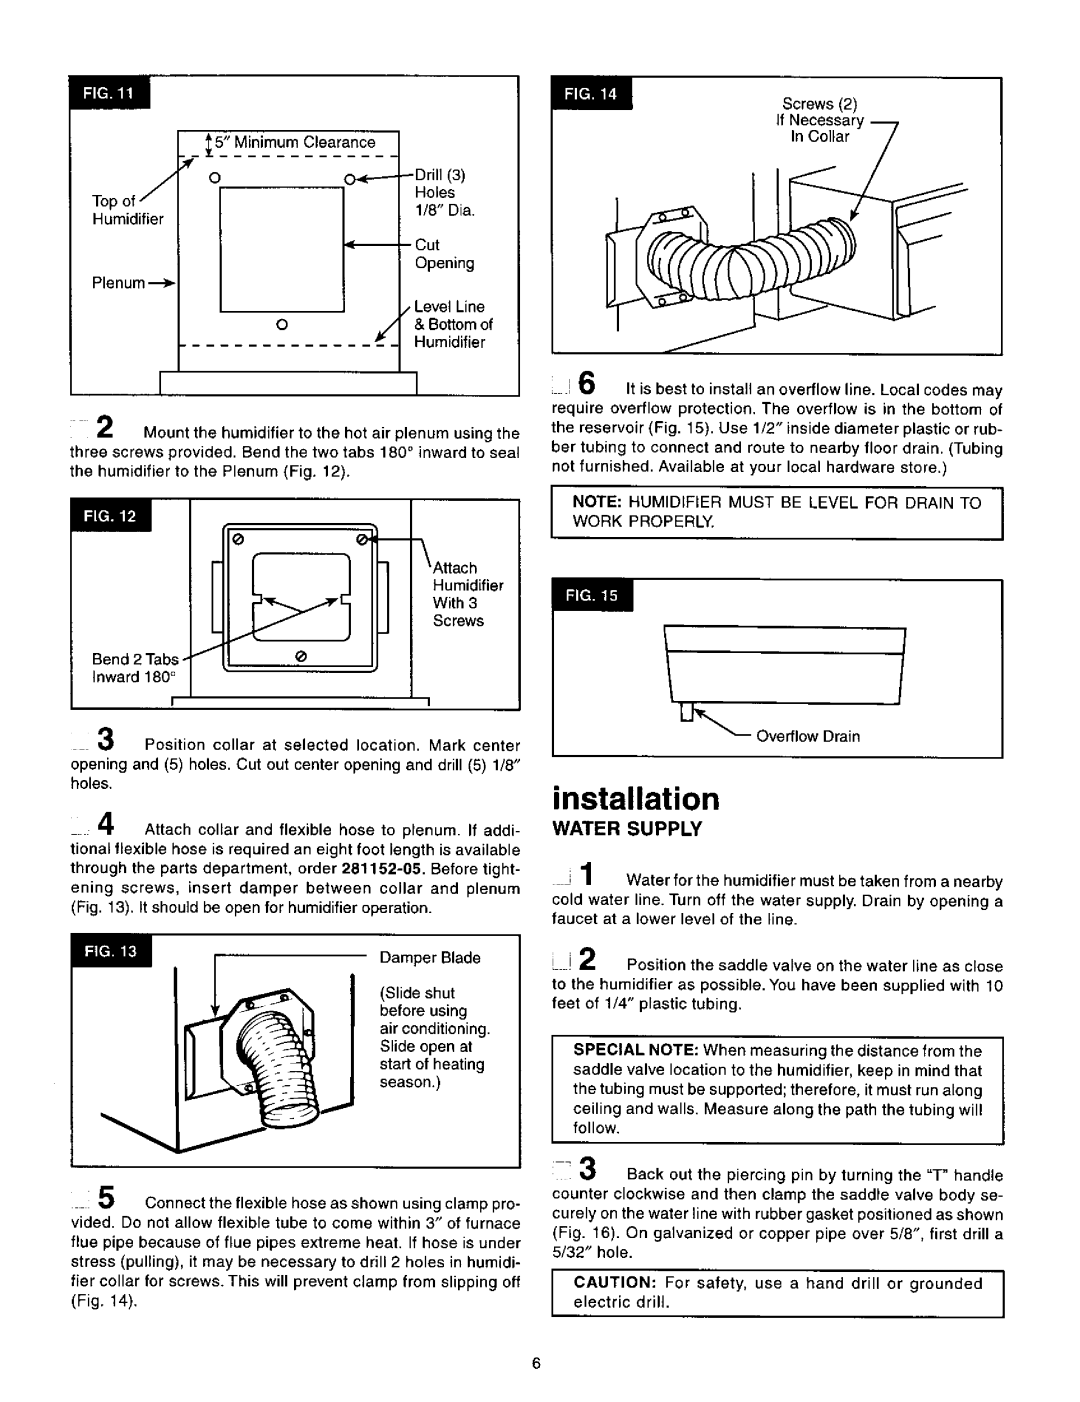
2Mount the humidifier to the hot air plenum using the three screws provided. Bend the two tabs 180 ° inward to seal the humidifier to the Plenum (Fig. 12).

Humidifier

With 3

Screws

Bend 2 Tabs -

Inward 180°

Screws (2)

If Necessary "_t

ar/

i 6 It is best to install an overflow line. Local codes may require overflow protection. The overflow is in the bottom of the reservoir (Fig. 15). Use 1/2" inside diameter plastic or rub- ber tubing to connect and route to nearby floor drain. (Tubing not furnished. Available at your local hardware store.)

NOTE: HUMIDIFIER MUST BE LEVEL FOR DRAIN TO I

WORK PROPERLY.

I


Position collar at selected location. Mark center

opening and (5) holes. Cut out center opening and drill (5) 1/8" holes.

4Attach collar and flexible hose to plenum. If addi- tional flexible hose is required an eight foot length is available through the parts department, order 281152-05. Before tight- ening screws, insert damper between collar and plenum (Fig. 13). it should be open for humidifier operation.

Damper Blade

(Slide shut before using

air conditioning. Slide open at

start of heating season.)

_

Overflow Drain

installation

WATER SUPPLY

J1 Water for the humidifier must be taken from a nearby

cold water line. Turn off the water supply. Drain by opening a faucet at a lower level of the line.

i J2 Position the saddle valve on the water line as close

to the humidifier as possible. You have been supplied with 10 feet of 1/4" plastic tubing.

SPECIAL NOTE: When measuring the distance from the saddle valve location to the humidifier, keep in mind that the tubing must be supported; therefore, it must run along

ceiling and walls. Measure along the path the tubing will follow.

;_1 Connect the flexible hose as shown using clamp pro- vided. Do not allow flexible tube to come within 3" of furnace flue pipe because of flue pipes extreme heat. If hose is under stress (pulling), it may be necessary to drill 2 holes in humidi- fier collar for screws. This will prevent clamp from slipping off (Fig. 14).

3Back out the piercing pin by turning the "T" handle counter clockwise and then clamp the saddle valve body se- curely on the water line with rubber gasket positioned as shown (Fig. 16). On galvanized or copper pipe over 5/8", first drill a 5/32" hole.

CAUTION: For safety, use a hand drill or grounded electric drill.

6

Page 6
Image 6
Sears 1700 manual Installation, Water Supply

1700 specifications

The Sears 1700 is a remarkable piece of technology that emerged during its heyday, capturing the attention of consumers with its innovative features and robust performance. Introduced in the late 20th century as part of Sears' commitment to offering quality products, the 1700 quickly established itself as a reliable option for those seeking an efficient and user-friendly appliance.

One of the most notable features of the Sears 1700 is its powerful motor, which allows for efficient operation across a range of tasks. Whether it’s tackling heavy laundry loads or managing daily chores, the motor ensures that it delivers consistent performance. Apart from its strength, the noise reduction technology implemented in the design helps maintain a quieter environment during operation, addressing a common complaint from users of similar appliances.

In terms of design, the Sears 1700 boasts a sleek, modern aesthetic that integrates well into any household. With a user-friendly interface, it features intuitive controls, making it accessible to users of all ages. This commitment to user experience is reflected in the layout, with clearly labeled buttons and dials for ease of use.

Another significant aspect of the Sears 1700 is its versatility. It offers multiple settings tailored to different fabric types, ensuring optimal care and cleaning for garments. This adaptability makes it an essential appliance for families, allowing users to wash everything from delicate fabrics to heavy-duty items without compromising on quality.

The technology behind the Sears 1700 also includes energy-efficient settings, allowing users to save on utility bills while reducing their environmental footprint. This focus on sustainability is part of a broader trend in the appliance industry toward energy conservation, appealing to eco-conscious consumers.

Durability is another hallmark of the Sears 1700. Constructed with high-quality materials, it is designed to withstand the rigors of daily use. This reliability, combined with a warranty for peace of mind, has led many consumers to consider the Sears 1700 a long-term investment for their household needs.

In summary, the Sears 1700 stands out due to its powerful motor, noise reduction technology, user-friendly design, versatility, energy efficiency, and durability. These features collectively position it as a quality choice for consumers looking to enhance their home appliance lineup. Whether for laundry or other household tasks, the Sears 1700 has proven to be a dependable and efficient solution for many families.