8.The charger will not stop when the battery is fully charged. For this reason it is important to check charging progress fequently. Overcharging can damage a battery. You must monitor and unplug charger when battery is fully charged.

9.When the battery is fully charged, unplug the charger power cord before attempting to disconnect charger clamps.

10.Standing away from the battery, remove the charger clamps in this order: (1) from the chassis connection and, (2) from the battery post or terminal.

11.Clean and store the battery charger in a dry location.

Charging your battery outside the vehicle:

1.Remove the battery from vehicle, making sure to disconnect grounded terminal first with all accessories and lights turned off in the vehicle.

2.Check the polarity of the battery posts as indicated

on the battery case: POSITIVE (POS, P, +) and

POSITIVE

NEGATIVE (NEG, N, -).


NOTE: On top-post batteries, the positive battery


terminal usually has a larger diameter post than the


negative one.

BATTERY

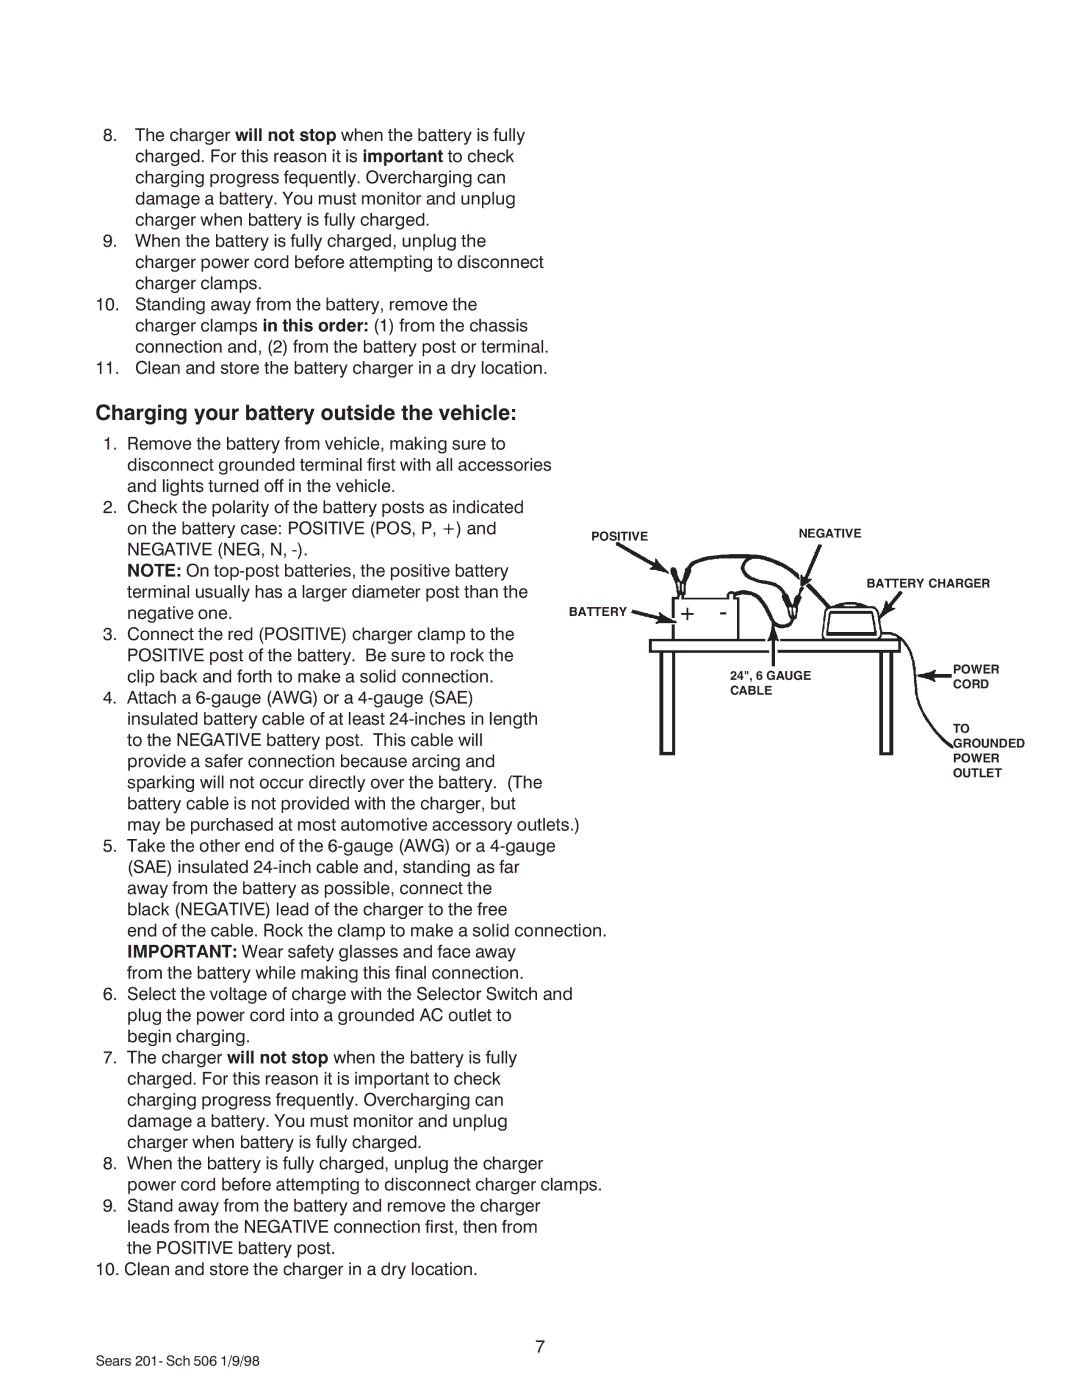
3.Connect the red (POSITIVE) charger clamp to the POSITIVE post of the battery. Be sure to rock the clip back and forth to make a solid connection.

4.Attach a 6-gauge (AWG) or a 4-gauge (SAE) insulated battery cable of at least 24-inches in length to the NEGATIVE battery post. This cable will provide a safer connection because arcing and sparking will not occur directly over the battery. (The battery cable is not provided with the charger, but

may be purchased at most automotive accessory outlets.)

5.Take the other end of the 6-gauge (AWG) or a 4-gauge (SAE) insulated 24-inch cable and, standing as far away from the battery as possible, connect the black (NEGATIVE) lead of the charger to the free

end of the cable. Rock the clamp to make a solid connection. IMPORTANT: Wear safety glasses and face away

from the battery while making this final connection.

6.Select the voltage of charge with the Selector Switch and plug the power cord into a grounded AC outlet to begin charging.

7.The charger will not stop when the battery is fully charged. For this reason it is important to check charging progress frequently. Overcharging can damage a battery. You must monitor and unplug charger when battery is fully charged.

8.When the battery is fully charged, unplug the charger

power cord before attempting to disconnect charger clamps.

9.Stand away from the battery and remove the charger leads from the NEGATIVE connection first, then from the POSITIVE battery post.

10. Clean and store the charger in a dry location.

7

NEGATIVE

BATTERY CHARGER

+-

24", 6 GAUGE

POWER

CORD

CABLE


TO


GROUNDED


POWER


OUTLET

Sears 201- Sch 506 1/9/98

Page 8
Image 8
Sears 200.71201 owner manual Charging your battery outside the vehicle, Negative NEG, N

200.71201 specifications

The Sears 200.71201, often recognized for its robust design and multifunctional capabilities, is a versatile device that appeals to a wide range of users from DIY enthusiasts to professional craftsmen. This high-performance tool combines modern technologies with user-friendly features, making it an ideal addition to any workshop or home maintenance arsenal.

One of the standout features of the Sears 200.71201 is its powerful motor, which delivers a consistent and reliable performance. The motor is designed to handle a variety of tasks, whether it's for drilling holes, driving screws, or other related applications. With adjustable speed settings, users can easily manage the tool's velocity, providing precise control according to the task at hand. This adaptability is especially beneficial for projects that require delicate handling or heavy-duty performance.

The ergonomic design of the Sears 200.71201 enhances its usability, allowing for prolonged operation without discomfort. The handle is constructed with a soft-grip material that reduces vibrations, providing a secure hold and greater accuracy. Additionally, the tool's lightweight nature ensures it can be maneuvered easily, even in tight spaces.

Another significant aspect of the Sears 200.71201 is its compatibility with a wide range of accessories. It supports various drill bits and attachments, allowing users to tackle different materials such as wood, metal, and plastic. This versatility extends its functionality, enabling users to accomplish multiple tasks with a single device.

Safety is also a key consideration in the design of the Sears 200.71201. It includes built-in features such as a protective switch and overload protection, which help prevent accidents and damage to the tool and work materials. Users can operate the device with confidence, knowing that it is equipped to handle demanding tasks without compromising on safety.

In summary, the Sears 200.71201 stands out due to its powerful motor, adjustable speed settings, ergonomic design, and compatibility with various accessories. These features make it an indispensable tool for anyone looking to enhance their DIY projects or professional work. Its emphasis on usability and safety further solidifies its reputation as a reliable addition to any toolkit, ensuring users can complete their tasks efficiently and effectively.