OPERATING INSTRUCTIONS
BEFORE OPERATING
Before using your WEEDWACKER read and understand the Safety
Rules for Power Tools.
•Always wear SAFETY GOGGLES.
•Cut to your LEFT s_de.
•Keep people away from you.
•Inspect the areas you are going to trim for wires, cord and any
HOW TO ACTUATE SELF FEEDING CUTTING LINE
t.Plug in power cord.
2.Start motor
3.Tap the hub light_, on
4.Repeat step number 3 to advance additional cutting line. The cutting line will be trimmed automatically by the _ade line cut- ter while motor is running, so don't"tap out" unneCessarily long cutting linelengths.
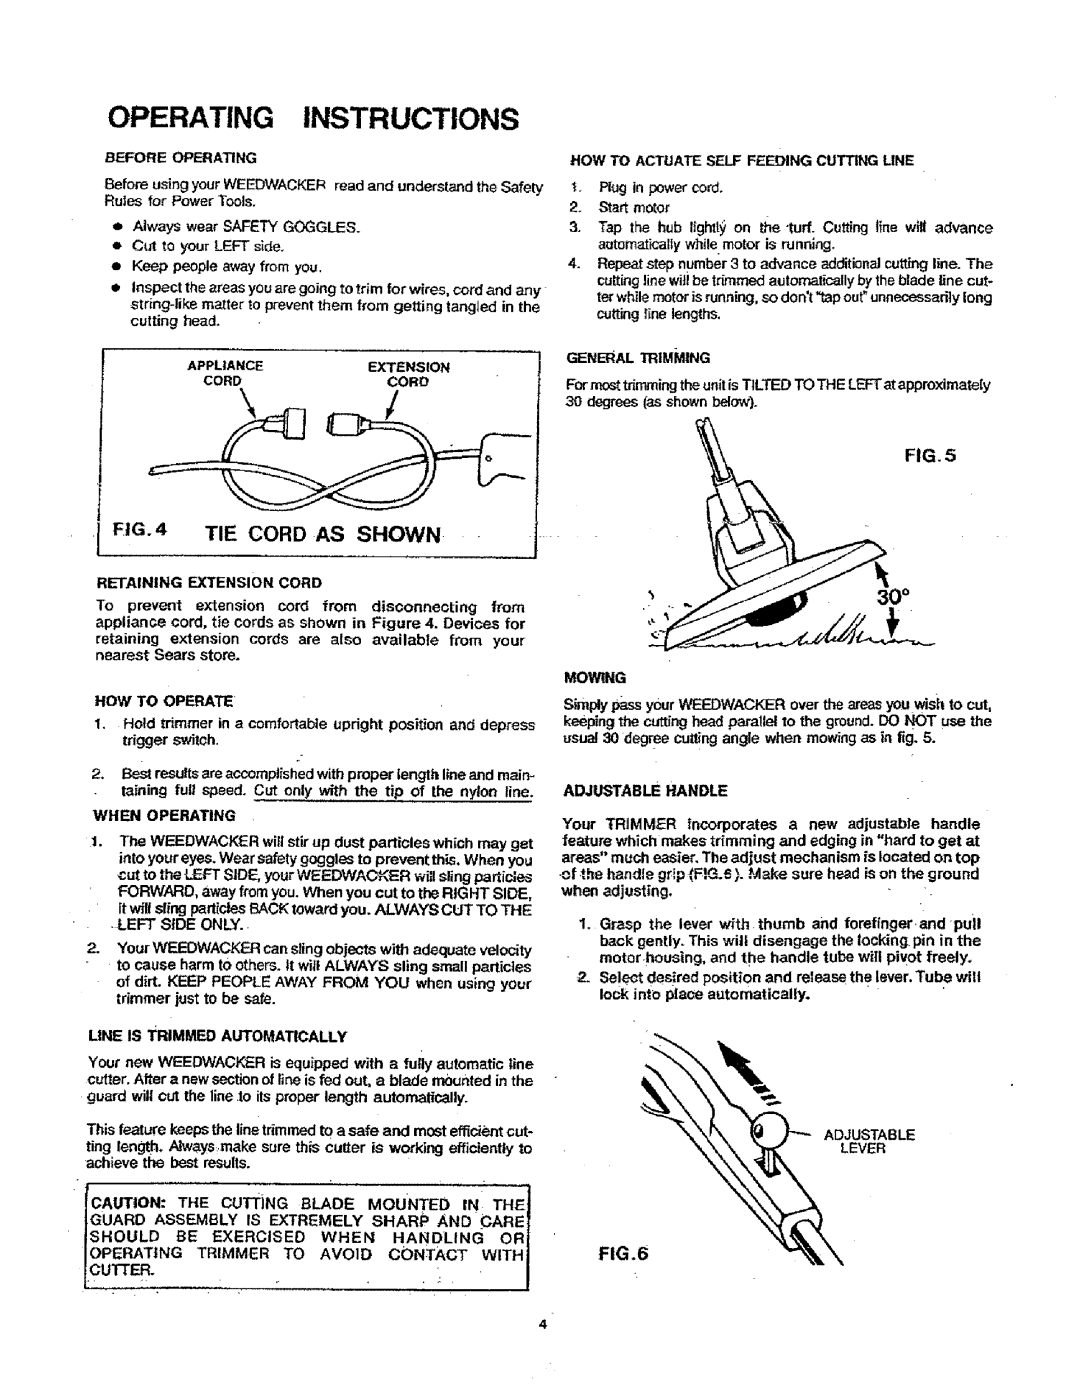
APPLIANCEEXTENSION
CORDCORD
\
FIG.4 TIE CORD AS SHOWN
RETAINING EXTENSION CORD
To prevent extension cord from disconnecting from appliance cord, tie cords as shown in Figure 4. Devices for
retaining extension cords are also available from your nearest Sears store.
HOW TO OPERATE
1, Hotd trimmer in a comfortable upright position and depress trigger switch.
2.Bestresultsare accomplished with proper length line and maim
taining full speed. Cut only with the tip of the nylon line.
WHEN OPERATING
1.The WEEDWACKER will stir up dust particles which may get into your eyes. Wear safety goggles to prevent this. When you cut to the LEFT SIDE, your WEEDWACKER will sling particles FORWARD, away from you. When you cut to the RIGHT SIDE,
it will sling par£[ctesBACK towardyou. ALWAYS CUT TO THE
.LEFT SIDE ONLY..
2.Your WEEDWACKF_Rcan sting objects with adequate velocity to cause harm tO others, it wilt ALWAYS sling small particles of dirt. KEEP PEOPLE AWAY FROM YOU when using your trimmer just to be safe.
UNE IS TRIMMED AUTOMATICALLY
Your new WEEDWACKER is equipped with a fut]y automatic line cutter. After a new section of line is fed out, a blade mounted in the guard will cut the line .to its proper length automatically.
This feature keepsthe line tdmmed to a safe and most efficient cut-
ting length. Always make sure this cutter is wo_'kingefficiently to achieve the best results.
GENERAL TRIMMING
For mosttdmmingthe unitis TILTED TO THE LEFTat approximately 30 degrees (as shownbelow).
FIG.5
0 °
MOWING
Simplypassyour WEEDWACKER over U'mareas you wish to cut, keepingthe cuttinghead parallel to the ground.DO NOT use the usual 30 degree cuing angle when mowing as in lig. 5.
ADJUSTABLE HANDLE
Your TRIMMER incorporates a new adjustable handle feature which makes trimming and edging in "hard to get at areas" much easier, The adjust mechanism is located on top
,P* +tit&'. \ _
1.Grasp the lever with. thumb and forefinger and puil back gently. This will disengage the locking.pin in the motor housing, and th e handle tube will pivot freely.
:2. Select desired position and release the lever. Tube will
Ioc!_into place automatically.
ADJUSTABLE
LEVER
toAUT,oNO0,-THE'B.G.OE.O0. 0INTHEI
tGUARDASSE ,SSLY S.ARPA"DeA" I
JSHOULD BE EXERCISED WHEN HANDLING OR
/OPE"AT'"T"'M"ERTOAVO'OCO.TAOV 'T"i FIG.6
4