Sears 303.147012 manual Amper Blade, Water Supply, #8 Screw

Models: 303.147012

1 13
Download 13 pages 41.26 Kb
Page 6
Image 6

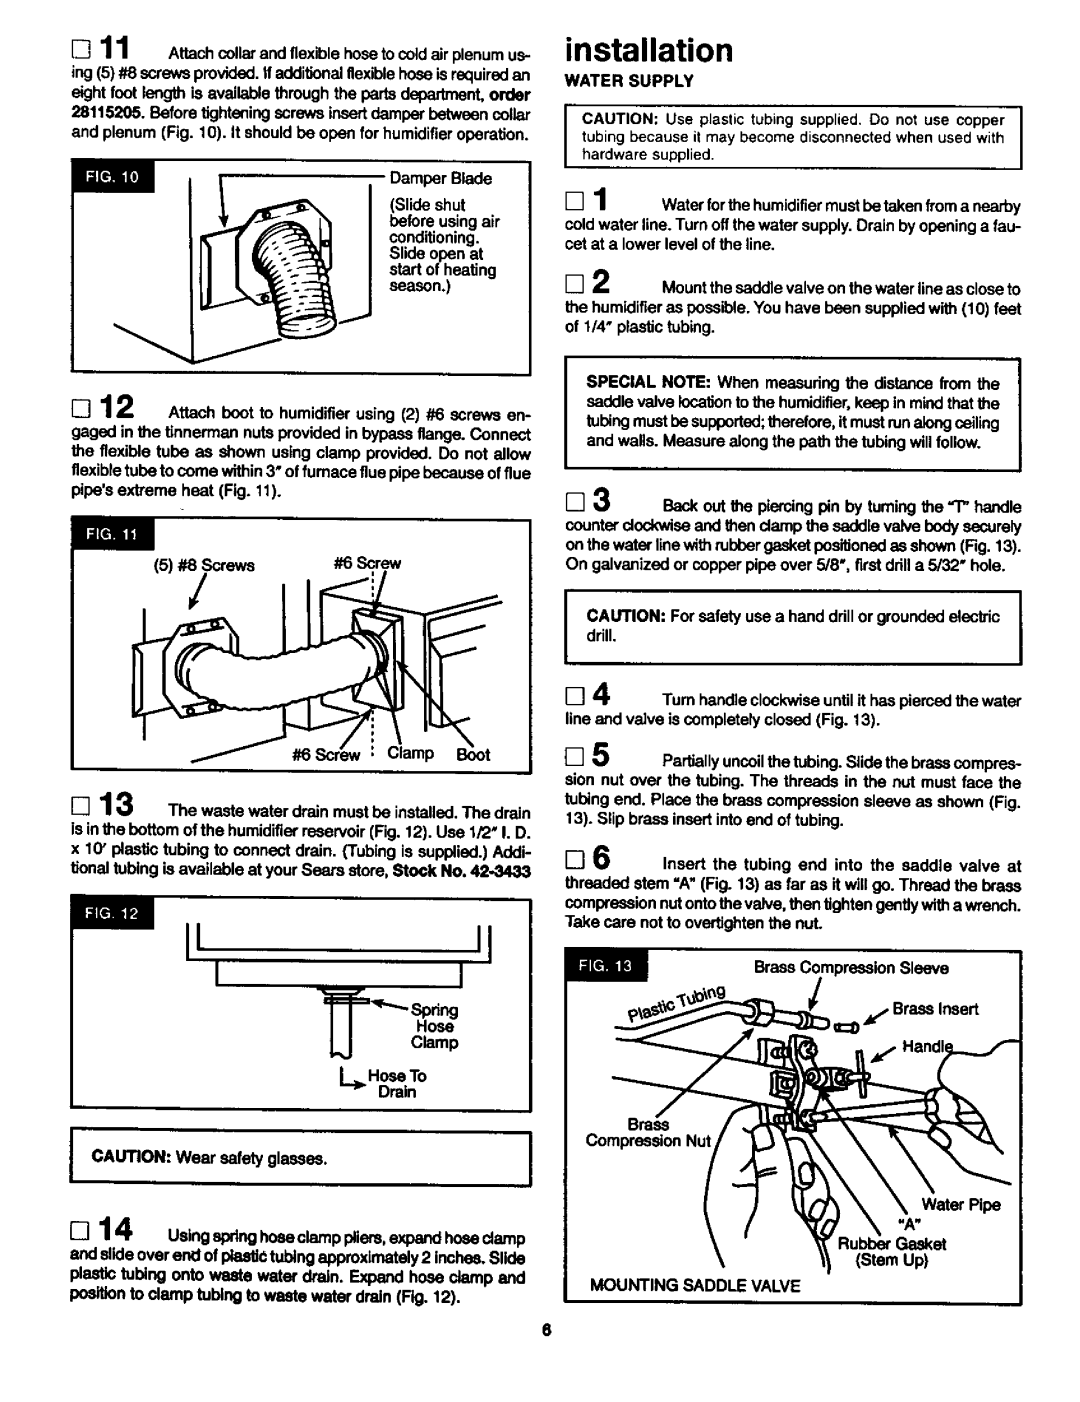
[] 11 Attachcollarand flexiblehoseto cold air plenumus- ing(5) #8 screwsprovided.Ifaddifionaiflexiblehoseis requiredan eightfoot length is availablethroughthe partsdepartment,order 28115205. Beforeflghtening screwsinsertdamperbetweencollar and plenum (Fig. 10). It shouldbe open for humidifieroperation.

(Slideshut beforeusingair

conditioning. Slide openat startof heating

season.)

___

amper Blade

installation

WATER SUPPLY

tubing because it may become disconnected when used with

ICAUTION: Use plastic tubing supplied, Do not use copper hardware supplied.

[] 1 Waterforthe humidifiermustbetakenfroma nearby

coldwater line.Turn offthewater supply.Drain byopeninga fau- cet at a lowerlevel ofthe line.

[] 2 Mountthe saddlevalve on thewater lineas closeto

the humidifieras possible.You have bean suppliedwith(10) feet of 114"plastictubing.

[] 12 Attach boot to humidifierusing (2) #8 screws en-

gaged in the tinnermannuts providedin bypass flange. Connect the flexible tube as shown usingclamp provided.Do not allow flexibletube to come within3" of furnace flue pipebecauseof flue pipe'sextreme heat (Fig. 11).

(5) #8/Screws

#8 Screw

#8 : Clamp

[] 13 The waste water drain mustbe installed.The drain is inthe bottomof the humidifierreservoir(Fig. 12). Use 1/2" I. D.

x10"plasflc tubing to connect drain. (Tubing is supplied.)Addi- tional tubing is available at yourSears store,Stock No. 42-3433

IIIIll

='q_--Spring

°%%

L.> Hose To

Drain

I CAUTION: Wear safety glasses.

I


SPECIAL NOTE: When measuring the distancefrom the saddlevalvelocationtothe humidifier,keep in mindthatthe tubing mustbesupported;therefore, it mustrunalongceiling and walls. Measurealongthe path the tubingwillfollow.

[] 3 _ out the piercingpin by tumingthe "T" handle

counterdockwiseand then clampthe saddlevalve bodysecurely onthe waterlinewith rubber gasketposifionedas shown(Fig. 13). On galvanizedor copper pipe over 5/8", firstdrilla 5/32" hole.

drill.

I AUTION: For safety use a handdrillor groundedelectric

[] 4 Turn handleclockwiseuntilit haspiercedthe water lineand valve iscompletely closed(Fig. 13).

[] 5 Partiallyuncoilthe tubing. Slidethe brasscompres- sion nut over the tubing. The threads in the nut must face the

tubing end. Place the brass compressionsleeve as shown(Fig. 13). Slipbrass insertintoend of tubing.

[] 6 Insert the tubing end into the saddle valve at threaded stem "A" (Fig. 13) as far as it will go. Thread the brass compression nutontothe valve, then tightengentlywith a wrench. Take care notto overtightenthe nut.

Brass CompressionSleeve

f Brass Insert

Brass

CompressionNut

[] 14 Uaingspringhoeaclamppliem,expandhoeaclamp

and slide over en_lof _ tubingapproximately2 inches.Slide

plastictubing onto waste water dr_n. Expandhose clamp and MOUNTING SADDLE VALVE poaiUonto clamp tubingto waste water drain (Fig. 12).

6

Page 6
Image 6
Sears 303.147012 manual Amper Blade, Water Supply, Tubing because it may become disconnected when used with, #8 Screw

303.147012 specifications

The Sears 303.147012 is a fascinating piece of technology that has found its niche among home appliances, particularly in the field of sewing machines. This model has become beloved for its combination of user-friendly features and advanced capabilities, catering to both novice and experienced sewers.

One of the most notable features of the Sears 303.147012 is its versatility. The sewing machine offers a range of stitch options, allowing users to create everything from simple hems to intricate designs. The adjustable stitch length and width provide additional customization, enabling sewers to tailor their projects to their specific needs. This adaptability makes the 303.147012 suitable for various fabrics, including lightweight materials and heavier textiles.

Another significant aspect of this model is its ease of use. The machine is designed with a clear focus on user-friendliness. An intuitive threading system simplifies setup, reducing the barrier for beginners. The machine often comes equipped with a built-in bobbin winder and a drop-in bobbin system, streamlining the sewing process and minimizing downtime. Furthermore, the presence of an automatic needle threader can save time and enhance the overall experience.

Technology is also a cornerstone of the Sears 303.147012. With its robust motor, the machine is capable of handling various sewing tasks efficiently. The direct-drive motor ensures smooth operation, allowing users to navigate through multiple layers of fabric without difficulty. The machine's speed control feature enables sewers to maintain precise control, providing the ability to tackle intricate designs without the risk of making mistakes.

Durability is another trait that stands out in the Sears 303.147012. Built with quality materials, this sewing machine is designed to withstand regular use over time. The metallic frame contributes to its stability, ensuring that it can handle various sewing projects without wobbling or misalignment.

In summary, the Sears 303.147012 sewing machine is a blend of simplicity and advanced features, making it an exceptional choice for sewers at all skill levels. Its range of stitch options, technology-driven efficiency, user-friendly design, and robust construction make it a reliable partner in the creative world of sewing. Whether you are mending a favorite garment or embarking on a new crafting project, the 303.147012 stands out as a versatile tool that can meet diverse sewing needs.