[] 7 Unwind the rest of the tubing. Take care not to Idnk

it. Run the tubing along flat surfaces to the humidifier. Support the

NOTE: The humidistat as supplied is assembled for return

air plenum installation (Fig. 16.).

tubing as needed to avoid contact with furnace.


[] 8 Close previouslyopened faucet.Turn on main wa- ter supply.Place a pail under the end of the tubing.Open the

saddlevalve. Flush the line. Make sure there are no leaks along the lineor at the valve. Turn valve off.

[] 9 With water supply tubing cut to the properlength,

slidethe plasticcompressionnut overthe tubing.Slipbrassinsert intothe end of tubing.

RETURN AIR PLENUM MOUNT

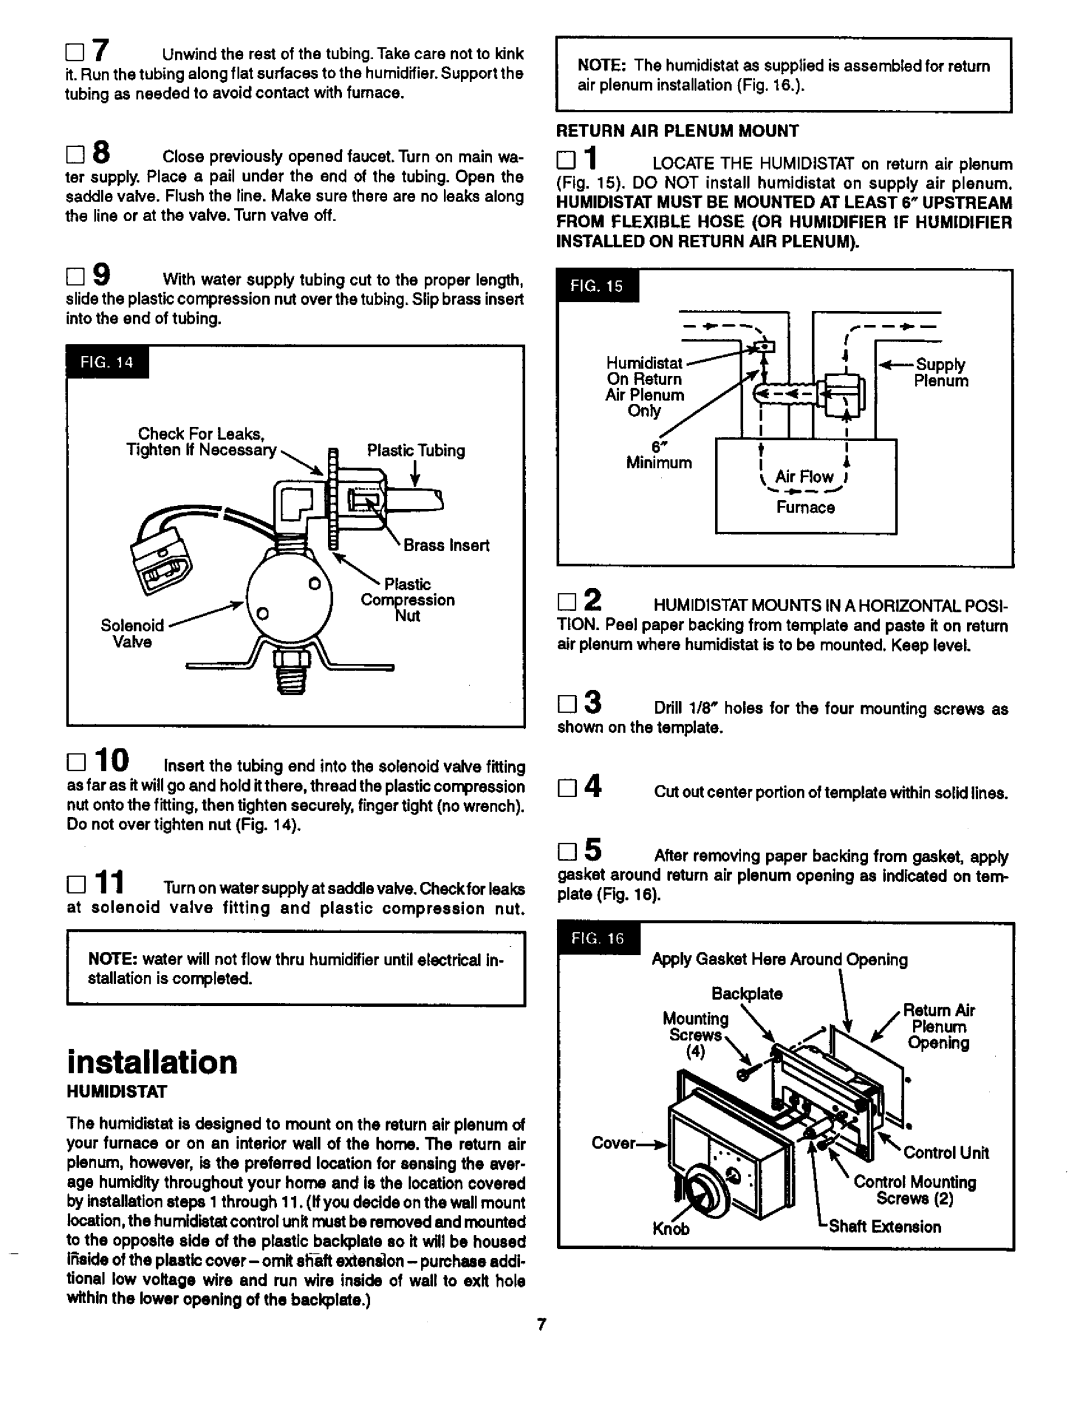
[] 1 LOCATE THE HUMIDISTAT on return air plenum

(Fig, 15). DO NOT install humidistat on supply air plenum.

HUMIDISTAT MUST BE MOUNTED AT LEAST 6" UPSTREAM FROM FLEXIBLE HOSE (OR HUMIDIFIER IF HUMIDIFIER

INSTALLED ON RETURN AIR PLENUM).

Check For Leaks,


Tighten if Necessary._

PlasticTubing

Brass Insert

-- ._.. I

_%

/..i

Humidistat

AirPlenum /I _ I-J'F--_-II

Ononly/Return J,IF,.l[... _,. _ /

6"tI

Minimum IA

I_ Air Flow J

_Fur"'nac_"

--.1_. I

Supply

Plenum

I

I

Compi'ession

Nut

Valve

[] 10 Insertthe tubing end intothe solenoidvalve fitting asfar as if willgo and hold itthere, threadthe plasticcompression nutontothe fitting, then tightensecurely,finger tight(no wrench).

Do not over tighten nut (Fig. 14).

[] 11 Turnon watersupplyat saddlevalve.Checkfor leaks at solenoid valve fitting and plastic compression nut.

I

NOTE: water will not flow thru humidifieruntilelectricalin- I

stallationis completed.

I


installation

HUMIDISTAT

The humidiatatis designedto mounton the returnair plenumof your furnace or on an interior wall of the home. The return air

plenum,however, is the preferred locationfor sensing the ever- age humiditythroughoutyour home and is the locationcovered byinstallationsteps 1 through11. (ifyou decideonthe wall mount location,the humidistatcontrolunitmustbe removedand mounted

to the oppositeside of the plasticbackplateeo it willbe housed l_aideof the plasticcover- omitsllaft extana]on- purchaseaddi- tional low voltage wire and run wire inside of wall to exit hole withinthe loweropening of the backplate.)

[] 2 HUMIDISTATMOUNTS IN A HORIZONTAL POSI-

TION. Peel paper backingfrom template and paste it on return air plenum where humidistatis to be mounted.Keep level.

[] 3 Drill 118" holes for the four mounting screws as shownon the template.

[] 4 cut outcenter portionoftemplatewithinsolidlines.

[] 5After removing paper backing from gasket, apply

gasket around return air plenum opening as indicated on tern- plate (Fig. 16).

ApplyGasket Here AroundOpening

Backplate

MountingPlenum

Screws

(4)Opening

_" ControlUnit

I Mounting

Screws (2)

LSheft Extension

7

Page 7
Image 7
Sears 303.147012 Return AIR Plenum Mount, 6tI Minimum IA Air Flow J Furnac, Valve, Humidistatmounts in a Horizontal Posi

303.147012 specifications

The Sears 303.147012 is a fascinating piece of technology that has found its niche among home appliances, particularly in the field of sewing machines. This model has become beloved for its combination of user-friendly features and advanced capabilities, catering to both novice and experienced sewers.

One of the most notable features of the Sears 303.147012 is its versatility. The sewing machine offers a range of stitch options, allowing users to create everything from simple hems to intricate designs. The adjustable stitch length and width provide additional customization, enabling sewers to tailor their projects to their specific needs. This adaptability makes the 303.147012 suitable for various fabrics, including lightweight materials and heavier textiles.

Another significant aspect of this model is its ease of use. The machine is designed with a clear focus on user-friendliness. An intuitive threading system simplifies setup, reducing the barrier for beginners. The machine often comes equipped with a built-in bobbin winder and a drop-in bobbin system, streamlining the sewing process and minimizing downtime. Furthermore, the presence of an automatic needle threader can save time and enhance the overall experience.

Technology is also a cornerstone of the Sears 303.147012. With its robust motor, the machine is capable of handling various sewing tasks efficiently. The direct-drive motor ensures smooth operation, allowing users to navigate through multiple layers of fabric without difficulty. The machine's speed control feature enables sewers to maintain precise control, providing the ability to tackle intricate designs without the risk of making mistakes.

Durability is another trait that stands out in the Sears 303.147012. Built with quality materials, this sewing machine is designed to withstand regular use over time. The metallic frame contributes to its stability, ensuring that it can handle various sewing projects without wobbling or misalignment.

In summary, the Sears 303.147012 sewing machine is a blend of simplicity and advanced features, making it an exceptional choice for sewers at all skill levels. Its range of stitch options, technology-driven efficiency, user-friendly design, and robust construction make it a reliable partner in the creative world of sewing. Whether you are mending a favorite garment or embarking on a new crafting project, the 303.147012 stands out as a versatile tool that can meet diverse sewing needs.