Before You Begin
AssemblyÑCont.
Congratulations for purchasing the innovative PROFORM¨ AB RESISTER. The AB RESISTER is designed to shape your upper abs, obliques, and lower abs to give you a firm, flat stomach, in only minutes a day. The unique AB RESISTER supports your head and neck as you exercise, and helps you maintain correct form for maximum results. Used as part of a fitness pro- gram that includes regular aerobic exercise and a proper diet, the AB RESISTER will help you to look better, feel better, and enjoy the benefits of better fitness.
Before you use the AB RESISTER, please read this
manual carefully. In addition, be sure to view the included videocassette. If you have additional questions, please call our
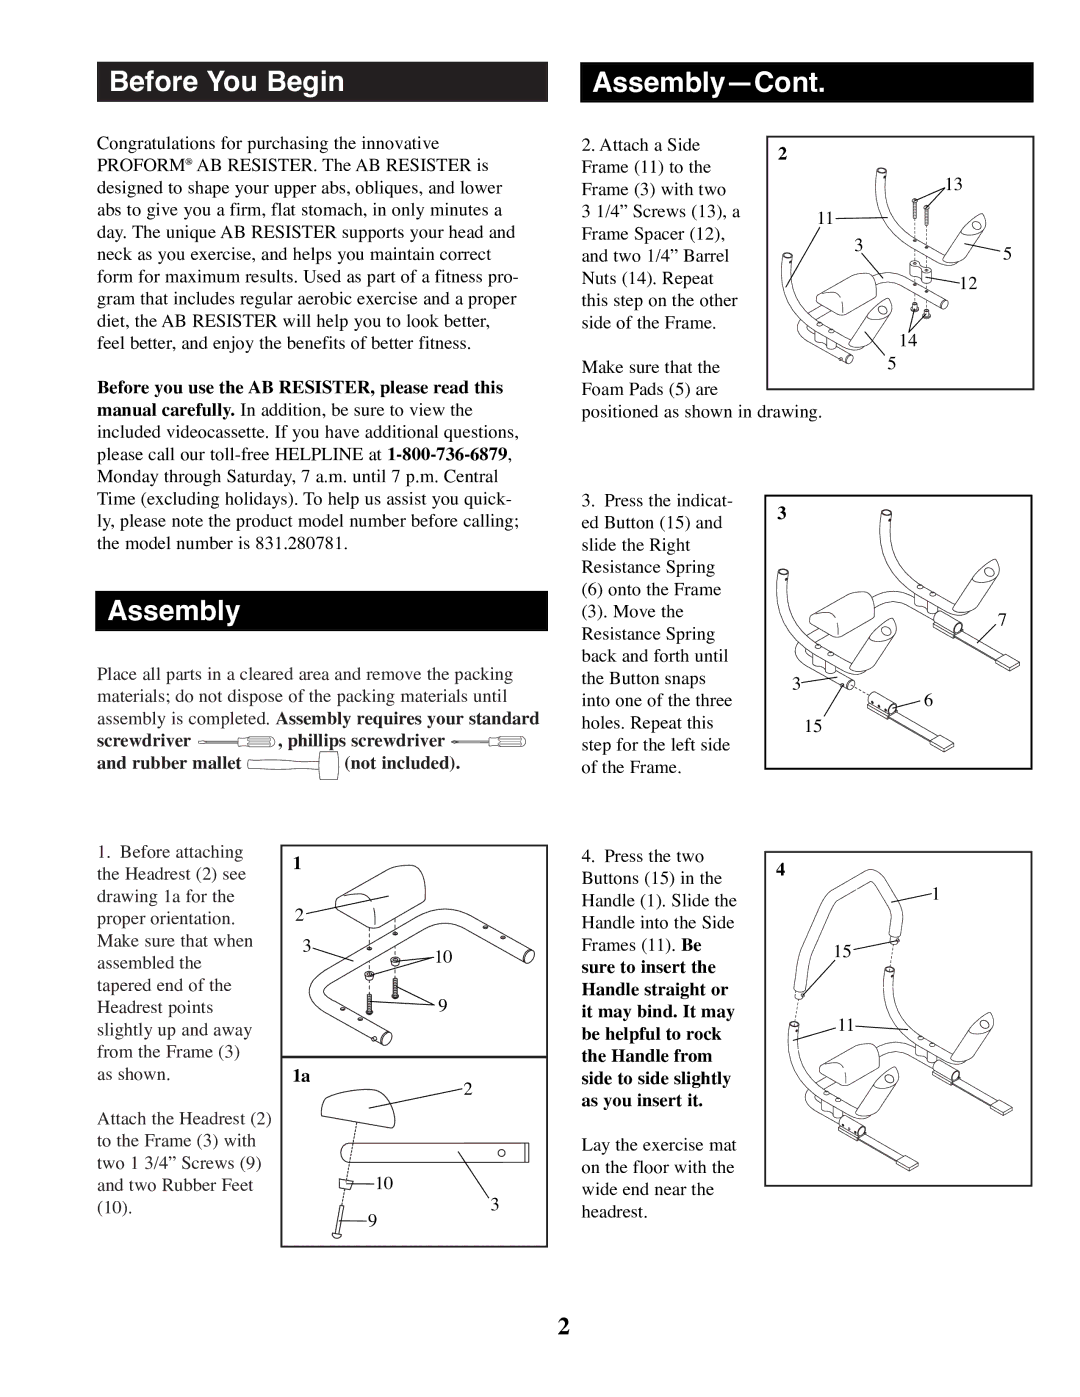
2. Attach a Side | 2 |
|
|
Frame (11) to the |
|
| |
|
| 13 | |
Frame (3) with two |
|
| |
3 1/4Ó Screws (13), a | 11 |
|
|
Frame Spacer (12), |
|
| |
| 3 | 5 | |
and two 1/4Ó Barrel |
| ||
|
| ||
Nuts (14). Repeat |
|
| 12 |
this step on the other |
|
| |
|
|
| |
side of the Frame. |
|
| 14 |
|
|
| |
Make sure that the |
|
| 5 |
Foam Pads (5) are |
|
|
|
positioned as shown in drawing. |
|
| |
Time (excluding holidays). To help us assist you quick- ly, please note the product model number before calling; the model number is 831.280781.
Assembly
Place all parts in a cleared area and remove the packing materials; do not dispose of the packing materials until assembly is completed. Assembly requires your standard
screwdriver ![]() , phillips screwdriver
, phillips screwdriver ![]()
![]()
and rubber mallet ![]() (not included).
(not included).
3.Press the indicat- ed Button (15) and slide the Right Resistance Spring
(6) onto the Frame
(3). Move the Resistance Spring back and forth until the Button snaps into one of the three holes. Repeat this step for the left side of the Frame.
3 |
7 |
3 |
6 |
15 |
1.Before attaching the Headrest (2) see drawing 1a for the proper orientation. Make sure that when assembled the tapered end of the Headrest points slightly up and away from the Frame (3) as shown.
Attach the Headrest (2) to the Frame (3) with two 1 3/4Ó Screws (9) and two Rubber Feet (10).
1 |
|
2 |
|
3 | 10 |
| |
| 9 |
1a | 2 |
| |
| 10 |
| 3 |
| 9 |
4.Press the two Buttons (15) in the Handle (1). Slide the Handle into the Side Frames (11). Be sure to insert the Handle straight or it may bind. It may be helpful to rock the Handle from side to side slightly as you insert it.
Lay the exercise mat on the floor with the wide end near the headrest.
4 |
1 |
15 |
11 |
2
