6.Connect the clamp to the battery post and twist or rock back and forth to make a solid connection. This will help keep the clamps from slipping off the posts and causing sparks.

7.Select the charge rate with the Selector Switch then plug the power cord into a grounded AC outlet to begin charging.

8.The charger will not stop when the battery is fully charged. For this reason it is important to check charging progress frequently. Overcharging can damage a battery, you must monitor and unplug charger when battery is fully charged.

9.When the battery is fully charged, the AMMETER pointer will fall to about half the charge rate selected. For specific positions, refer to the

“Ammeter” section in “Using your battery charger” on a page 6.

10.When the battery is fully charged, unplug the charger power cord before attempting to disconnect charger clamps.

11.Standing away from the battery, remove the charger clamps in this order: (1) from the chassis connection and, (2) from the battery post or terminal.

12.Clean and store the battery charger in a dry location.

Charging your battery outside the vehicle:

1.Remove the battery from vehicle, making sure to disconnect grounded terminal first with all accessories and lights turned off in the vehicle.

2.Check the polarity of the battery posts as indicated on the battery case: POSITIVE (POS, P, +) and NEGATIVE (NEG, N, -).

NOTE: On top-post batteries, the positive battery terminal usually has a larger diameter than the negative one.

3.Connect the red (POSITIVE) charger clamp to the POSITIVE post of the battery. Be sure to rock the clip back and forth to make a solid connection.

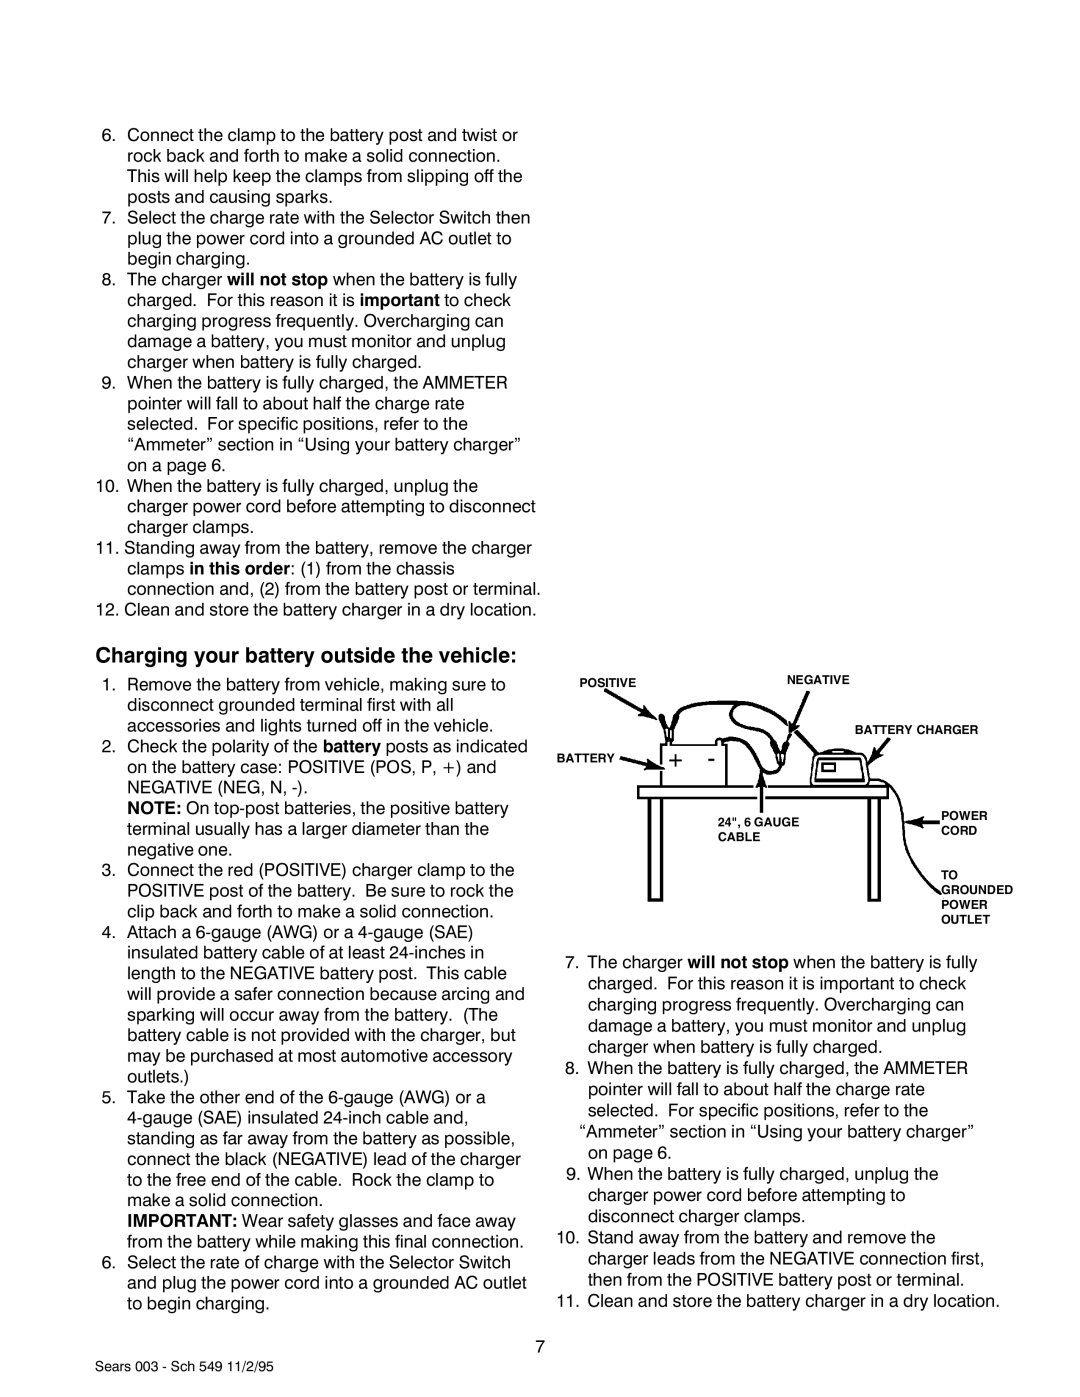
4.Attach a 6-gauge (AWG) or a 4-gauge (SAE) insulated battery cable of at least 24-inches in length to the NEGATIVE battery post. This cable will provide a safer connection because arcing and sparking will occur away from the battery. (The battery cable is not provided with the charger, but may be purchased at most automotive accessory outlets.)

5.Take the other end of the 6-gauge (AWG) or a 4-gauge (SAE) insulated 24-inch cable and, standing as far away from the battery as possible, connect the black (NEGATIVE) lead of the charger to the free end of the cable. Rock the clamp to make a solid connection.

IMPORTANT: Wear safety glasses and face away from the battery while making this final connection.

6.Select the rate of charge with the Selector Switch and plug the power cord into a grounded AC outlet to begin charging.

7

POSITIVENEGATIVE

BATTERY CHARGER

BATTERY + -

24", 6 GAUGE

POWER

CORD

CABLE


TO


GROUNDED


POWER


OUTLET

7.The charger will not stop when the battery is fully charged. For this reason it is important to check charging progress frequently. Overcharging can damage a battery, you must monitor and unplug charger when battery is fully charged.

8.When the battery is fully charged, the AMMETER pointer will fall to about half the charge rate selected. For specific positions, refer to the

“Ammeter” section in “Using your battery charger” on page 6.

9.When the battery is fully charged, unplug the charger power cord before attempting to disconnect charger clamps.

10.Stand away from the battery and remove the charger leads from the NEGATIVE connection first, then from the POSITIVE battery post or terminal.

11.Clean and store the battery charger in a dry location.

Sears 003 - Sch 549 11/2/95

Page 8
Image 8
Sears 47003 owner manual Charging your battery outside the vehicle

47003 specifications

Sears 47003, a significant entry in the realm of power tools, has garnered attention for its innovative features and robust design. As part of Sears’ extensive lineup, this model combines reliability with performance, catering to both DIY enthusiasts and professional tradespeople alike.

One of the standout features of the Sears 47003 is its powerful motor, which ensures efficient operation across a variety of tasks. The motor’s design not only enhances durability but also provides consistent power, making it suitable for heavy-duty projects. Users have emphasized the tool's ability to handle tough materials, offering a seamless experience whether you're cutting wood, metal, or plastic.

The ergonomic design of the Sears 47003 further elevates its usability. The handle is crafted to reduce fatigue, allowing for extended periods of use without compromising comfort. This thoughtful construction incorporates soft grip materials, ensuring a secure hold even in the most challenging settings. Additionally, the balanced weight distribution of the tool helps to prevent strain on the arms and wrists, making it an excellent choice for longer jobs.

Technologically, the Sears 47003 is equipped with an advanced electronic speed control feature. This allows users to adjust the speed to match the specific requirements of their task, providing greater precision and control. Furthermore, the integrated safety features, such as a blade guard and an emergency shut-off switch, showcase Sears’ commitment to user security, making it an even more attractive option for both novices and experts.

Another important characteristic of the 47003 is its compatibility with a wide range of accessories. This versatility not only enhances its functionality but also enables users to customize their tool setup according to their specific project needs. Whether you require precision drilling or more robust cutting, the comprehensive accessory options afford users the freedom to adapt the tool as necessary.

In summary, the Sears 47003 stands out in the competitive power tool market due to its powerful motor, ergonomic design, advanced technological features, and versatile compatibility. Whether tackling home improvement projects or engaging in professional work, this tool is engineered to meet a variety of demands, making it a valuable addition to any toolkit.