ELECTRICALCONNECTIONS


ELECTRICALCONNECTIONS


FOR 3-WIRE SYSTEM


FOR 4-WIRE SYSTEM


ELECTR/CDryer

I [

ELECTR/C Dryer

]


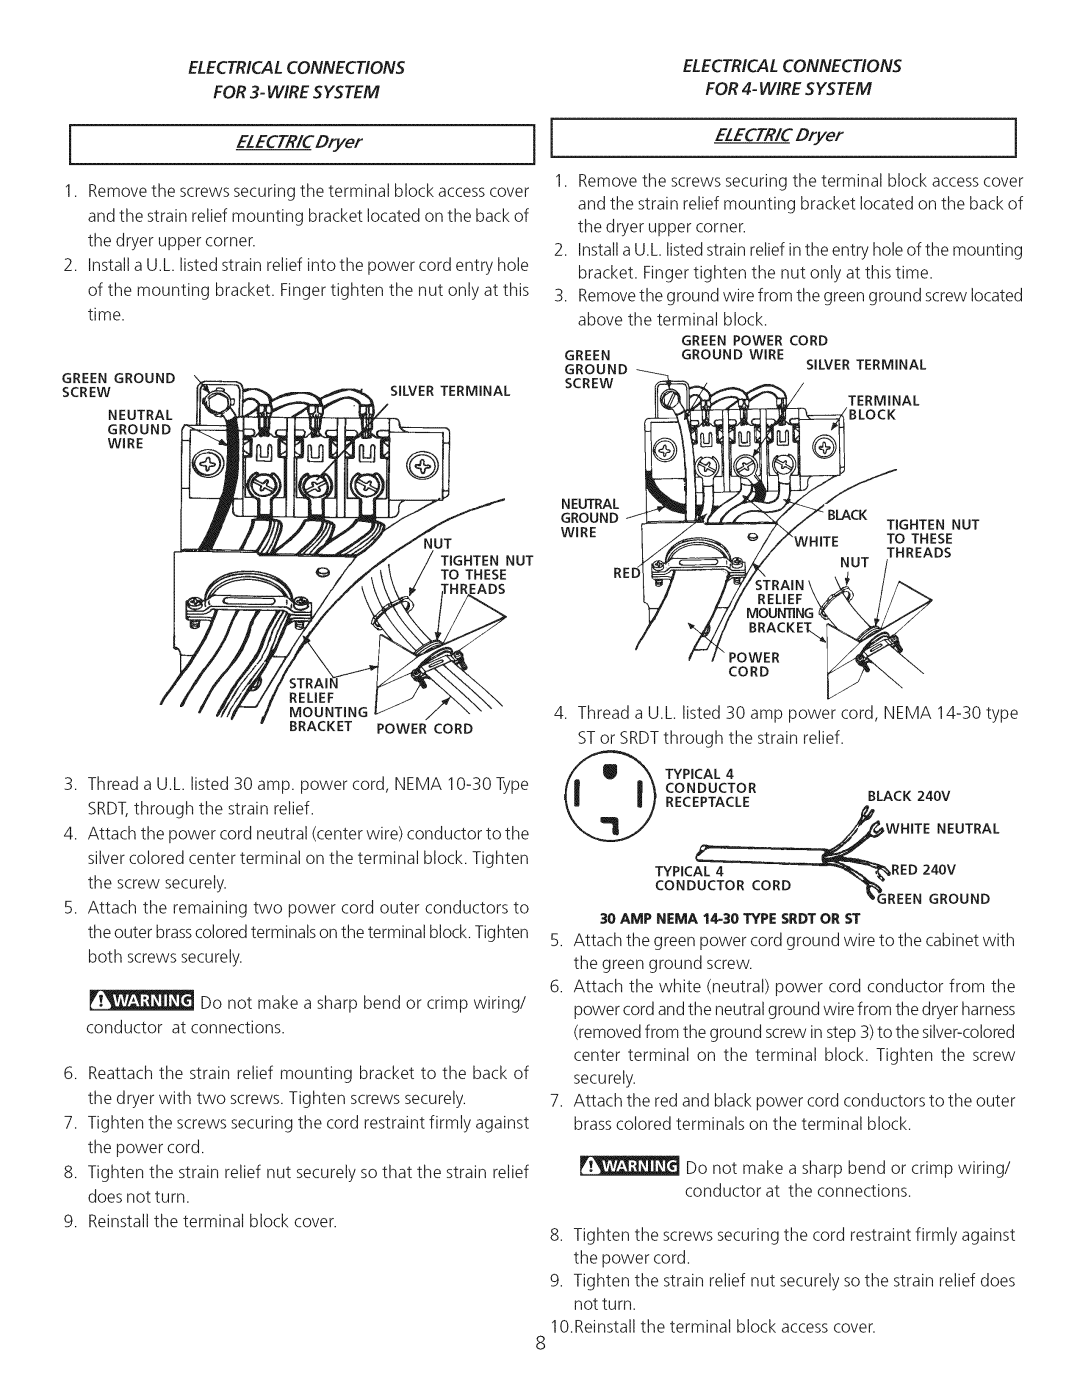
1.Remove the screws securing the terminal block accesscover and the strain relief mounting bracket located on the back of the dryer upper corner.

2.Install a U.L. listed strain relief into the power cord entry hole of the mounting bracket. Finger tighten the nut only at this time.

GREEN GROUND

SILVER TERMINAL

SCREW

NEUTRAL


GROUND


WIRE


NUT

TIGHTEN NUT

TO THESE

EADS

RELIEF

MOUNTING

BRACKET POWER CORD

3.Thread a U.L. listed 30 amp. power cord, NEMA 10-30 Type SRDT,through the strain relief.

4.Attach the power cord neutral (center wire) conductor to the silver colored center terminal on the terminal block. Tighten the screw securely.

5.Attach the remaining two power cord outer conductors to the outer brasscolored terminals on the terminal block. Tighten both screws securely.

Do not make a sharp bend or crimp wiring/ conductor at connections.

6.Reattach the strain relief mounting bracket to the back of the dryer with two screws. Tighten screws securely.

7.Tighten the screws securing the cord restraint firmly against the power cord.

8.Tighten the strain relief nut securely so that the strain relief does not turn.

9.Reinstall the terminal block cover.

1.Remove the screws securing the terminal block accesscover and the strain relief mounting bracket located on the back of the dryer upper corner.

2.Install a U.L. listedstrain relief in the entry hole of the mounting bracket. Finger tighten the nut only at this time.

3.Removethe ground wire from the green ground screw located above the terminal block.


GREEN POWER CORD

GREEN

GROUND

WIRE

GROUND


SILVER TERMINAL

SCREW ----_

____

TERMINAL

GROUND

11

_

_

;/J-BLACK

TIGHTEN NUT

WIRE


_


_/ _<WHITE

TO THESE


/f!Z::_--_%-

//

NUT THREADS


REI_

_ELIEF

STRAIN _

/_

D/

4.Thread a U.L. listed 30 amp power cord, NEMA 14-30 type ST or SRDTthrough the strain relief.

TYPICAL 4


CONDUCTOR

BLACK 240V

RECEPTACLE


WHITE NEUTRAL

TYPICAL 4

__RED

240V

CONDUCTOR CORD

_%"

GROUND


_GREEN

30 AMP NEMA 14-30TYPE SRDT OR ST

5.Attach the green power cord ground wire to the cabinet with the green ground screw.

6.Attach the white (neutral) power cord conductor from the power cord and the neutral ground wire from the dryer harness (removed from the ground screw in step 3) to the silver-colored center terminal on the terminal block. Tighten the screw securely.

7.Attach the red and black power cord conductors to the outer brass colored terminals on the terminal block.

Do not make a sharp bend or crimp wiring/ conductor at the connections.

8.Tighten the screws securing the cord restraint firmly against the power cord.

9.Tighten the strain relief nut securely so the strain relief does not turn.

l O.Reinstall the terminal block accesscover.

Page 8
Image 8
Sears 74182, 64182 manual Electricalconnections For 3-WIRE System For 4-WIRE System

74182, 64182 specifications

Sears 64182 and 74182 are two models that represent a significant part of the retailer's history, showcasing innovations in home appliances and the evolution of consumer technology. Both models have stood out in the market for their reliability, performance, and user-friendly features.

The Sears 64182 is known for its compact design, making it an ideal choice for those looking to maximize space without sacrificing functionality. This model boasts a robust motor that provides efficient performance across various applications, from cooking to cleaning. One of its hallmark features is the multi-functionality that allows it to serve as both a toaster oven and a broiler, providing great versatility for culinary enthusiasts. Its easy-to-read control panel and adjustable temperature settings make it accessible for users of all skill levels.

On the other hand, the Sears 74182 has garnered acclaim for its larger capacity and advanced technological features. It is designed to accommodate families or those who frequently entertain guests. The 74182 incorporates a state-of-the-art convection cooking system that ensures even heat distribution, resulting in perfectly cooked meals with a crisp exterior and moist interior. Additionally, it comes equipped with a digital timer and an intuitive interface, allowing users to set cooking times with precision and ease.

Both models prioritize energy efficiency, reflecting a growing trend in consumer appliances. They are built with insulation materials that minimize heat loss while consuming fewer resources, which helps reduce electricity bills and environmental impact. Moreover, the Sears 64182 and 74182 have been designed with safety in mind, featuring automatic shut-off systems that prevent overheating and ensure user safety during operation.

Another important characteristic of these models is their ease of cleaning, which has been enhanced by non-stick surfaces and removable components that simplify the maintenance process. This focus on practicality extends to their aesthetic appeal, with modern designs that can seamlessly blend into various kitchen styles.

In summary, the Sears 64182 and 74182 models highlight the brand's commitment to quality and innovation. With their combination of functionality, advanced technologies, and consumer-friendly features, these appliances serve as excellent examples of what modern home goods can offer, making them valuable additions to any household.