OPERATION
_ | The operation | of any | tractor can result | in foreign | objects | thrown | into | the | eyes, | which can | ||||
| result | in severe | eye | damage, | Always | wear | safety | glasses | or eye | shields | while | operating | ||
| your | tractor or performing any | adjustments | or repairs. We recommend | a wide vision | safety | ||||||||
| mask over the spectacles or standard safety glasses, | ,i i, |
|
| .... | i , | ii,li,_ | |||||||
|
| ..... n |
|
|
|
|
|
|
|
| ||||
..............................................,,u ,,i i,un,,,
HOW TO USE YOUR TRACTOR
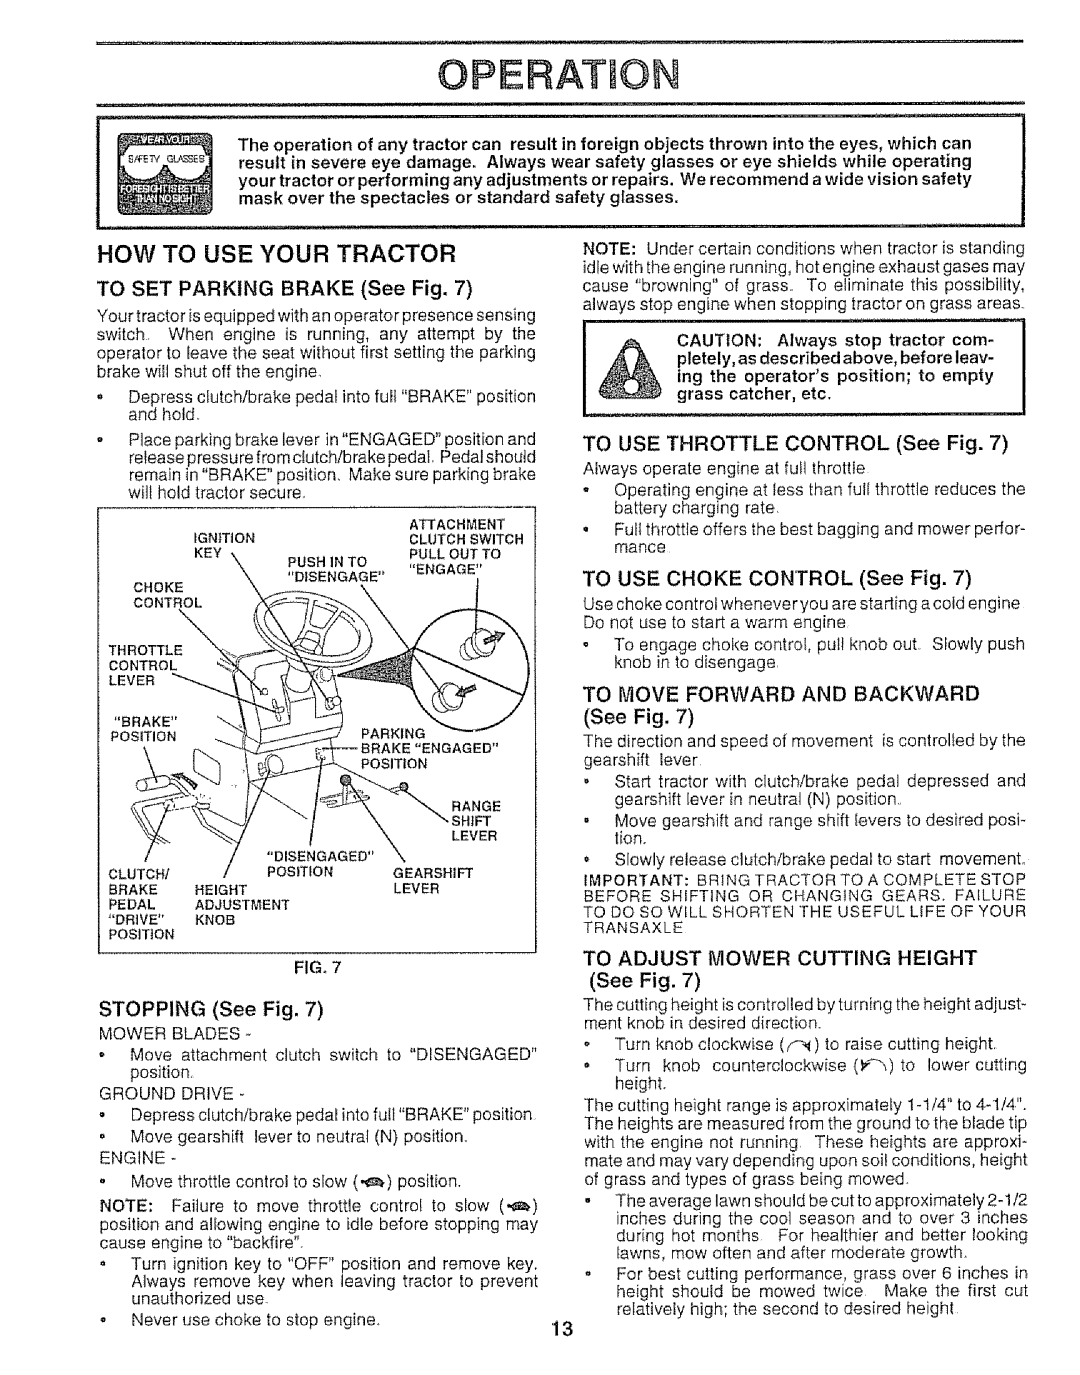
TO SET PARKING BRAKE (See Fig. 7)
Your tractor is equipped with an operator presence sensing switch When engine is running, any attempt by the operator to leave the seat without first setting the parking brake witt shut off the engine,
. Depress clutch/brake pedal into full "BRAKE" position and hold
Place parking brake lever in "ENGAGED" position and release pressure from clutch/brake pedal Pedalshoutd remain in "BRAKE" position, Make sure parking brake will hold tractor secure_
ATTACHMENT
IGNITIONCLUTCH SWlTCH
KEYPULLOUTTO
PUSHINTO "ENGAGE" "DISENGAGE"
CHOKE CONTROL
THROTTLE
CONTROL
LEVER
NOTE: Under certain conditions when tractor is standing idle with the engine running, hot engine exhaust gases may cause "browning" of grass., To eliminate this possibility, always stop engine when stopping tractor on grass areas.,
, | ,, | ,n | ,, H ,i i, | i, ,, |
pletely, as described above, before leav-
CAUTION:theoperator'sAlwaysingposition;stoptractor emptycom- grass catcher, etc.
TO USE THROTTLE CONTROL (See Fig. 7)
Always operate engine at futl throttle
-Operating engine at less than full throttle reduces the battery charging rate,
•Full throttle offers the best bagging and mower perfor- mance
TO USE CHOKE CONTROL (See Fig. 7)
Use choke control whenever you are starting a cold engine Do not use to start a warm engine
. To engage choke control, pull knob out Slowly push knob in to disengage
|
| RANGE |
|
| "SHIFT |
|
| LEVER |
| "DISENGAGED" |
|
CLUTCH/ | POSITION | GEARSHIFT |
BRAKE | HEIGHT | LEVER |
PEDAL | ADJUSTMENT |
|
"DRIVE" | KNOB |
|
POSITION |
|
|
FIG_ 7
STOPPING (See Fig. 7)
MOWER BLADES -
. Move attachment clutch switch to "DISENGAGED" position,
GROUND DRIVE -
•Depress clutch/brake pedal into futl "BRAKE" position = Move gearshift !ever to neutral (N) position,,
ENGINE -
. Move throttle control to slow (,_) position,
NOTE: Failure to move throttle control to slow (._) position and a!lowing engine to idle before stopping may cause engine to "backfire".
=Turn ignition key to "OFF" position and remove key.
Always remove key when leaving tractor to prevent unauthorized use°
o Never use choke to stop engine. | 13 |
|
TO MOVE FORWARD AND BACKWARD
(See Fig. 7)
The direction and speed of movement is controlled by the gearshift Iever
,Start tractor with clutch/brake pedal depressed and gearshift lever in neutral (N) position.
. Move gearshift and range shift levers to desired posi- tion.
. Slowly release clutch/brake pedal to start movement,
IMPORTANT: BRING TRACTOR TO A COMPLETE STOP BEFORE SHIFTING OR CHANGING GEARS. FAILURE
TO DO SO WILL SHORTEN "],'HEUSEFUL LIFE OF YOUR TRANSAXLE
TO ADJUST MOWER CUTTING HEIGHT (See Fig. 7)
The cutting height is controlled by turning the height adjust- merit knob in desired direction.
o Turn knob clockwise (f_) to raise cutting height
•Turn knob counterclockwise (_'_"_)to lower cutting height.
The cutting height range is approximately
•The average lawn should be cut to approximately
°For best cutting performance, grass over 6 inches in height should be rnowed twice Make the first cut relatively high; the second to desired height