MAINTENANCE / HELPFUL HINTS

B. Wet outer edge of "O" Ring with detergent solution.

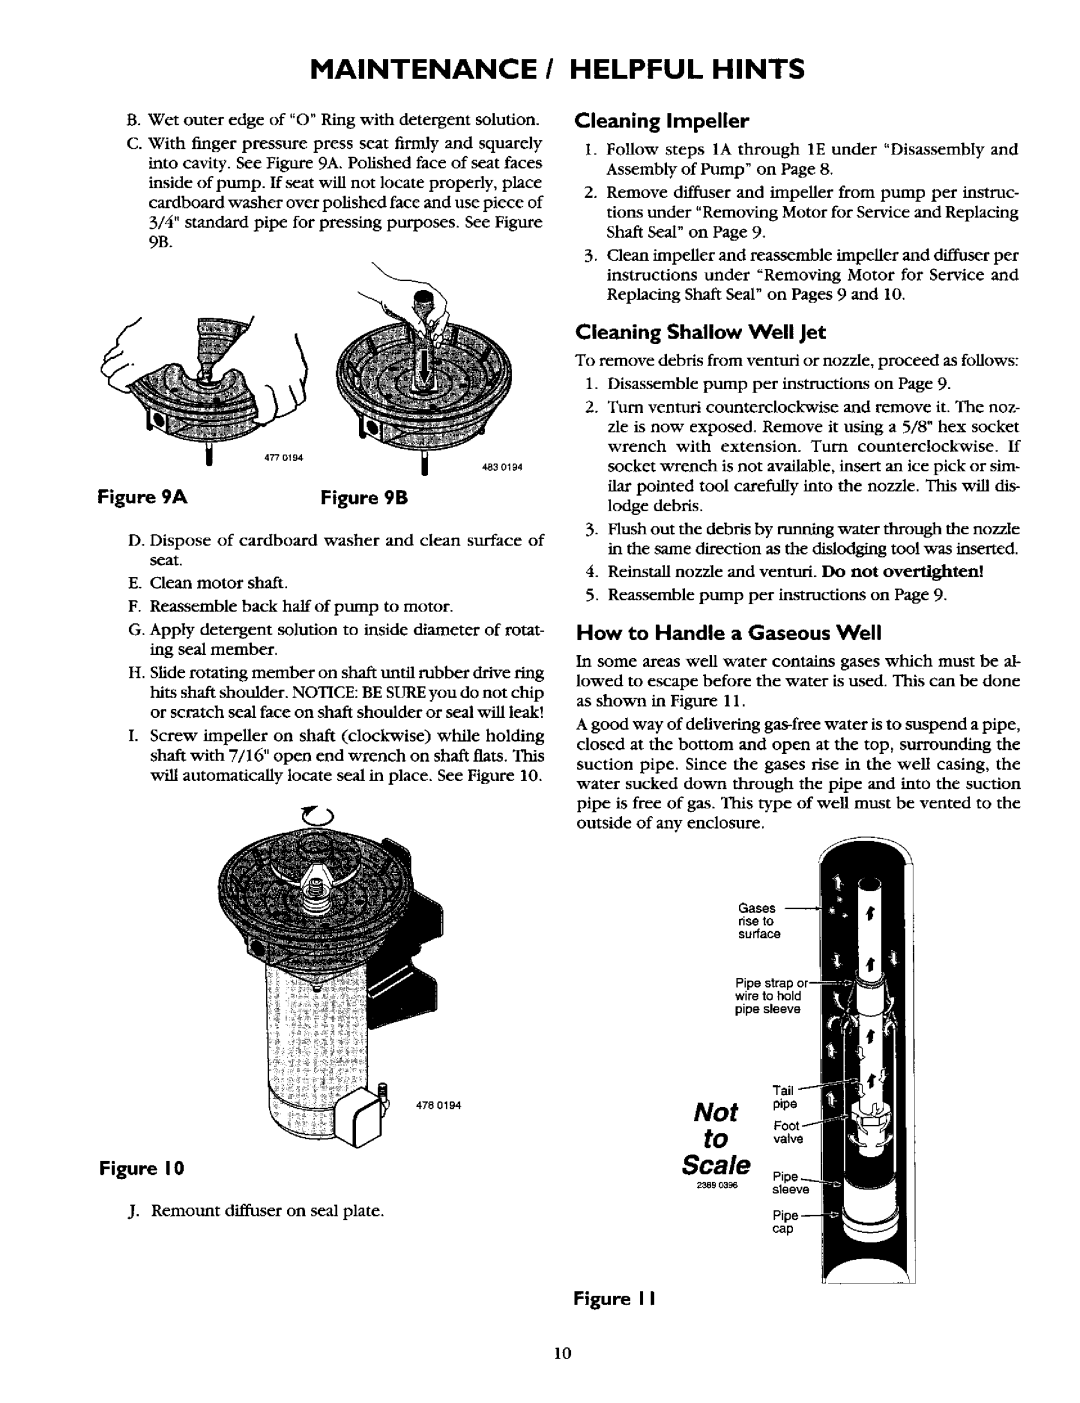
C. With finger pressure press seat firmly and squarely into cavity. See Figure 9A. Polished face of seat faces inside of pump. If seat vdll not locate properly, place

cardboard washer over polished face and use piece of

3/4" standard pipe for pressing purposes. See Figure 9B.

Cleaning Impeller

I. Follow steps 1A through 1E under "Disassembly and Assembly of Pump" on Page 8.

2.Remove diffuser and impeller from pump per instruc- tions under "Removing Motor for Service and Replacing Shaft Seal" on Page 9.

3.Clean impeller and reassemble impeller and diffuser per

instructions under "Removing Motor for Service and Replacing Shaft Seal" on Pages 9 and 10.

483 0194

Figure 9A

Figure 9B

D. Dispose of cardboard washer and clean surface of seat.

E. Clean motor shaft.

F. Reassemble back half of pump to motor.

G. Apply detergent solution to inside diameter of rotat- ing seal member.

H. Sfide rotating member on shaft until rubber drive ring hits shaft shoulder. NOTICE: BE SURE you do not chip or scratch seal face on shaft shoulder or seal v_Rl leak!

I. Screw impeller on shaft (clockwise) while holding shaft with 7/16" open end wrench on shaft flats. This

will automatically locate seal in place. See Figure 10.

Cleaning Shallow Well Jet

To remove debris from venturi or nozzle, proceed as follows:

1.Disassemble pump per instructions on Page 9.

2.Turn venturi counterclockwise and remove it. The noz-

zle is now exposed. Remove it using a 5/8" hex socket

wrench with extension. Turn counterclockwise. If socket wrench is not available, insert an ice pick or sim-

ilar pointed tool carefully into the nozzle. This will dis- lodge debris.

3.Flush out the debris by running water through the nozzle in the same direction as the dislodging tool was inserted.

4.Reinstall nozzle and venturi. Do not overtighten!

5.Reassemble pump per instructions on Page 9.

How to Handle a Gaseous Well

In some areas well water contains gases which must be al- lowed to escape before the water is used. This can be done as shown in Figure 11.

A good way of delivering gas-free water is to suspend a pipe,

closed at the bottom and open at the top, surrounding the suction pipe. Since the gases rise in the well casing, the

water sucked down through the pipe and into the suction pipe is free of gas. This type of well must be vented to the outside of any enclosure.

_ase$

riseto surface

wire to hold

pipe sleeve

478

0194

Not

pip°


tovalve

Figure I 0

Scale

2369 _396sleeve

J. Remount diffuser on seal plate.

cap

Figure I I

10

Page 10
Image 10
Sears 390.2521 Maintenance / Helpful Hints, Cleaning Impeller, How to Handle a Gaseous Well, Cleaning Shallow Well Jet

390.2521 specifications

The Sears 390.2521 is a notable addition to the world of household appliances, particularly recognized for its versatility and user-friendly design. This multi-functional device is primarily known as a microwave oven, making it a staple in many kitchens. With its compact build and efficient performance, the 390.2521 caters to various cooking needs, from heating leftovers to preparing entire meals.

One of the main features of the Sears 390.2521 is its powerful microwave generator, which typically operates at a wattage of around 900 watts. This ensures that food heats evenly and efficiently, reducing cooking time and energy consumption. The model's sleek design includes a spacious interior that can accommodate large dishes, making it suitable for family meals or batch cooking.

The 390.2521 comes equipped with a variety of cooking presets, allowing users to quickly select the appropriate settings for different types of food. These presets include options for popcorn, pizza, and beverages, among others. The intuitive control panel is designed for ease of use, featuring soft-touch buttons and a digital display that clearly indicates cooking times and power levels.

In terms of safety features, the Sears 390.2521 includes a child lock function to prevent accidental operation, making it a trustworthy option for families with young children. Additionally, the appliance is fitted with an automatic shut-off system, which activates at the end of the cooking cycle to prevent overheating and ensure safe use.

Technologically, the 390.2521 leverages the latest advancements in microwave technology. Its sleek interior design is easy to clean, thanks to a non-stick coating that resists food buildup. The turntable feature ensures even cooking by rotating food for optimal heat distribution, which is particularly beneficial when reheating or defrosting.

Another noteworthy characteristic of the Sears 390.2521 is its energy efficiency. The appliance is designed to minimize energy consumption, which is an essential consideration for environmentally conscious consumers. Its compact size also makes it easy to fit into various kitchen layouts, offering both functionality and aesthetic appeal.

In conclusion, the Sears 390.2521 microwave oven stands out in the competitive kitchen appliance market due to its combination of power, safety features, and user-centric design. Whether for quick heating, defrosting, or cooking, this model serves as a reliable and stylish option for any modern kitchen, making meal preparation faster and more convenient.