SYSTEM2013PLL
![]()
![]() 2,5 mm ø
2,5 mm ø
1
P2 | P1 |
2 |
|
![]()
![]() TEST BOX
TEST BOX ![]()
![]()
3
4
E |
5 |
P2 | P1 |
6 |
|
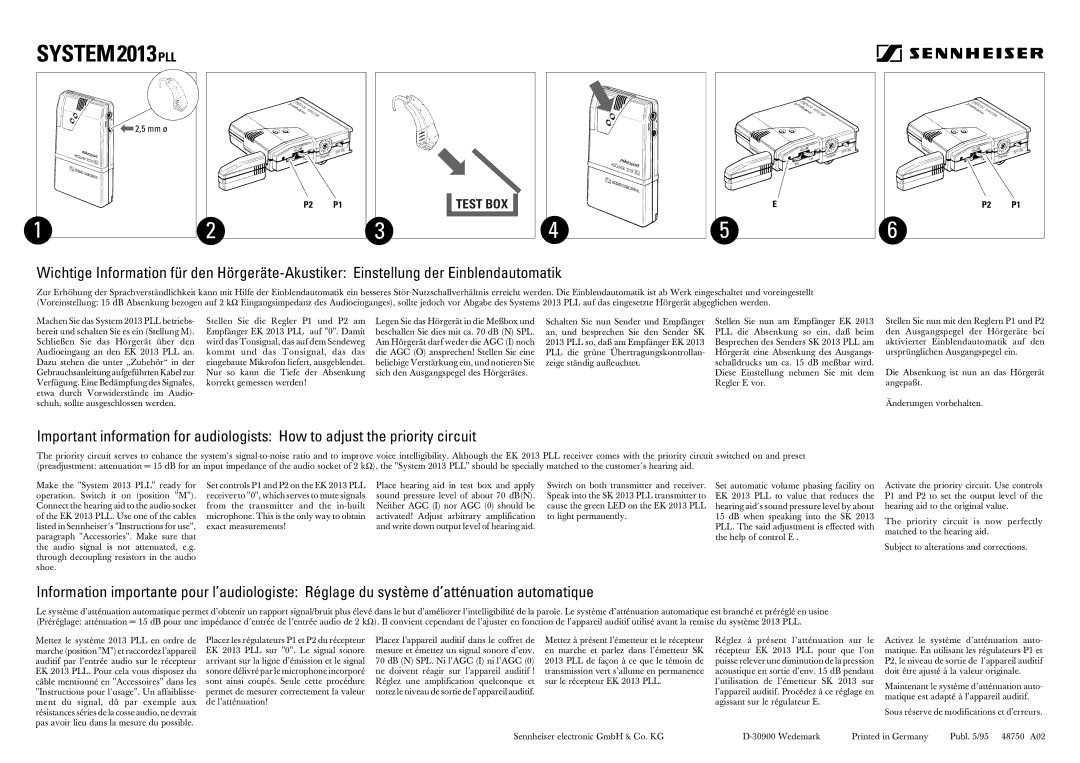
Wichtige Information für den
Zur Erhöhung der Sprachverständlichkeit kann mit Hilfe der Einblendautomatik ein besseres
Machen Sie das System 2013 PLL betriebs- bereit und schalten Sie es ein (Stellung M). Schließen Sie das Hörgerät über den Audioeingang an den EK 2013 PLL an. Dazu stehen die unter „Zubehör“ in der Gebrauchsanleitung aufgeführten Kabel zur Verfügung. Eine Bedämpfung des Signales, etwa durch Vorwiderstände im Audio- schuh, sollte ausgeschlossen werden.
Stellen Sie die Regler P1 und P2 am Empfänger EK 2013 PLL auf "0". Damit wird das Tonsignal, das auf dem Sendeweg kommt und das Tonsignal, das das eingebaute Mikrofon liefert, ausgeblendet. Nur so kann die Tiefe der Absenkung korrekt gemessen werden!
Legen Sie das Hörgerät in die Meßbox und beschallen Sie dies mit ca. 70 dB (N) SPL. Am Hörgerät darf weder die AGC (I) noch die AGC (O) ansprechen! Stellen Sie eine beliebige Verstärkung ein, und notieren Sie sich den Ausgangspegel des Hörgerätes.
Schalten Sie nun Sender und Empfänger an, und besprechen Sie den Sender SK 2013 PLL so, daß am Empfänger EK 2013 PLL die grüne Übertragungskontrollan- zeige ständig aufleuchtet.
Stellen Sie nun am Empfänger EK 2013 PLL die Absenkung so ein, daß beim Besprechen des Senders SK 2013 PLL am Hörgerät eine Absenkung des Ausgangs- schalldrucks um ca. 15 dB meßbar wird. Diese Einstellung nehmen Sie mit dem Regler E vor.
Stellen Sie nun mit den Reglern P1 und P2 den Ausgangspegel der Hörgeräte bei aktivierter Einblendautomatik auf den ursprünglichen Ausgangspegel ein.
Die Absenkung ist nun an das Hörgerät angepaßt.
Änderungen vorbehalten.
Important information for audiologists: How to adjust the priority circuit
The priority circuit serves to enhance the system´s
Make the "System 2013 PLL" ready for operation. Switch it on (position "M"). Connect the hearing aid to the audio socket of the EK 2013 PLL. Use one of the cables listed in Sennheiser´s "Instructions for use", paragraph "Accessories". Make sure that the audio signal is not attenuated, e.g. through decoupling resistors in the audio shoe.
Set controls P1 and P2 on the EK 2013 PLL receiver to "0", which serves to mute signals from the transmitter and the
Place hearing aid in test box and apply sound pressure level of about 70 dB(N). Neither AGC (I) nor AGC (0) should be activated! Adjust arbitrary amplification and write down output level of hearing aid.
Switch on both transmitter and receiver. Speak into the SK 2013 PLL transmitter to cause the green LED on the EK 2013 PLL to light permanently.
Set automatic volume phasing facility on EK 2013 PLL to value that reduces the hearing aid´s sound pressure level by about 15 dB when speaking into the SK 2013 PLL. The said adjustment is effected with the help of control E .
Activate the priority circuit. Use controls P1 and P2 to set the output level of the hearing aid to the original value.
The priority circuit is now perfectly matched to the hearing aid.
Subject to alterations and corrections.
Information importante pour l’audiologiste: Réglage du système d’atténuation automatique
Le système d’atténuation automatique permet d’obtenir un rapport signal/bruit plus élevé dans le but d’améliorer l’intelligibilité de la parole. Le système d’atténuation automatique est branché et préréglé en usine (Préréglage: atténuation = 15 dB pour une impédance d´entrée de l´entrée audio de 2 kΩ). Il convient cependant de l’ajuster en fonction de l’appareil auditif utilisé avant la remise du système 2013 PLL.
Mettez le système 2013 PLL en ordre de marche (position "M") et raccordez l’appareil auditif par l’entrée audio sur le récepteur EK 2013 PLL. Pour cela vous disposez du câble mentionné en "Accessoires" dans les "Instructions pour l´usage". Un affaiblisse- ment du signal, dû par exemple aux résistances séries de la cosse audio, ne devrait pas avoir lieu dans la mesure du possible.
Placez les régulateurs P1 et P2 du récepteur EK 2013 PLL sur "0". Le signal sonore arrivant sur la ligne d’émission et le signal sonore délivré par le microphone incorporé sont ainsi coupés. Seule cette procédure permet de mesurer correctement la valeur de l’atténuation!
Placez l’appareil auditif dans le coffret de | Mettez à présent l’émetteur et le récepteur |
mesure et émettez un signal sonore d’env. | en marche et parlez dans l’émetteur SK |
70Ê dB (N) SPL. Ni l’AGC (I) ni l’AGC (0) | 2013 PLL de façon à ce que le témoin de |
ne doivent réagir sur l’appareil auditifÊ ! | transmission vert s’allume en permanence |
Réglez une amplification quelconque et | sur le récepteur EK 2013 PLL. |
notez le niveau de sortie de l’appareil auditif. |
|
Sennheiser electronic GmbH & Co. KG | Printed in Germany | Publ. 5/95 48750 A02 |