OPERATING INSTRUCTIONS
OPERATING INSTRUCTIONS
Changing & Cleaning the Pre-
Motor Filter
Warning: To reduce the risk of electric shock, the power cord must be disconnected before removing the dust cup, dust cup filter,changing the filters or performing maintenance/trouble shooting checks.
The
1.Remove the dust cup from the vacuum cleaner.
2.Make sure that you empty the dust cup before turning it upside down to remove the
3.Press inward on the two clips on the side of the filter and pull out to remove.
4.Clean the
5.Replace the filter into the dust cup and push down until you hear it click into place.
Changing & Cleaning the Exhaust Filter
Warning: To reduce the risk of electric shock, the power cord must be disconnected before removing the dust cup, dust cup filter,changing the filters or performing maintenance/trouble shooting checks.
The exhaust filter is located on the front of the unit below where the dust cup is.
1.Check the exhaust filter frequently and clean when dirty.
2.Press inward on each side of the exhaust filter cover and pull out to remove from the vacuum cleaner.
3.Remove the exhaust filter.
4.Rinse in lukewarm water and dry the filter completely before re- installing into the vacuum. Do not use a washing machine to rinse the filter. Do not use a hair dryer to dry it. Air dry only. Never operate the vacuum without the filters in place.
5.When the filter is dry, replace into the vacuum and replace the filter cover.
Cleaning the Dust Cup
Warning: To reduce the risk of electric shock, the power cord must be disconnected before removing the dust cup, dust cup filter,changing the filters or performing maintenance/trouble shooting checks.
The dust cup can be washed in lukewarm water. Do not use strong detergents. Ensure that the dust cup is fully dry before putting back on the vacuum cleaner. (Fig. 16) Do not wash in dishwasher.
Fig. 16
Motor Thermostat
Important: This motor is equipped with a motor protective thermostat. If for some reason the vacuum cleaner should overheat, the thermostat will automatically turn the unit off. Should this occur:
•Push the On/Off button once.
•Disconnect the plug from the power source.
•Check the source of overheating problem. (i.e. clogged hose or filter)
•if clogged hose or filter is found, unclog the hose and replace the filters.
•Wait at least 30 minutes before attempting to reuse the vacuum.
•After unit has cooled down for
30 minutes, plug in the cleaner and push the On/Off button. The vacuum should start again.
•If the vacuum still does not start, contact
Cleaning & Changing the Belt
Warning: To reduce the risk of electric shock, the power cord must be disconnected before removing the dust cup, dust cup filter,changing the filters or performing maintenance/trouble shooting checks.
Occasionally the power nozzle drive belt will require changing, the frequency will depend upon the amount of use your vacuum sees.
1.Turn the vacuum "Off" and unplug from power supply.
2.Release the handle by pressing on the handle release pedal and pull back on the handle until it releases from its upright position. Then turn the vacuum over and place on the floor.
3.With a Phillips #2 screw driver remove the five screws on the bottom plate. (Fig. 17)
Fig. 17
4.Carefully remove any residue that may exist in the belt area.
5.If the belt has broken, remove any loose pieces before replacing.
6.Hold the agitator with your hand. If the belt is still attached to the agitator, there will be tension on it.
7.Carefully lift the left side of the agitator and then the right side.
8.Remove the worn or broken belt from the motor drive shaft.
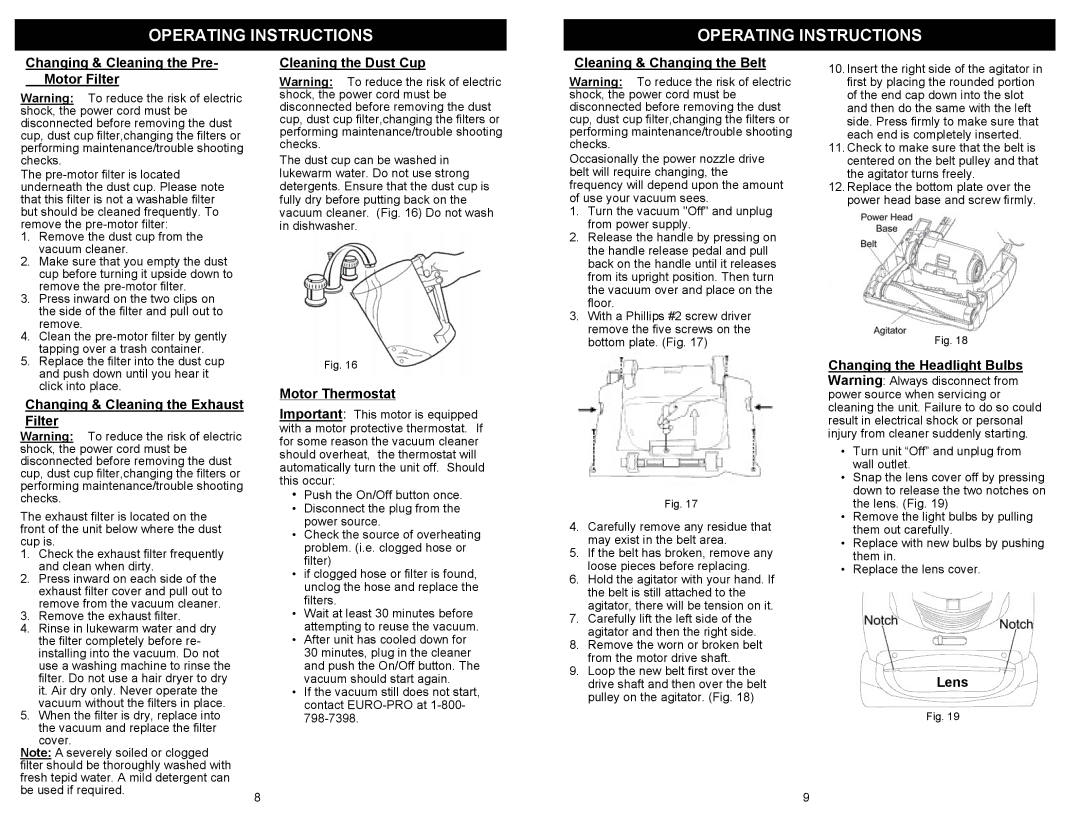
9.Loop the new belt first over the drive shaft and then over the belt pulley on the agitator. (Fig. 18)
10.Insert the right side of the agitator in first by placing the rounded portion of the end cap down into the slot and then do the same with the left side. Press firmly to make sure that each end is completely inserted.
11.Check to make sure that the belt is centered on the belt pulley and that the agitator turns freely.
12.Replace the bottom plate over the power head base and screw firmly.
Fig. 18
Changing the Headlight Bulbs Warning: Always disconnect from power source when servicing or cleaning the unit. Failure to do so could result in electrical shock or personal injury from cleaner suddenly starting.
•Turn unit “Off” and unplug from wall outlet.
•Snap the lens cover off by pressing down to release the two notches on the lens. (Fig. 19)
•Remove the light bulbs by pulling them out carefully.
•Replace with new bulbs by pushing them in.
•Replace the lens cover.
Lens
Fig. 19
Note: A severely soiled or clogged |
|
filter should be thoroughly washed with |
|
fresh tepid water. A mild detergent can |
|
be used if required. | 8 |
|
9