Press the ON/STAND-BY button to turn the power on.

RECORDING

When recording important selections, be sure to make a preliminary test to ensure that the desired material is being properly recorded.

The VOLUME, X-BASS and EQUALIZER controls may be adjusted with no effect on the recorded sig- nal (Variable Sound Monitor).

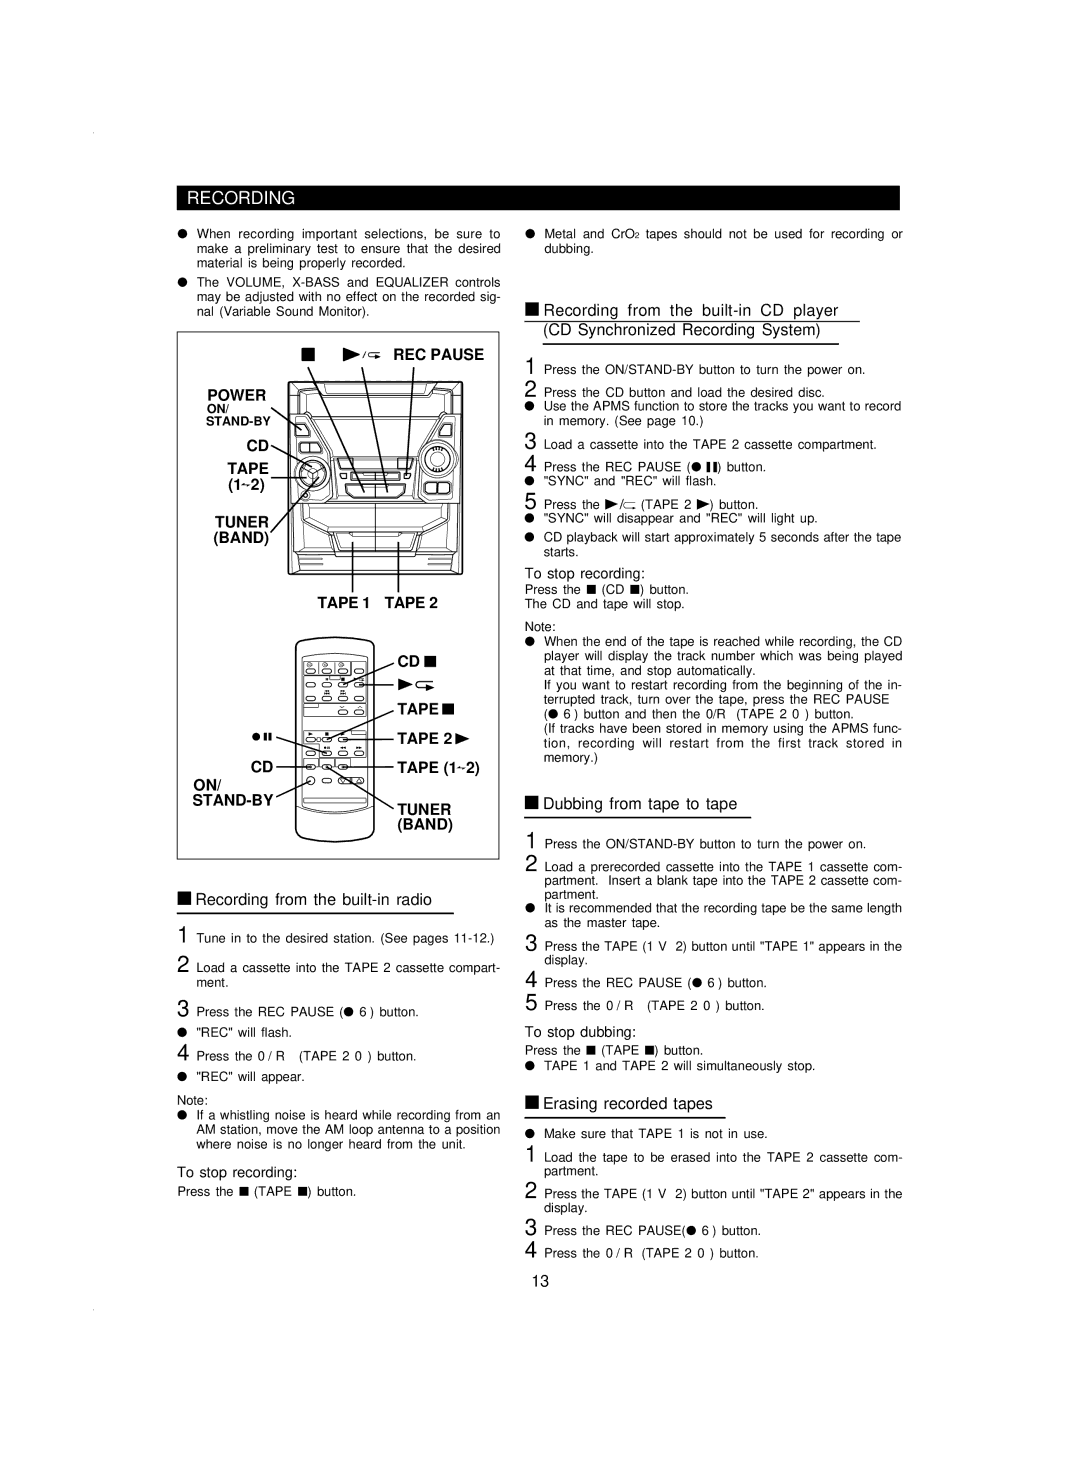
REC PAUSE

POWER

ON/

STAND-BY

CD

TAPE (1 2)

TUNER (BAND)

TAPE 1 TAPE 2

CD

TAPE

TAPE 2

CD

TAPE (1 2)

ON/

STAND-BY

TUNER (BAND)

Recording from the built-in radio

1 Tune in to the desired station. (See pages 11-12.)

2 Load a cassette into the TAPE 2 cassette compart- ment.

3 Press the REC PAUSE (● 6) button.

"REC" will flash.

4 Press the 0 / R (TAPE 2 0) button.

"REC" will appear.

Note:

If a whistling noise is heard while recording from an AM station, move the AM loop antenna to a position where noise is no longer heard from the unit.

To stop recording:

Press the (TAPE ) button.

Metal and CrO2 tapes should not be used for recording or dubbing.

Recording from the built-in CD player (CD Synchronized Recording System)

1 Press the ON/STAND-BY button to turn the power on. 2 Press the CD button and load the desired disc.

Use the APMS function to store the tracks you want to record in memory. (See page 10.)

3 Load a cassette into the TAPE 2 cassette compartment. 4 Press the REC PAUSE (● 6) button.

"SYNC" and "REC" will flash.

5 Press the 0/R (TAPE 2 0) button.

"SYNC" will disappear and "REC" will light up.

CD playback will start approximately 5 seconds after the tape starts.

To stop recording:

Press the (CD ) button.

The CD and tape will stop.

Note:

When the end of the tape is reached while recording, the CD player will display the track number which was being played at that time, and stop automatically.

If you want to restart recording from the beginning of the in- terrupted track, turn over the tape, press the REC PAUSE (● 6) button and then the 0/R(TAPE 2 0) button.

(If tracks have been stored in memory using the APMS func- tion, recording will restart from the first track stored in memory.)

Dubbing from tape to tape

1

2 Load a prerecorded cassette into the TAPE 1 cassette com- partment. Insert a blank tape into the TAPE 2 cassette com- partment.

It is recommended that the recording tape be the same length as the master tape.

3 Press the TAPE (1 V 2) button until "TAPE 1" appears in the display.

4 Press the REC PAUSE (● 6) button.

5 Press the 0 / R (TAPE 2 0) button.

To stop dubbing:

Press the (TAPE ) button.

TAPE 1 and TAPE 2 will simultaneously stop.

Erasing recorded tapes

Make sure that TAPE 1 is not in use.

1 Load the tape to be erased into the TAPE 2 cassette com- partment.

2 Press the TAPE (1 V 2) button until "TAPE 2" appears in the display.

3 Press the REC PAUSE(● 6) button.

4 Press the 0 / R(TAPE 2 0) button.

13

Page 14
Image 14
Sharp CD-BA120 operation manual Recording

CD-BA120 specifications

The Sharp CD-BA120 is a versatile mini audio system designed to enhance your sound experience at home. This compact system combines a CD player, FM tuner, and powerful speakers, making it an ideal choice for music lovers who appreciate quality audio without taking up too much space.

One of the standout features of the CD-BA120 is its CD playback capability. It can handle standard audio CDs as well as CD-R and CD-RW formats, giving users the freedom to enjoy their entire music library. The system also boasts a built-in FM tuner that offers multiple station presets, enabling seamless access to your favorite radio channels. The user-friendly control panel makes navigation effortless, while the clear digital display provides easy readability.

Another notable aspect of the CD-BA120 is its audio output. The system is equipped with two high-quality speakers that deliver impressive sound reproduction with deep bass and clear treble. The total output power of the system ensures that it can fill a room with music, making it suitable for gatherings or casual listening sessions. Additionally, the bass boost feature adds that extra punch to your music, enhancing its overall richness and presence.

The CD-BA120 also supports various audio formats, allowing you to play MP3 files via USB, which further expands your listening options. This flexibility makes it easier to enjoy digital music stored on flash drives. Furthermore, the audio system includes an auxiliary input, enabling you to connect external devices like smartphones or tablets, transforming the system into a dynamic sound station for any device.

For those who enjoy customizing their listening experience, the Sharp CD-BA120 offers various equalizer presets. These presets can adjust sound parameters to suit different genres of music, whether you prefer rock, pop, jazz, or classical. The incorporation of Bluetooth technology is also a significant advantage, facilitating wireless streaming from smartphones, tablets, or other compatible devices.

In summary, the Sharp CD-BA120 combines advanced technology with user-friendly features in a compact design. Its CD player, FM tuner, multiple audio format support, and Bluetooth connectivity make it a comprehensive audio solution, ideal for any music enthusiast looking for quality sound in a stylish package.