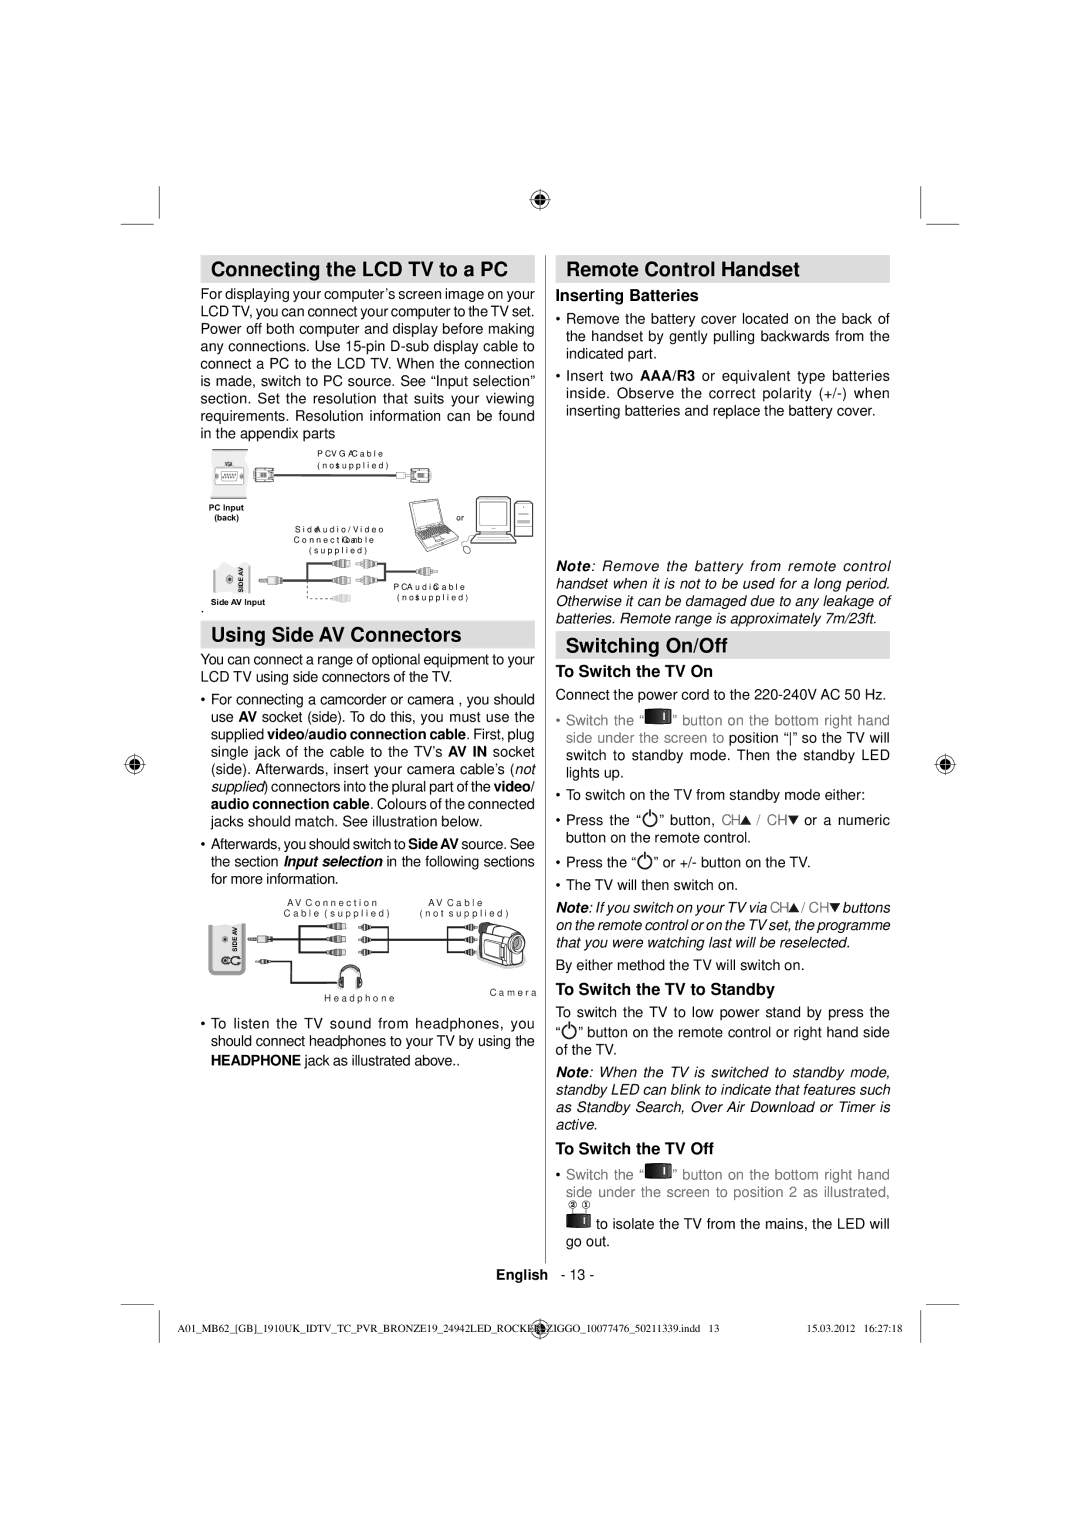
Connecting the LCD TV to a PC

For displaying your computer’s screen image on your LCD TV, you can connect your computer to the TV set. Power off both computer and display before making any connections. Use 15-pin D-sub display cable to connect a PC to the LCD TV. When the connection is made, switch to PC source. See “Input selection” section. Set the resolution that suits your viewing requirements. Resolution information can be found in the appendix parts


PC VGA Cable


(not supplied)

PC Input

or

(back)


Side Audio/Video


Connection Cable


(supplied)

SIDE AV

PC Audio Cable

. Side AV Input

(not supplied)


Using Side AV Connectors

You can connect a range of optional equipment to your LCD TV using side connectors of the TV.

For connecting a camcorder or camera , you should use AV socket (side). To do this, you must use the supplied video/audio connection cable. First, plug single jack of the cable to the TV’s AV IN socket (side). Afterwards, insert your camera cable’s (not supplied) connectors into the plural part of the video/ audio connection cable. Colours of the connected jacks should match. See illustration below.

Afterwards, you should switch to Side AV source. See the section Input selection in the following sections for more information.

AV Connection

AV Cable

Cable (supplied)

(not supplied)

Remote Control Handset

Inserting Batteries

Remove the battery cover located on the back of the handset by gently pulling backwards from the indicated part.

Insert two AAA/R3 or equivalent type batteries inside. Observe the correct polarity (+/-) when inserting batteries and replace the battery cover.

Note: Remove the battery from remote control handset when it is not to be used for a long period. Otherwise it can be damaged due to any leakage of batteries. Remote range is approximately 7m/23ft.

Switching On/Off

To Switch the TV On

Connect the power cord to the 220-240V AC 50 Hz.

Switch the “” button on the bottom right hand side under the screen to position “” so the TV will switch to standby mode. Then the standby LED lights up.

To switch on the TV from standby mode either:

Press the “” button, CH / CH or a numeric button on the remote control.

Press the “ ” or +/- button on the TV.

The TV will then switch on.

Note: If you switch on your TV via CH / CH buttons on the remote control or on the TV set, the programme

SIDE AV

Headphone

Camera

that you were watching last will be reselected.

By either method the TV will switch on.

To Switch the TV to Standby

To listen the TV sound from headphones, you should connect headphones to your TV by using the

HEADPHONE jack as illustrated above..

To switch the TV to low power stand by press the

” button on the remote control or right hand side of the TV.

Note: When the TV is switched to standby mode, standby LED can blink to indicate that features such as Standby Search, Over Air Download or Timer is active.

To Switch the TV Off

Switch the “” button on the bottom right hand side under the screen to position 2 as illustrated,

to isolate the TV from the mains, the LED will go out.

English - 13 -

A01_MB62_[GB]_1910UK_IDTV_TC_PVR_BRONZE19_24942LED_ROCKER

_

ZIGGO_10077476_50211339.indd 13

15.03.2012 16:27:18


Page 14
Image 14
Sharp LC-24LE240E Connecting the LCD TV to a PC, Using Side AV Connectors, Remote Control Handset, Switching On/Off

LC-24LE240E specifications

The Sharp LC-24LE240E is a compact and versatile 24-inch LED television that caters to the needs of those seeking quality viewing in smaller spaces. This model is ideal for kitchens, bedrooms, or any area where space is limited but entertainment is desired. Its sleek design and convenient size ensure it fits neatly into various environments without compromising on aesthetic appeal.

One of the standout features of the Sharp LC-24LE240E is its HD Ready resolution of 1366 x 768 pixels. This allows viewers to enjoy sharp and clear images, enhancing the overall viewing experience. The LED backlighting technology not only improves brightness but also contributes to better energy efficiency compared to traditional LCD panels. This model utilizes direct LED lighting that provides uniform brightness and stunning color contrast, making it perfect for watching movies or live sports.

The television supports multiple viewing modes, which allows users to optimize the display settings based on what they are watching. Whether it's a dramatic film or a fast-paced game, the LC-24LE240E is designed to deliver the best possible visuals.

Connectivity is another strong point for the Sharp LC-24LE240E. It features a variety of input options, including HDMI and USB ports, allowing users to connect a range of devices such as gaming consoles, Blu-ray players, or USB flash drives. This means that enjoying your favorite movies, shows, or games is incredibly straightforward.

The integrated digital tuner ensures that users can easily access a wide range of Freeview channels without the need for an additional set-top box. The television also includes built-in speakers that deliver decent sound quality, providing an immersive home viewing experience.

Energy efficiency is a notable aspect of the LC-24LE240E, designed with eco-friendly technologies that comply with contemporary energy standards. This not only helps reduce electricity bills but also lowers the carbon footprint of your home entertainment setup.

In summary, the Sharp LC-24LE240E is a superb choice for those looking for a compact television without sacrificing performance. With its HD Ready display, LED backlighting, versatile connectivity, and energy-efficient design, it stands out as an ideal solution for small spaces. Whether you're watching your favorite series or catching up on the news, this television promises quality and convenience.