Introduction

Remote control unit

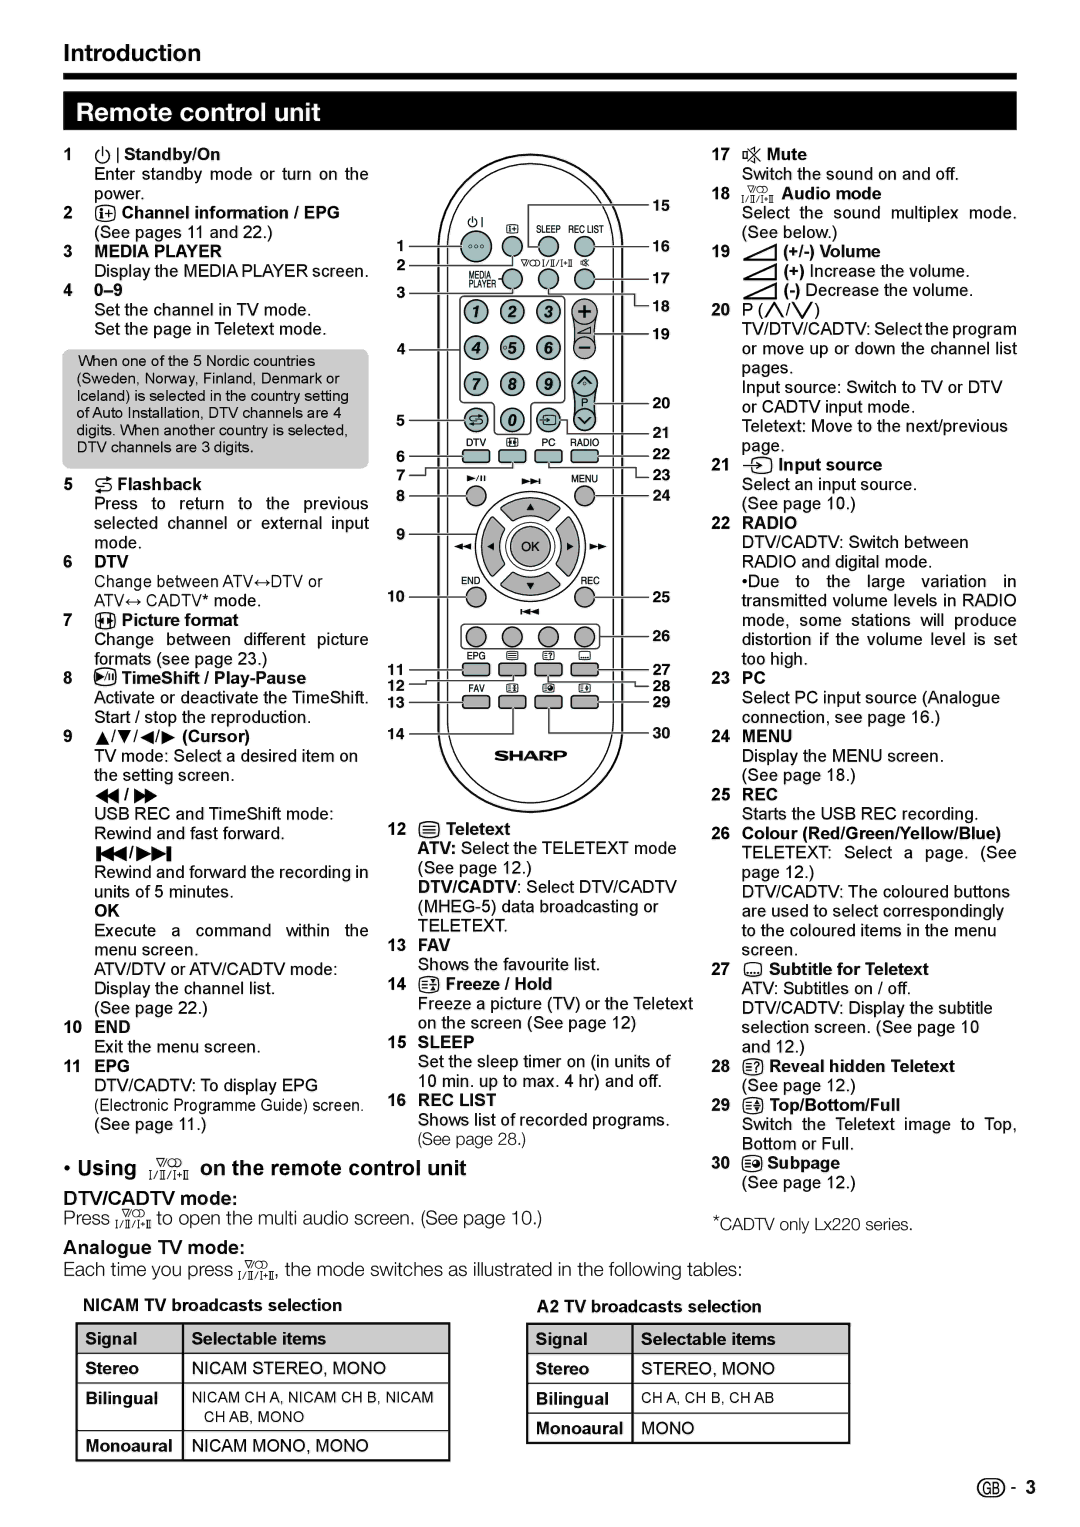
1BStandby/On

Enter standby mode or turn on the power.

2pChannel information / EPG (See pages 11 and 22.)

3MEDIA PLAYER

Display the MEDIA PLAYER screen.

40–9

Set the channel in TV mode. Set the page in Teletext mode.

When one of the 5 Nordic countries (Sweden, Norway, Finland, Denmark or Iceland) is selected in the country setting of Auto Installation, DTV channels are 4 digits. When another country is selected, DTV channels are 3 digits.

5AFlashback

Press to return to the previous selected channel or external input mode.

6DTV

Change between ATV↔DTV or ATV↔ CADTV* mode.

7fPicture format

Change between different picture formats (see page 23.)

8/ TimeShift / Play-Pause Activate or deactivate the TimeShift. Start / stop the reproduction.

9a/b/c/d (Cursor)

TV mode: Select a desired item on

the setting screen.

S/ V

USB REC and TimeShift mode: Rewind and fast forward.

T/L

Rewind and forward the recording in units of 5 minutes.

OK

Execute a command within the menu screen.

ATV/DTV or ATV/CADTV mode: Display the channel list.

(See page 22.)

10END

Exit the menu screen.

11EPG

DTV/CADTV: To display EPG (Electronic Programme Guide) screen. (See page 11.)

12mTeletext

ATV: Select the TELETEXT mode (See page 12.)

DTV/CADTV: Select DTV/CADTV (MHEG-5) data broadcasting or

TELETEXT.

13FAV

Shows the favourite list.

143Freeze / Hold

Freeze a picture (TV) or the Teletext on the screen (See page 12)

15SLEEP

Set the sleep timer on (in units of 10 min. up to max. 4 hr) and off.

16REC LIST

Shows list of recorded programs.

(See page 28.)

17

eMute


Switch the sound on and off.

18

2 Audio mode


Select the sound multiplex mode.


(See below.)

19

i(+/-) Volume


i(+) Increase the volume.


i(-)Decrease the volume.

20

P (r/s)


TV/DTV/CADTV: Select the program


or move up or down the channel list


pages.


Input source: Switch to TV or DTV


or CADTV input mode.


Teletext: Move to the next/previous


page.

21

bInput source


Select an input source.


(See page 10.)

22

RADIO


DTV/CADTV: Switch between


RADIO and digital mode.


•Due to the large variation in


transmitted volume levels in RADIO


mode, some stations will produce


distortion if the volume level is set


too high.

23

PC


Select PC input source (Analogue


connection, see page 16.)

24

MENU


Display the MENU screen.


(See page 18.)

25

REC


Starts the USB REC recording.

26

Colour (Red/Green/Yellow/Blue)


TELETEXT: Select a page. (See


page 12.)


DTV/CADTV: The coloured buttons


are used to select correspondingly


to the coloured items in the menu


screen.

27

[Subtitle for Teletext


ATV: Subtitles on / off.


DTV/CADTV: Display the subtitle


selection screen. (See page 10


and 12.)

28

kReveal hidden Teletext


(See page 12.)

29

vTop/Bottom/Full


Switch the Teletext image to Top,


Bottom or Full.

Using 2 on the remote control unit

DTV/CADTV mode:

Press 2to open the multi audio screen. (See page 10.)

30 1Subpage

(See page 12.)

*CADTV only Lx220 series.

Analogue TV mode:

Each time you press 2, the mode switches as illustrated in the following tables:

NICAM TV broadcasts selection

Signal

Selectable items

Stereo

NICAM STEREO, MONO

Bilingual

NICAM CH A, NICAM CH B, NICAM


CH AB, MONO

Monoaural

NICAM MONO, MONO

A2 TV broadcasts selection

Signal

Selectable items

Stereo

STEREO, MONO

Bilingual

CH A, CH B, CH AB

Monoaural

MONO

3

Page 5
Image 5
Sharp LC-24LE210E Remote control unit, Introduction, Using 2 on the remote control unit, DTV/CADTV mode, Analogue TV mode

LC-32LB220E, LC-24LE210E, LC-32LS220E, LC-24LE220E, LC-32LE220E specifications

The Sharp LC-32LE210E, LC-32LE220E, LC-24LE220E, LC-32LS220E, and LC-24LE210E television models represent the brand’s commitment to delivering high-quality entertainment experiences. These models are particularly known for their vivid picture quality and advanced technologies that cater to various viewing preferences.

Starting with the LC-32LE210E and LC-32LE220E, both possess a 32-inch screen size, making them ideal for smaller living environments like bedrooms or cozy media rooms. They are equipped with LED-backlit LCD panels, providing excellent brightness and color representation. The Full HD resolution (1920 x 1080) ensures sharp image quality, making them suitable for watching movies, sports, and gaming.

The LC-32LE220E boasts additional smart features, such as integrated Wi-Fi connectivity, allowing users to access streaming services and browse the internet seamlessly. This model supports various applications, enabling easy access to popular platforms like Netflix and YouTube. Both of these models feature multiple HDMI and USB ports, simplifying the connection of external devices like game consoles and Blu-ray players.

The LC-24LE220E and LC-24LE210E are compact 24-inch models designed for smaller spaces like kitchens or dorm rooms. Despite their size, they do not compromise on picture quality. They also offer HD Ready resolution (1366 x 768), providing decent clarity for casual viewing. The inclusion of HDMI and USB ports allows for versatility in connecting various multimedia devices.

Lastly, the LC-32LS220E stands out with its sleek design and enhanced audio capabilities. This model features built-in speakers that deliver clear and rich sound quality, elevating the viewing experience. Additionally, it shares the smart features of the LC-32LE220E, making it a great choice for users who want a balance of size and functionality.

In summary, the Sharp LC-32LE210E, LC-32LE220E, LC-24LE220E, LC-32LS220E, and LC-24LE210E televisions are well-crafted devices that offer excellent display and sound quality. They cater to various needs with their different sizes and smart capabilities, ensuring that viewers enjoy a versatile and engaging home entertainment experience. Each model is designed with customer convenience in mind, making them suitable choices for any household.