Preparation
Antennas
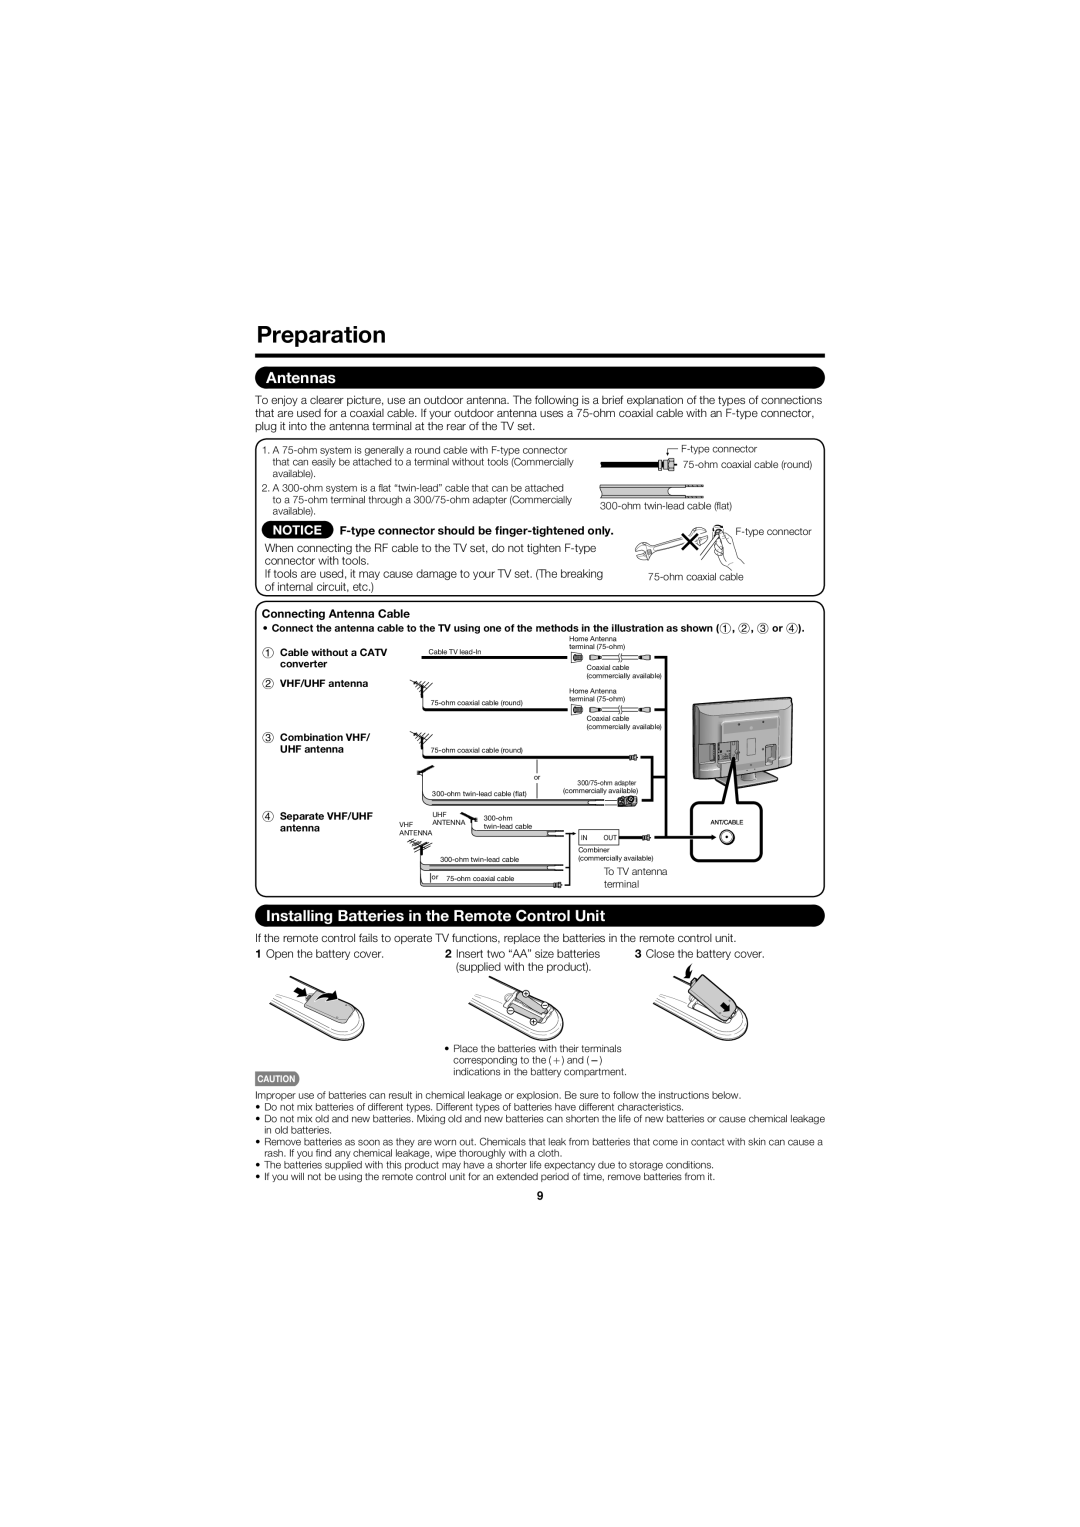
To enjoy a clearer picture, use an outdoor antenna. The following is a brief explanation of the types of connections that are used for a coaxial cable. If your outdoor antenna uses a
1.A
2.A
![]()
NOTICE
When connecting the RF cable to the TV set, do not tighten
If tools are used, it may cause damage to your TV set. (The breaking of internal circuit, etc.)
Connecting Antenna Cable
• Connect the antenna cable to the TV using one of the methods in the illustration as shown (1, 2, 3 or 4).
1Cable without a CATV converter
2VHF/UHF antenna
3Combination VHF/ UHF antenna
4Separate VHF/UHF antenna
|
|
|
| Home Antenna | |
| Cable TV |
| terminal | ||
|
|
|
| ||
|
|
|
| Coaxial cable | |
|
|
|
| (commercially available) | |
|
|
|
| Home Antenna | |
| terminal | ||||
|
|
| |||
|
|
|
| Coaxial cable | |
|
|
|
| (commercially available) | |
|
|
| |||
|
|
|
| or |
|
|
|
|
| ||
| (commercially available) | ||||
|
|
| |||
| UHF |
|
| ||
VHF | ANTENNA |
|
| ||
|
| ||||
|
|
|
| ||
ANTENNA |
|
| IN | OUT | |
|
|
|
| ||
|
|
|
| Combiner | |
|
| (commercially available) | |||
| or |
| To TV antenna | ||
|
| terminal | |||
|
|
|
|
| |
Installing Batteries in the Remote Control Unit
If the remote control fails to operate TV functions, replace the batteries in the remote control unit.
1 Open the battery cover. | 2 Insert two “AA” size batteries | 3 Close the battery cover. |
| (supplied with the product). |
|
•Place the batteries with their terminals corresponding to the (e) and (f) indications in the battery compartment.
CAUTION
Improper use of batteries can result in chemical leakage or explosion. Be sure to follow the instructions below.
•Do not mix batteries of different types. Different types of batteries have different characteristics.
•Do not mix old and new batteries. Mixing old and new batteries can shorten the life of new batteries or cause chemical leakage in old batteries.
•Remove batteries as soon as they are worn out. Chemicals that leak from batteries that come in contact with skin can cause a rash. If you fi nd any chemical leakage, wipe thoroughly with a cloth.
•The batteries supplied with this product may have a shorter life expectancy due to storage conditions.
•If you will not be using the remote control unit for an extended period of time, remove batteries from it.
9
