Manuals
/
Shindaiwa
/
Lawn and Garden
/
Trimmer
Shindaiwa
81010
manual
Installing a Trimmer Head T272X, Install the Trimmer Head
Models:
81010
1
8
40
40
Download
40 pages
18.9 Kb
5
6
7
8
9
10
11
12
Troubleshooting
Install
Maintenance
Additional Problems
continuación DIAGNOSTICO GUIA
Prior to Assembly
Assembly and Adjustments
How to
What is
Safety
Page 8
Image 8
Page 7
Page 9
Page 8
Image 8
Page 7
Page 9
Contents
T272 T272X
T272 TRIMMER T272X TRIMMER
SHINDAIWA OWNER’S/OPERATOR’S MANUAL
Attention Statements
Contents
Introduction
General Safety Instructions The Properly Equipped Operator
Work Safely
Stay Alert
Minimize the Risk of Fire
Safety Labels
Be Aware of the Working Environment
FEET
T272
Specifications T272/T272X
Prior to Assembly
Product Description
Assembly and Adjustments
Adjusting Throttle Level Free Play T272/T272X
To Adjust the Handle
Handle T272/T272X
Install the Cutting Attachment Shield T272/T272X
Sub-Shield T272X when trimmer head is in use
Cutting Attachment Shield
To Change Position of Line Cutter
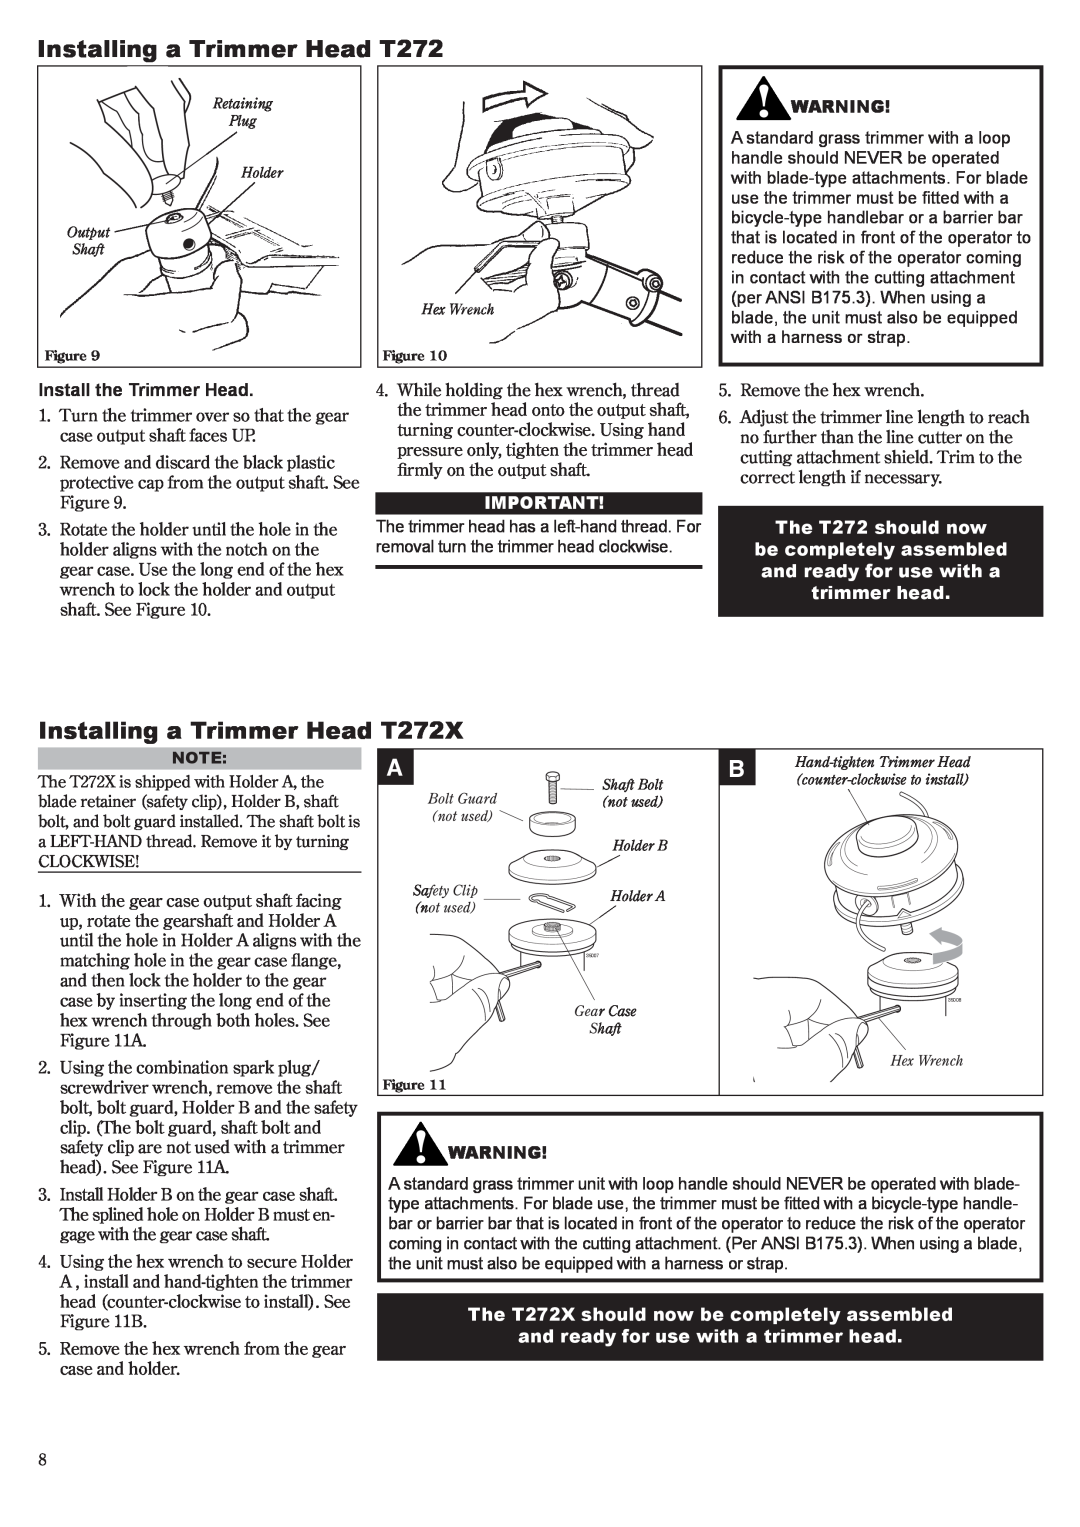
Installing a Trimmer Head T272
Installing a Trimmer Head T272X
Install the Trimmer Head
The T272 should now
Installing a Blade T272X
The T272X should now be
completely assembled to
operate with a blade
Mixing Fuel
Filling the Fuel Tank
Starting the Engine
Examples of 501 mixing quantities
Engine Idle Adjustment
When the Engine Starts
Idle Speed Adjustment
Starting the Engine continued
Using a T272X with a Blade
Check Unit Condition
Shoulder Strap T272X
T272
Using A Brushcutter Blade T272X
Blade Thrust
Brushcutter Handlebar
Shoulder Strap
General Maintenance
Daily Maintenance
10-Hour Maintenance
10/15-Hour Maintenance
50-Hour Maintenance
135-Hour Maintenance
Every 50 hours of operation
Every 135 hours of operation, remove
Long Term Storage
Blade Sharpening
Shindaiwa Tornado Blade
Multiple-tooth Circular Blade
Troubleshooting Guide
What To Check
Possible Cause
Remedy
Troubleshooting Guide continued
LOW POWER OUTPUT
Symptom
ADDITIONAL PROBLEMS
Emission System Warranty Statement
Your Warranty Rights and Obligations
Owners Warranty Responsibilities
Manufacturer’s Warranty Coverage
por administrada es garantía Esta
Emisión de Sistema del Garantía de Declaración
Cubierto Está No Que
Propietario del Garantía de Responsabilidades
continuación DIAGNOSTICO GUIA
ADICIONALES PROBLEMAS
Remedio
Causa Posible
POTENCIA BAJA
Remedio
Causa Posible
Revisar Que
Revisar Que
DIAGNOSTICO GUIA
ARRANCA NO MOTOR EL
Discos de Afilado
Plazo Largo de Almacenamiento
Múltiples Dientes de Discos
¡ADVERTENCIA
operación de horas 135 Cada
Mantenimiento Horas 135 Cada
Horas 50 Cada Mantenimiento
Horas 10/15 Cada Mantenimiento
Horas 10 Cada Mantenimiento
Diario Mantenimiento
General Mantenimiento
T272X Disco un Usando
Verticales Cortes
Motor del Operación
Desmalezadoras para Arnés
Nylon de Cabezal con Equipadas Máquinas - Césped de Corte
Unidad La De Condición La Verifique
Orillas
Césped de Podado y Recorte
Motor del Mínima Marcha de Ajuste
Motor del Parada
continuación Motor del Arranque
¡ADVERTENCIA! Mínima Marcha de Ajuste
Motor del Arranque
Combustible de
Tanque el Llenando
¡PRECAUCION
Ajustes y Ensamblaje
disco un con operar para
ensamblada completamente
¡ADVERTENCIA
T272X Nylon de Cabezal del Instalación
T272 Nylon de Cabezal del Instalación
podadora como operada ser para
ensamblada completamente ahora estar debe T272X La
Ajustes y Ensamblaje
PRECAUCION
PRECAUCIÓN
uso en está cabezal el cuando
Mango el Ajustar Para
T272/T272X Acelerador del Palanca la de Holgura la de Ajuste
T272/T272X Mango
Ensamblar de Antes
T272/T272X Especificaciones
Producto del Descripción
Seguridad de Etiquetas
Metros
Trabajo de Area del Alerta Esté
3 Figura
Seguridad de
Equipado Debidamente Operario El
Generales Instrucciones
SIEMPRE
Introducción
Contenido
Seguridad De Declaraciones
5/05 .Rev
81010 part de Numero
T272X T272
Top
Page
Image
Contents