Intermediate Frame Snowthrowers

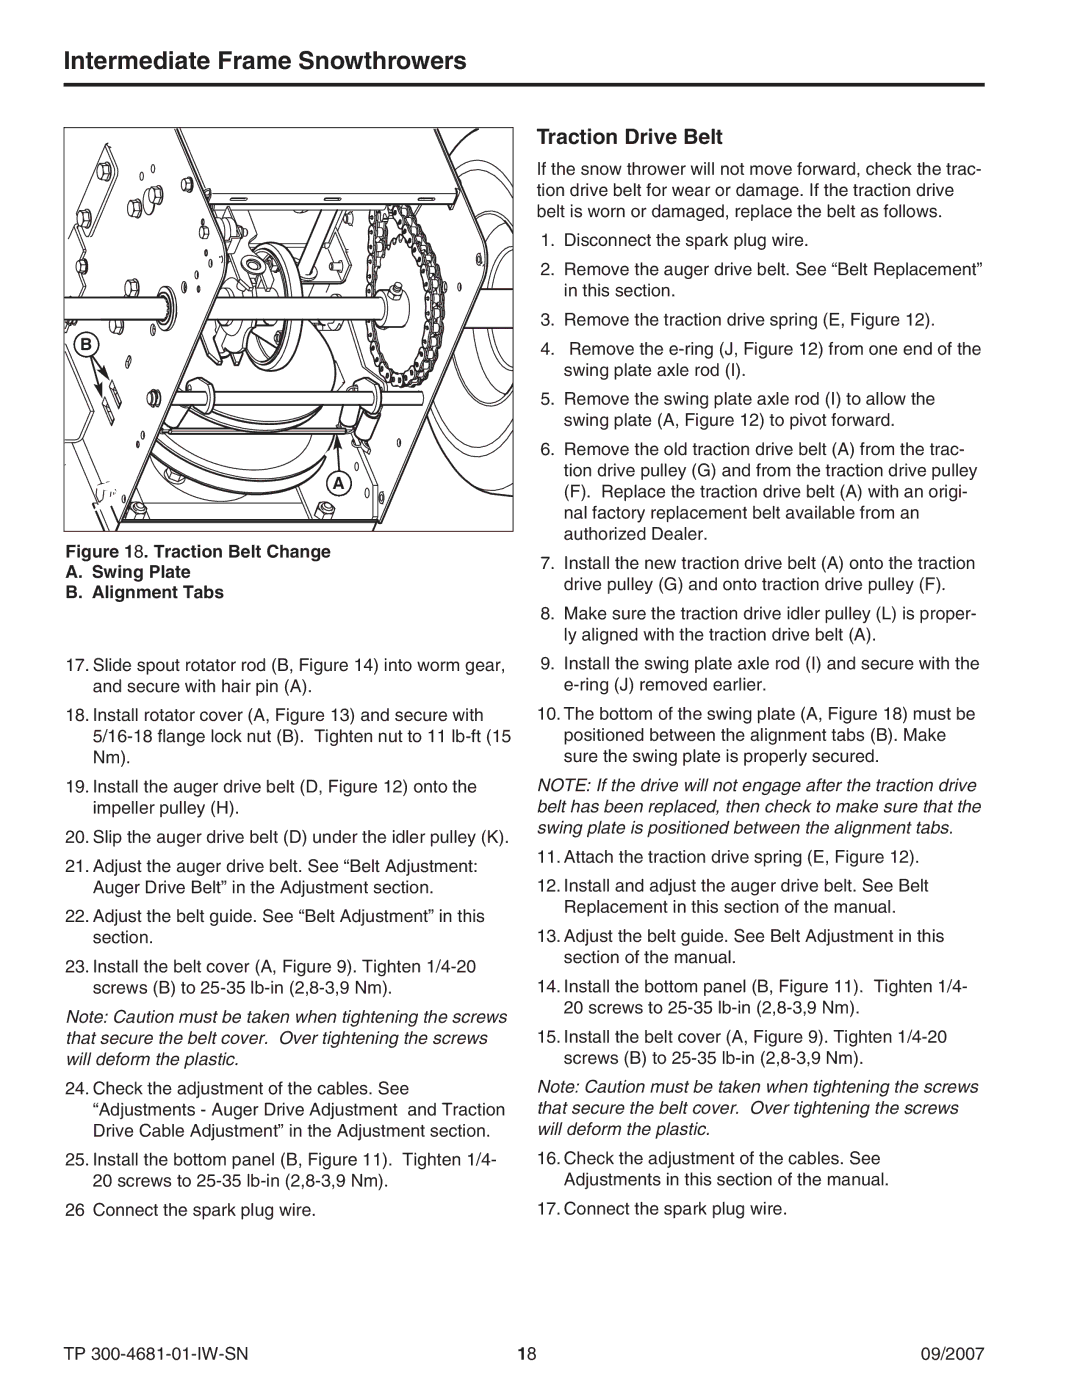
B

A

Figure 18. Traction Belt Change

A.Swing Plate

B.Alignment Tabs

17.Slide spout rotator rod (B, Figure 14) into worm gear, and secure with hair pin (A).

18.Install rotator cover (A, Figure 13) and secure with 5/16-18 flange lock nut (B). Tighten nut to 11 lb-ft (15 Nm).

19.Install the auger drive belt (D, Figure 12) onto the impeller pulley (H).

20.Slip the auger drive belt (D) under the idler pulley (K).

21.Adjust the auger drive belt. See “Belt Adjustment: Auger Drive Belt” in the Adjustment section.

22.Adjust the belt guide. See “Belt Adjustment” in this section.

23.Install the belt cover (A, Figure 9). Tighten 1/4-20 screws (B) to 25-35 lb-in (2,8-3,9 Nm).

Note: Caution must be taken when tightening the screws that secure the belt cover. Over tightening the screws will deform the plastic.

24.Check the adjustment of the cables. See “Adjustments - Auger Drive Adjustment and Traction Drive Cable Adjustment” in the Adjustment section.

25.Install the bottom panel (B, Figure 11). Tighten 1/4- 20 screws to 25-35 lb-in (2,8-3,9 Nm).

26 Connect the spark plug wire.

Traction Drive Belt

If the snow thrower will not move forward, check the trac- tion drive belt for wear or damage. If the traction drive belt is worn or damaged, replace the belt as follows.

1.Disconnect the spark plug wire.

2.Remove the auger drive belt. See “Belt Replacement” in this section.

3.Remove the traction drive spring (E, Figure 12).

4.Remove the e-ring (J, Figure 12) from one end of the swing plate axle rod (I).

5.Remove the swing plate axle rod (I) to allow the swing plate (A, Figure 12) to pivot forward.

6.Remove the old traction drive belt (A) from the trac- tion drive pulley (G) and from the traction drive pulley

(F). Replace the traction drive belt (A) with an origi- nal factory replacement belt available from an authorized Dealer.

7.Install the new traction drive belt (A) onto the traction drive pulley (G) and onto traction drive pulley (F).

8.Make sure the traction drive idler pulley (L) is proper- ly aligned with the traction drive belt (A).

9.Install the swing plate axle rod (I) and secure with the e-ring (J) removed earlier.

10.The bottom of the swing plate (A, Figure 18) must be positioned between the alignment tabs (B). Make sure the swing plate is properly secured.

NOTE: If the drive will not engage after the traction drive belt has been replaced, then check to make sure that the swing plate is positioned between the alignment tabs.

11.Attach the traction drive spring (E, Figure 12).

12.Install and adjust the auger drive belt. See Belt Replacement in this section of the manual.

13.Adjust the belt guide. See Belt Adjustment in this section of the manual.

14.Install the bottom panel (B, Figure 11). Tighten 1/4- 20 screws to 25-35 lb-in (2,8-3,9 Nm).

15.Install the belt cover (A, Figure 9). Tighten 1/4-20 screws (B) to 25-35 lb-in (2,8-3,9 Nm).

Note: Caution must be taken when tightening the screws that secure the belt cover. Over tightening the screws will deform the plastic.

16.Check the adjustment of the cables. See Adjustments in this section of the manual.

17.Connect the spark plug wire.

TP 300-4681-01-IW-SN

18

09/2007

Page 18
Image 18
Simplicity 9GT B&S24(CE), SNP I1924EX, SMI I1924EX, SMI I 1924EX, B&S 24 (CE) Traction Belt Change Swing Plate Alignment Tabs

9GT, 9GT B&S24(CE), B&S24, B&S 24 (CE), B&S24(CE) specifications

The Simplicity SMI I1924EX, 9GT, B&S24, SMI I1924E, and SNP I1924EX are cutting-edge lawn tractors designed to revolutionize the way users maintain their yards. Each model brings unique features that cater to a variety of landscaping needs, making them ideal for both residential and light commercial applications.

One of the standout features of these models is their powerful Briggs & Stratton engines. The B&S24 engine, in particular, delivers robust performance with impressive torque and reliability. This engine capability ensures that even the toughest mowing tasks can be tackled with ease. The powerful engine is complemented by a smooth transmission system, providing seamless speed adjustments and enhancing overall maneuverability.

Another key characteristic is their innovative cutting technology. With a mower deck designed for precision, the Simplicity SMI I1924EX series provides a clean, even cut, significantly reducing the amount of time spent on lawn maintenance. The decks are engineered for superior grass dispersal, leading to healthier lawn growth while minimizing clumping. The adjustable cutting height feature allows users to achieve the perfect lawn aesthetic.

These models also boast user-friendly controls, making them accessible for users of all experience levels. Intuitive dashboards and ergonomic seating ensure comfort during prolonged use. Many of the models in this series come equipped with cruise control, allowing for a consistent mowing speed that reduces user fatigue.

Durability is a cornerstone of Simplicity’s design philosophy. The robust construction of the chassis and the high-quality materials used in the build ensure that these tractors can endure the rigors of regular use over time. This reliability is further enhanced by features like a reinforced mower deck that withstands rough terrain and obstacles.

Additionally, the Simplicity SMI I1924 series incorporates advanced technologies such as easy-start systems and low emissions engines, which make them environmentally friendly choices for lawn care enthusiasts. The easy maintenance features, including accessible oil drains and air filters, simplify upkeep, allowing users to spend more time mowing and less time on maintenance.

In summary, the Simplicity SMI I1924EX, 9GT, B&S24, SMI I1924E, and SNP I1924EX lawn tractors combine power, precision, comfort, and durability. They are the perfect solution for anyone seeking efficient lawn care equipment that meets the demands of modern landscaping. Whether for home use or professional landscaping services, these models are built to deliver exceptional results.