Houselink® Garage Door


Remote Control

Model 318TR

1. INTRODUCTION

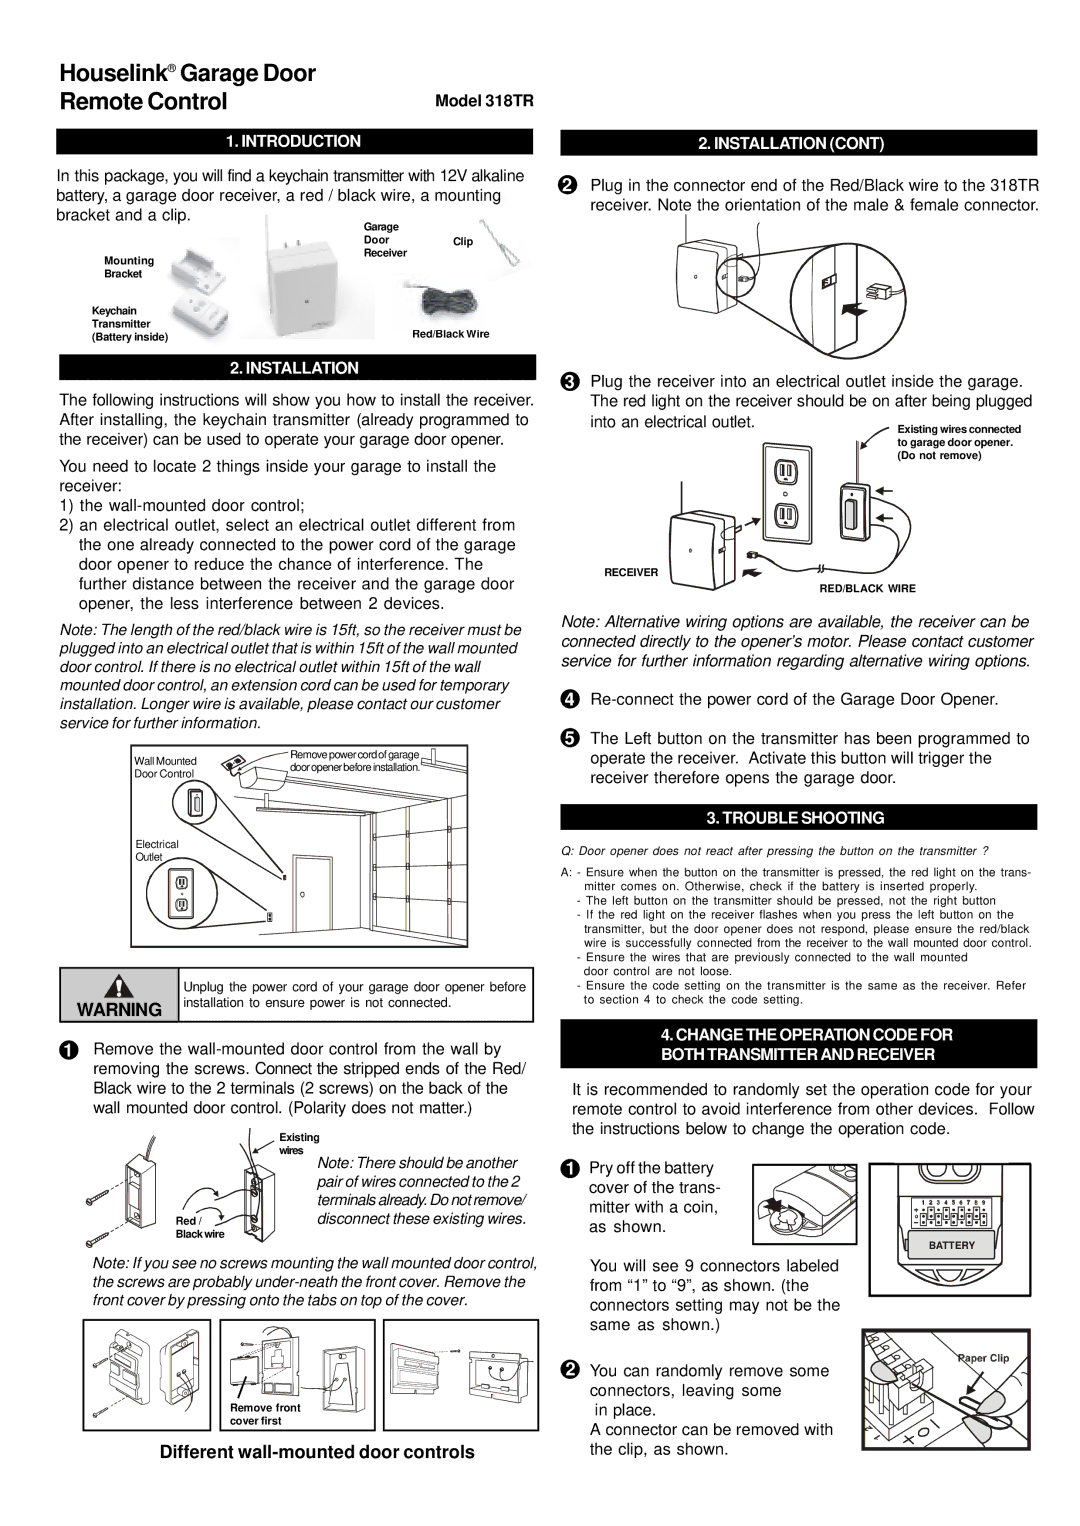
In this package, you will find a keychain transmitter with 12V alkaline battery, a garage door receiver, a red / black wire, a mounting bracket and a clip.

2. INSTALLATION (CONT)

2Plug in the connector end of the Red/Black wire to the 318TR receiver. Note the orientation of the male & female connector.

Mounting Bracket

Garage

DoorClip

Receiver

Keychain


Transmitter

Red/Black Wire

(Battery inside)

2. INSTALLATION

The following instructions will show you how to install the receiver. After installing, the keychain transmitter (already programmed to the receiver) can be used to operate your garage door opener.

You need to locate 2 things inside your garage to install the receiver:

1)the wall-mounted door control;

2)an electrical outlet, select an electrical outlet different from the one already connected to the power cord of the garage door opener to reduce the chance of interference. The further distance between the receiver and the garage door opener, the less interference between 2 devices.

Note: The length of the red/black wire is 15ft, so the receiver must be plugged into an electrical outlet that is within 15ft of the wall mounted door control. If there is no electrical outlet within 15ft of the wall mounted door control, an extension cord can be used for temporary installation. Longer wire is available, please contact our customer service for further information.

Wall Mounted

Remove power cordof garage

dooropenerbeforeinstallation.

Door Control


Electrical

Outlet


Unplug the power cord of your garage door opener before

WARNING

installation to ensure power is not connected.


1Remove the wall-mounted door control from the wall by removing the screws. Connect the stripped ends of the Red/ Black wire to the 2 terminals (2 screws) on the back of the wall mounted door control. (Polarity does not matter.)

Existing

wires

Note: There should be another


pair of wires connected to the 2


terminals already. Do not remove/

Red /

disconnect these existing wires.

Black wire


Note: If you see no screws mounting the wall mounted door control, the screws are probably under-neath the front cover. Remove the front cover by pressing onto the tabs on top of the cover.

Remove front

cover first

Different wall-mounted door controls

3Plug the receiver into an electrical outlet inside the garage. The red light on the receiver should be on after being plugged

into an electrical outlet.


Existing wires connected


to garage door opener.


(Do not remove)


RECEIVER

RED/BLACK WIRE

Note: Alternative wiring options are available, the receiver can be connected directly to the opener’s motor. Please contact customer service for further information regarding alternative wiring options.

4Re-connect the power cord of the Garage Door Opener.

5The Left button on the transmitter has been programmed to operate the receiver. Activate this button will trigger the receiver therefore opens the garage door.

3.TROUBLE SHOOTING

Q:Door opener does not react after pressing the button on the transmitter ?

A:- Ensure when the button on the transmitter is pressed, the red light on the trans- mitter comes on. Otherwise, check if the battery is inserted properly.

-The left button on the transmitter should be pressed, not the right button

-If the red light on the receiver flashes when you press the left button on the transmitter, but the door opener does not respond, please ensure the red/black wire is successfully connected from the receiver to the wall mounted door control.

-Ensure the wires that are previously connected to the wall mounted

door control are not loose.

-Ensure the code setting on the transmitter is the same as the receiver. Refer to section 4 to check the code setting.

4.CHANGE THE OPERATION CODE FOR BOTH TRANSMITTER AND RECEIVER

It is recommended to randomly set the operation code for your remote control to avoid interference from other devices. Follow the instructions below to change the operation code.

1 Pry off the battery cover of the trans- mitter with a coin, as shown.

BATTERY

You will see 9 connectors labeled from “1” to “9”, as shown. (the connectors setting may not be the same as shown.)

2 You can randomly remove some connectors, leaving some

in place.

A connector can be removed with the clip, as shown.

Page 1
Image 1
SkyLink 318TR manual Introduction, Installation, Into an electrical outlet, Trouble Shooting

318TR specifications

The SkyLink 318TR is a cutting-edge satellite communication system that represents a significant advancement in personal and enterprise connectivity solutions. Designed for users who require reliable internet access in remote locations or during travel, the 318TR integrates advanced technologies to deliver seamless performance.

One of the standout features of the SkyLink 318TR is its high-speed data transmission capability. Utilizing next-generation satellite technology, it can achieve download speeds of up to 100 Mbps, while upload speeds can reach up to 30 Mbps. This makes it suitable for a variety of applications, including video conferencing, streaming, and cloud-based services, which are increasingly vital in today's digital age.

The 318TR is also equipped with a compact and lightweight design, making it highly portable. Weighing only 3.5 kilograms, it is easy to transport and can be set up quickly, which is ideal for users on the go. Its rugged casing ensures durability, allowing it to withstand harsh environmental conditions often encountered in outdoor or field settings.

In terms of connectivity, the SkyLink 318TR features multiple ports, including Ethernet, USB, and Wi-Fi functionalities. This versatility allows users to connect a range of devices such as laptops, tablets, and smartphones, ensuring that everyone within range can access the satellite broadband service without any hassle.

Security is a paramount concern in satellite communications, and the 318TR addresses this with robust encryption options. It employs advanced security protocols to protect data integrity and user privacy, making it a trusted choice for both personal and business applications.

Additionally, the SkyLink 318TR operates on a global satellite constellation, which provides extensive coverage regardless of geographical constraints. Users can stay connected in remote areas where traditional internet service providers may not reach, making it an invaluable tool for adventurers, researchers, and field professionals alike.

An intuitive mobile app enhances user experience by enabling users to manage their connections and monitor data usage easily. This feature empowers users to make informed decisions about their connectivity in real-time.

In summary, the SkyLink 318TR is a revolutionary satellite communication solution that combines high-speed connectivity, portability, and advanced security features. It is designed to cater to the demands of modern users who need reliable internet access, regardless of their location. Whether for personal, business, or adventure purposes, the 318TR sets a new standard in satellite technology, ensuring users remain connected when it matters most.