Introduction
The Keychain Transmitter (4B-434) conveniently fits on any keychain. It allows you to arm and disarm the Security Control Panel SC-001 and activate the Emergency Dialer AD-1010 from a maximum distance of approximately 100 feet from the unit. It has a panic button that lets you remotely activate the siren or dialer instantly.
Program the Keychain Transmitter (4B-434) to the Security Control Panel (SC-001)
1.Enter the current MPIN (Master Personal Identifi- cation Number) on the SC-001.
2.Press [B].
3.Press the number key to identify which zone to add the panic transmitter to. Do not program the keychain transmitter to zone 1,2,3,4. The keychain transmitter is designed to be programmed in zone 5 for SC-001. Therefore, press [5] for SC-001.
4.Press [ * ] within 8 seconds.
5.Activate the keychain transmitter by pressing one of the buttons on the transmitter. You will hear a long beep from the control panel, and the keychain transmitter will now communicate to that zone.
Program the Keychain Transmitter (4B-434) to the Emergency Dialer (AD-1010)
1. Press [L], [5] when in clock mode, the display will show “L5 Id codE”.
2.Activate the keychain transmitter within 5 seconds by pressing any button on the transmitter. The red LED light of the transmitter will be on when the button is pressed. The display will return to clock mode once the keychain transmitter has been learned.
3.If the panic button of the keychain transmitter is pressed, it will trigger the Emergency Dialer and start dialing preset phone numbers (refer to AD-1010 User’s Instruction).
Operation for Emergency Dialer (AD-1010)
The keychain transmitter (4B-434) can be used to control the Emergency Dialer AD- 1010. The function of buttons #1, #2, #3 are the same as the functions as T1, T2, T3 on the keypad of the Emergency Dialer. When one of these buttons are pressed, the dialer will dial the stored phone number in the one-touch memory (T1 or T2 or T3). The panic button on the transmitter works the same as the panic button on the keypad of the Emergency Dialer. It activates the dialer immediately and dials the preset emergency phone numbers. Refer to the User’s Instruction of the Emer- gency Dialer AD-1010 for details.
Operation for Control Panel (SC-001)
To arm the system using the keychain transmitter:
There are 2 different arm options to choose from:
1.Press button #1, and the Control Panel will beep once.
The system will be armed in the Away Sequence. This sequence arms the system when you are the last person leaving the premises. (refer to SC-100 User’s Instruction for details) Pressing button #1 will give you the same result as pressing: MPIN, [B], [C] on the keypad.
2.Press button #2, and the Control Panel will beep once.
The system will be armed in Home Sequence. It arms the system when someone remains in the premises. (refer to SC-100 User’s Instruction for details)
Pressing button #2 will give you the same result as pressing: MPIN, [C] on the keypad. To disarm the system using the keychain transmitter:
When the system is armed, press button #3. The red light on the transmitter flashes and the Control Panel beeps twice. The system is now disarmed.
To deactivate the siren using the keypad transmitter:
Press and hold button #3, the red light on the transmitter flashes and the siren is deactivated.
Operation for Control Panel (SC-001)
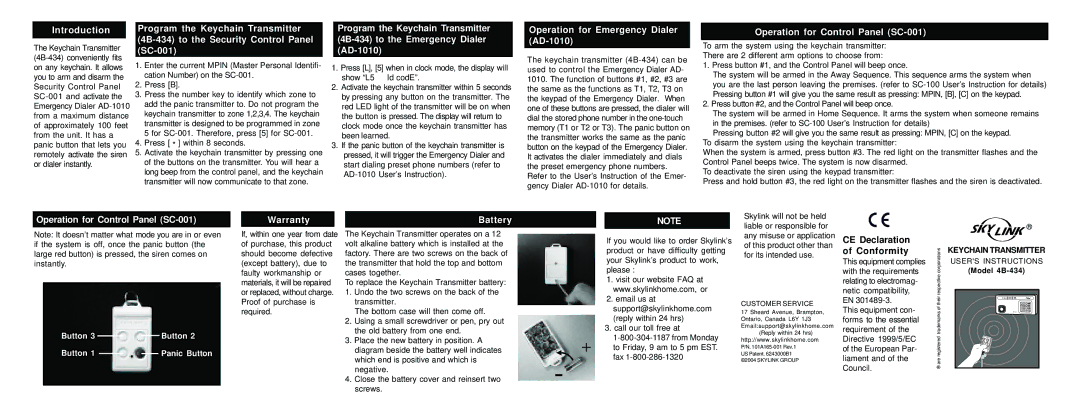
Note: It doesn’t matter what mode you are in or even if the system is off, once the panic button (the large red button) is pressed, the siren comes on instantly.
Button 3 | Button 2 |
Button 1 | Panic Button |
Warranty
If, within one year from date of purchase, this product should become defective (except battery), due to faulty workmanship or materials, it will be repaired or replaced, without charge. Proof of purchase is required.
Battery
The Keychain Transmitter operates on a 12 volt alkaline battery which is installed at the factory. There are two screws on the back of the transmitter that hold the top and bottom cases together.
To replace the Keychain Transmitter battery:
1. Undo the two screws on the back of the | |
transmitter. | |
The bottom case will then come off. | |
2. Using a small screwdriver or pen, pry out | |
the old battery from one end. | |
3. Place the new battery in position. A | + |
diagram beside the battery well indicates |
which end is positive and which is | - |
negative. |
4. Close the battery cover and reinsert two |
screws. | |
NOTE
If you would like to order Skylink’s product or have difficulty getting your Skylink’s product to work, please :
1.visit our website FAQ at www.skylinkhome.com, or
2.email us at support@skylinkhome.com (reply within 24 hrs)
3.call our toll free at
1-800-304-1187 from Monday to Friday, 9 am to 5 pm EST. fax 1-800-286-1320
Skylink will not be held liable or responsible for any misuse or application of this product other than for its intended use.
CUSTOMER SERVICE
17 Sheard Avenue, Brampton, Ontario, Canada L6Y 1J3 Email:support@skylinkhome.com
(Reply within 24 hrs) http://www.skylinkhome.com
P/N. 101A165-001 Rev.1
US Patent. 6243000B1
©2004 SKYLINK GROUP
CE Declaration of Conformity
This equipment complies with the requirements relating to electromag- netic compatibility, EN 301489-3.
This equipment con- forms to the essential requirement of the Directive 1999/5/EC of the European Par- liament and of the Council.
| ® |
corporations | KEYCHAIN TRANSMITTER |
USER'S INSTRUCTIONS |
(Model 4B-434) |
® are registered trademarks of their respective | |