The G6T3 can be password protected. If you enable the password pro- tection, you can only operate G6T3 after you input the correct password.
Password can be 2-8 digits long, which is a combination of 1, 2 and 3. For example, password can be 1, 2, 1, 2. To input this password, you
have to press [  ], then [
 ], then [
  ], then [
 ].
].
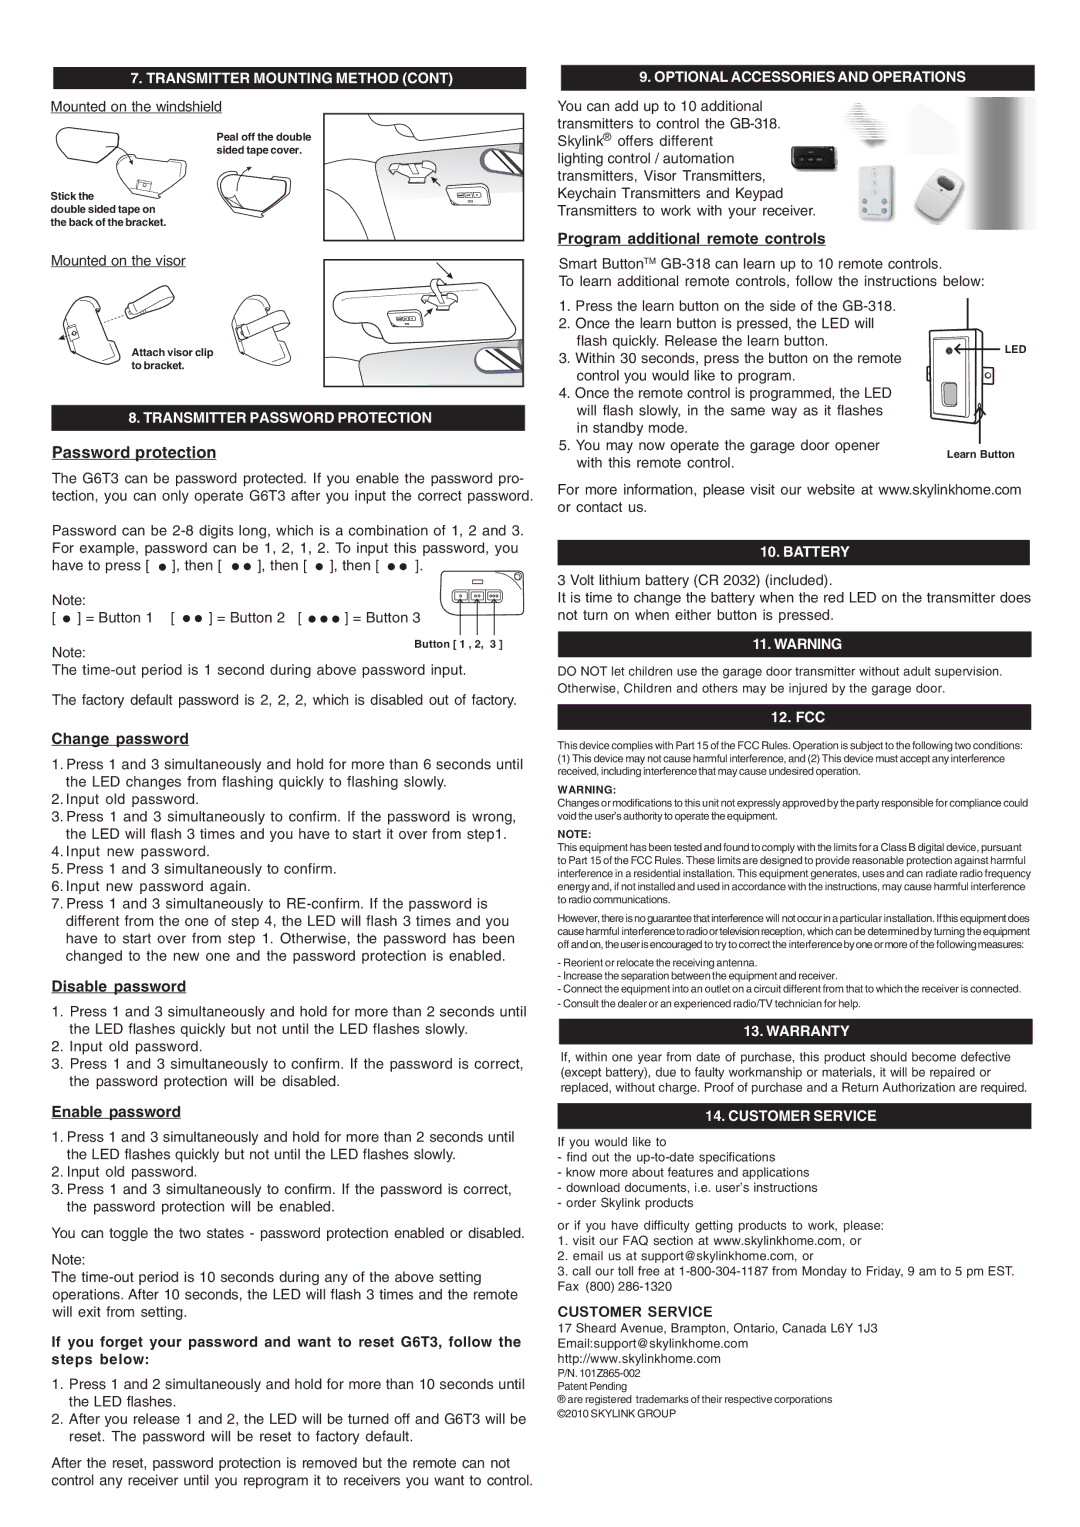
Note: | | |
[ ] = Button 1 [ | ] = Button 2 [ | ] = Button 3 |
Note:
The time-out period is 1 second during above password input.
The factory default password is 2, 2, 2, which is disabled out of factory.
Change password
1.Press 1 and 3 simultaneously and hold for more than 6 seconds until the LED changes from flashing quickly to flashing slowly.
2.Input old password.
3.Press 1 and 3 simultaneously to confirm. If the password is wrong, the LED will flash 3 times and you have to start it over from step1.
4.Input new password.
5.Press 1 and 3 simultaneously to confirm.
6.Input new password again.
7.Press 1 and 3 simultaneously to RE-confirm. If the password is different from the one of step 4, the LED will flash 3 times and you have to start over from step 1. Otherwise, the password has been changed to the new one and the password protection is enabled.
Disable password
1.Press 1 and 3 simultaneously and hold for more than 2 seconds until the LED flashes quickly but not until the LED flashes slowly.
2.Input old password.
3.Press 1 and 3 simultaneously to confirm. If the password is correct, the password protection will be disabled.
Enable password
1.Press 1 and 3 simultaneously and hold for more than 2 seconds until the LED flashes quickly but not until the LED flashes slowly.
2.Input old password.
3.Press 1 and 3 simultaneously to confirm. If the password is correct, the password protection will be enabled.
You can toggle the two states - password protection enabled or disabled.
Note:
The time-out period is 10 seconds during any of the above setting operations. After 10 seconds, the LED will flash 3 times and the remote will exit from setting.
If you forget your password and want to reset G6T3, follow the steps below:
1.Press 1 and 2 simultaneously and hold for more than 10 seconds until the LED flashes.
2.After you release 1 and 2, the LED will be turned off and G6T3 will be reset. The password will be reset to factory default.
After the reset, password protection is removed but the remote can not control any receiver until you reprogram it to receivers you want to control.
For more information, please visit our website at www.skylinkhome.com or contact us.
10. BATTERY
3 Volt lithium battery (CR 2032) (included).
It is time to change the battery when the red LED on the transmitter does not turn on when either button is pressed.
11. WARNING
DO NOT let children use the garage door transmitter without adult supervision. Otherwise, Children and others may be injured by the garage door.
12. FCC
This device complies with Part 15 of the FCC Rules. Operation is subject to the following two conditions:
(1)This device may not cause harmful interference, and (2) This device must accept any interference received, including interference that may cause undesired operation.
WARNING:
Changes or modifications to this unit not expressly approved by the party responsible for compliance could void the user’s authority to operate the equipment.
NOTE:
This equipment has been tested and found to comply with the limits for a Class B digital device, pursuant to Part 15 of the FCC Rules. These limits are designed to provide reasonable protection against harmful interference in a residential installation. This equipment generates, uses and can radiate radio frequency energy and, if not installed and used in accordance with the instructions, may cause harmful interference to radio communications.
However, there is no guarantee that interference will not occur in a particular installation. If this equipment does cause harmful interference to radio or televisionreception, which can be determined by turning the equipment off and on, the user is encouraged to try to correct the interference by one or more of the following measures:
-Reorient or relocate the receiving antenna.
-Increase the separation between the equipment and receiver.
-Connect the equipment into an outlet on a circuit different from that to which the receiver is connected.
-Consult the dealer or an experienced radio/TV technician for help.
13. WARRANTY
If, within one year from date of purchase, this product should become defective (except battery), due to faulty workmanship or materials, it will be repaired or replaced, without charge. Proof of purchase and a Return Authorization are required.
14. CUSTOMER SERVICE
If you would like to
-find out the up-to-date specifications
-know more about features and applications
-download documents, i.e. user’s instructions
-order Skylink products
or if you have difficulty getting products to work, please:
1.visit our FAQ section at www.skylinkhome.com, or
2.email us at support@skylinkhome.com, or
3.call our toll free at 1-800-304-1187 from Monday to Friday, 9 am to 5 pm EST. Fax (800) 286-1320
CUSTOMER SERVICE
17 Sheard Avenue, Brampton, Ontario, Canada L6Y 1J3 Email:support@skylinkhome.com http://www.skylinkhome.com
P/N. 101Z865-002
Patent Pending
®are registered trademarks of their respective corporations ©2010 SKYLINK GROUP