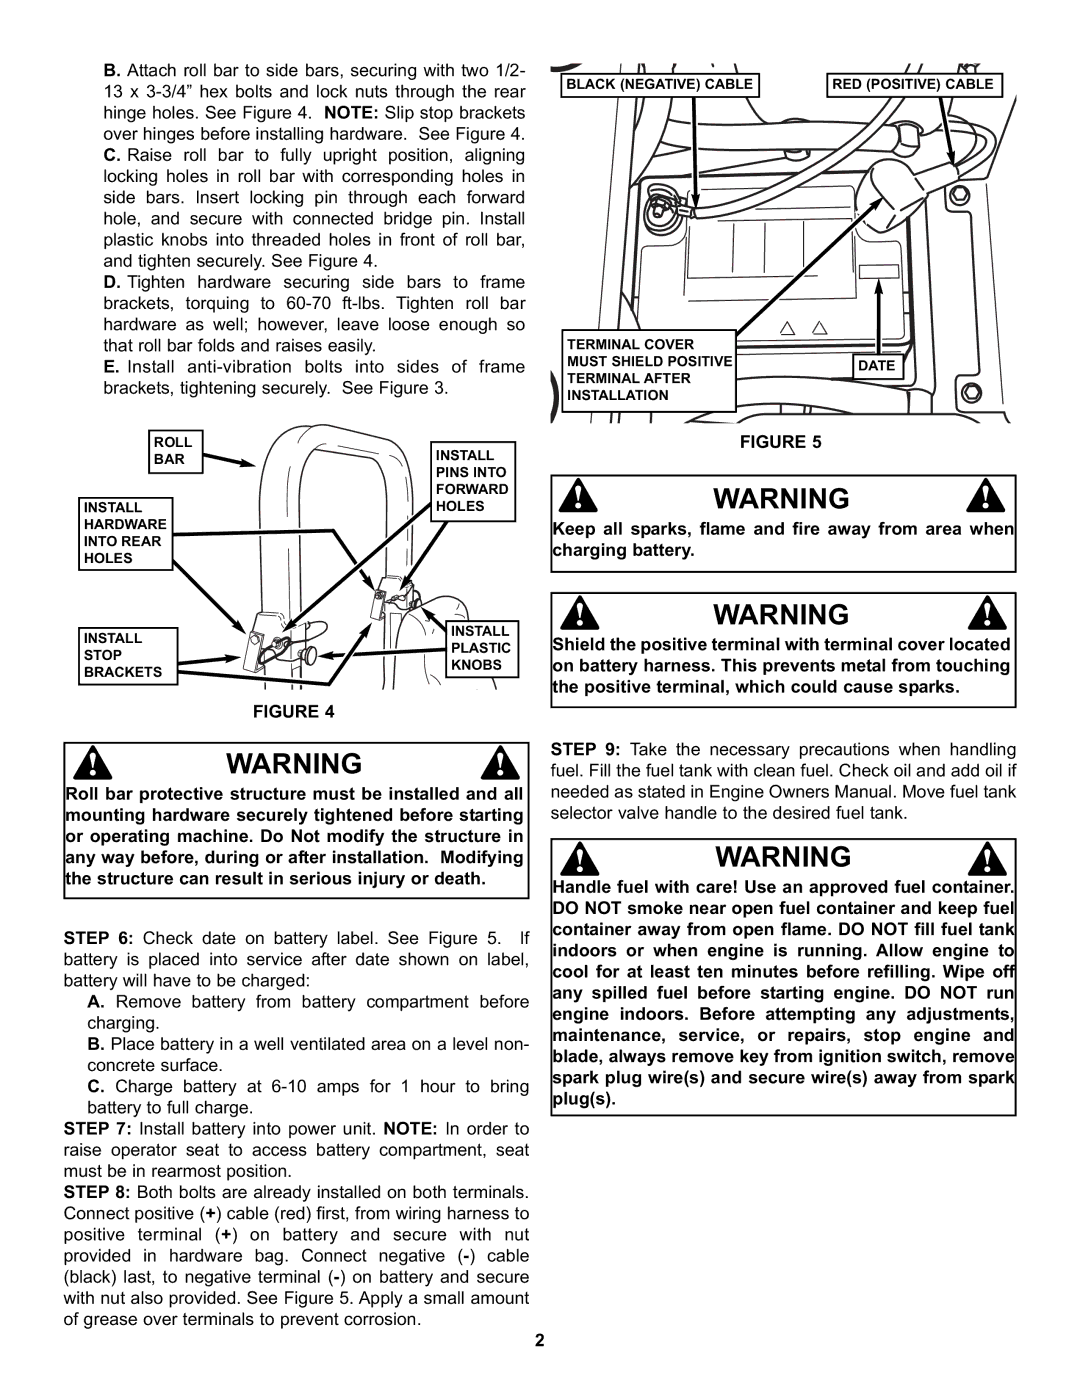
B. Attach roll bar to side bars, securing with two 1/2- 13 x 3-3/4” hex bolts and lock nuts through the rear hinge holes. See Figure 4. NOTE: Slip stop brackets over hinges before installing hardware. See Figure 4. C. Raise roll bar to fully upright position, aligning locking holes in roll bar with corresponding holes in side bars. Insert locking pin through each forward hole, and secure with connected bridge pin. Install plastic knobs into threaded holes in front of roll bar, and tighten securely. See Figure 4.

D. Tighten hardware securing side bars to frame brackets, torquing to 60-70 ft-lbs. Tighten roll bar hardware as well; however, leave loose enough so that roll bar folds and raises easily.

E. Install anti-vibration bolts into sides of frame brackets, tightening securely. See Figure 3.

BLACK (NEGATIVE) CABLE

TERMINAL COVER MUST SHIELD POSITIVE TERMINAL AFTER INSTALLATION

RED (POSITIVE) CABLE

DATE

ROLL

INSTALL

BAR

PINS INTO


FORWARD

INSTALL

HOLES

HARDWARE


INTO REAR


HOLES


FIGURE 5


!

WARNING

!

Keep all sparks, flame and fire away from area when charging battery.

INSTALL

INSTALL

PLASTIC

STOP

KNOBS

BRACKETS


FIGURE 4

!

WARNING

!

Roll bar protective structure must be installed and all mounting hardware securely tightened before starting or operating machine. Do Not modify the structure in any way before, during or after installation. Modifying the structure can result in serious injury or death.

STEP 6: Check date on battery label. See Figure 5. If battery is placed into service after date shown on label, battery will have to be charged:

A. Remove battery from battery compartment before charging.

B. Place battery in a well ventilated area on a level non- concrete surface.

C. Charge battery at 6-10 amps for 1 hour to bring battery to full charge.

STEP 7: Install battery into power unit. NOTE: In order to raise operator seat to access battery compartment, seat must be in rearmost position.

STEP 8: Both bolts are already installed on both terminals. Connect positive (+) cable (red) first, from wiring harness to positive terminal (+) on battery and secure with nut provided in hardware bag. Connect negative (-) cable (black) last, to negative terminal (-) on battery and secure with nut also provided. See Figure 5. Apply a small amount of grease over terminals to prevent corrosion.

!

WARNING

!

Shield the positive terminal with terminal cover located on battery harness. This prevents metal from touching the positive terminal, which could cause sparks.

STEP 9: Take the necessary precautions when handling fuel. Fill the fuel tank with clean fuel. Check oil and add oil if needed as stated in Engine Owners Manual. Move fuel tank selector valve handle to the desired fuel tank.

!

WARNING

!

Handle fuel with care! Use an approved fuel container. DO NOT smoke near open fuel container and keep fuel container away from open flame. DO NOT fill fuel tank indoors or when engine is running. Allow engine to cool for at least ten minutes before refilling. Wipe off any spilled fuel before starting engine. DO NOT run engine indoors. Before attempting any adjustments, maintenance, service, or repairs, stop engine and blade, always remove key from ignition switch, remove spark plug wire(s) and secure wire(s) away from spark plug(s).

2

Page 2
Image 2
Snapper Zero Turning Z-Riding manual Install

Zero Turning Z-Riding specifications

The Snapper Zero Turn Z-Rider series is a robust and innovative solution for landscapers and homeowners looking for an efficient way to maintain their lawns and gardens. This line of zero-turn mowers is designed to navigate tight spaces with exceptional agility, allowing users to tackle a variety of mowing tasks with ease.

At the heart of the Snapper Zero Turn Z-Rider is its unique zero-turn technology. Unlike traditional riding mowers, which require wide turning arcs, the Z-Rider can pivot 180 degrees in place. This capability drastically reduces mowing time, especially in complex landscaping where obstacles, trees, and flower beds are present. The dual-lever steering system further enhances maneuverability, allowing the operator to seamlessly control speed and direction with just a touch of their fingers.

One of the standout features of the Snapper Zero Turn Z-Rider is its powerful engine options. Equipped with durable Briggs & Stratton or Kohler engines, these mowers deliver the performance needed for heavy-duty cutting tasks. Users can choose from various engine sizes to match their specific mowing needs, ensuring optimal power and efficiency. Coupled with a high-performance cutting deck, typically available in sizes ranging from 48 to 60 inches, the Z-Rider delivers a clean and even cut every time.

Technology plays a critical role in the design of the Snapper Zero Turn Z-Rider. The mowers feature a robust hydrostatic transmission that provides smooth speed control. This advanced transmission system allows for rapid acceleration and deceleration, making it easier to navigate various terrains. Additionally, the Z-Rider boasts an ergonomic design with adjustable seats and controls to enhance operator comfort during extended mowing sessions.

Durability is another key characteristic of the Snapper Zero Turn Z-Rider. The chassis is constructed from heavy-duty steel, providing a sturdy platform that can withstand the rigors of regular use. Furthermore, the mower is equipped with reinforced cutting decks that are built to last, reducing the need for frequent replacement or repairs.

Safety features are designed with the operator in mind. These include anti-tip technology and automatic brake systems, ensuring that the mower remains stable and secure during operation. The easy-access maintenance points simplify routine checks and upkeep, making it user-friendly for both novice and experienced operators.

Overall, the Snapper Zero Turn Z-Rider series combines cutting-edge technology, powerful performance, and robust durability, making it an ideal choice for anyone looking to achieve a beautifully manicured lawn with minimal effort. Whether for residential use or commercial landscaping, this mower is built to deliver results.