Installation Installation Installation Installazione

Precautions

•Do not tamper with the four holes on the upper surface of the unit. They are for tuner adjustments to be done only by service technicians.

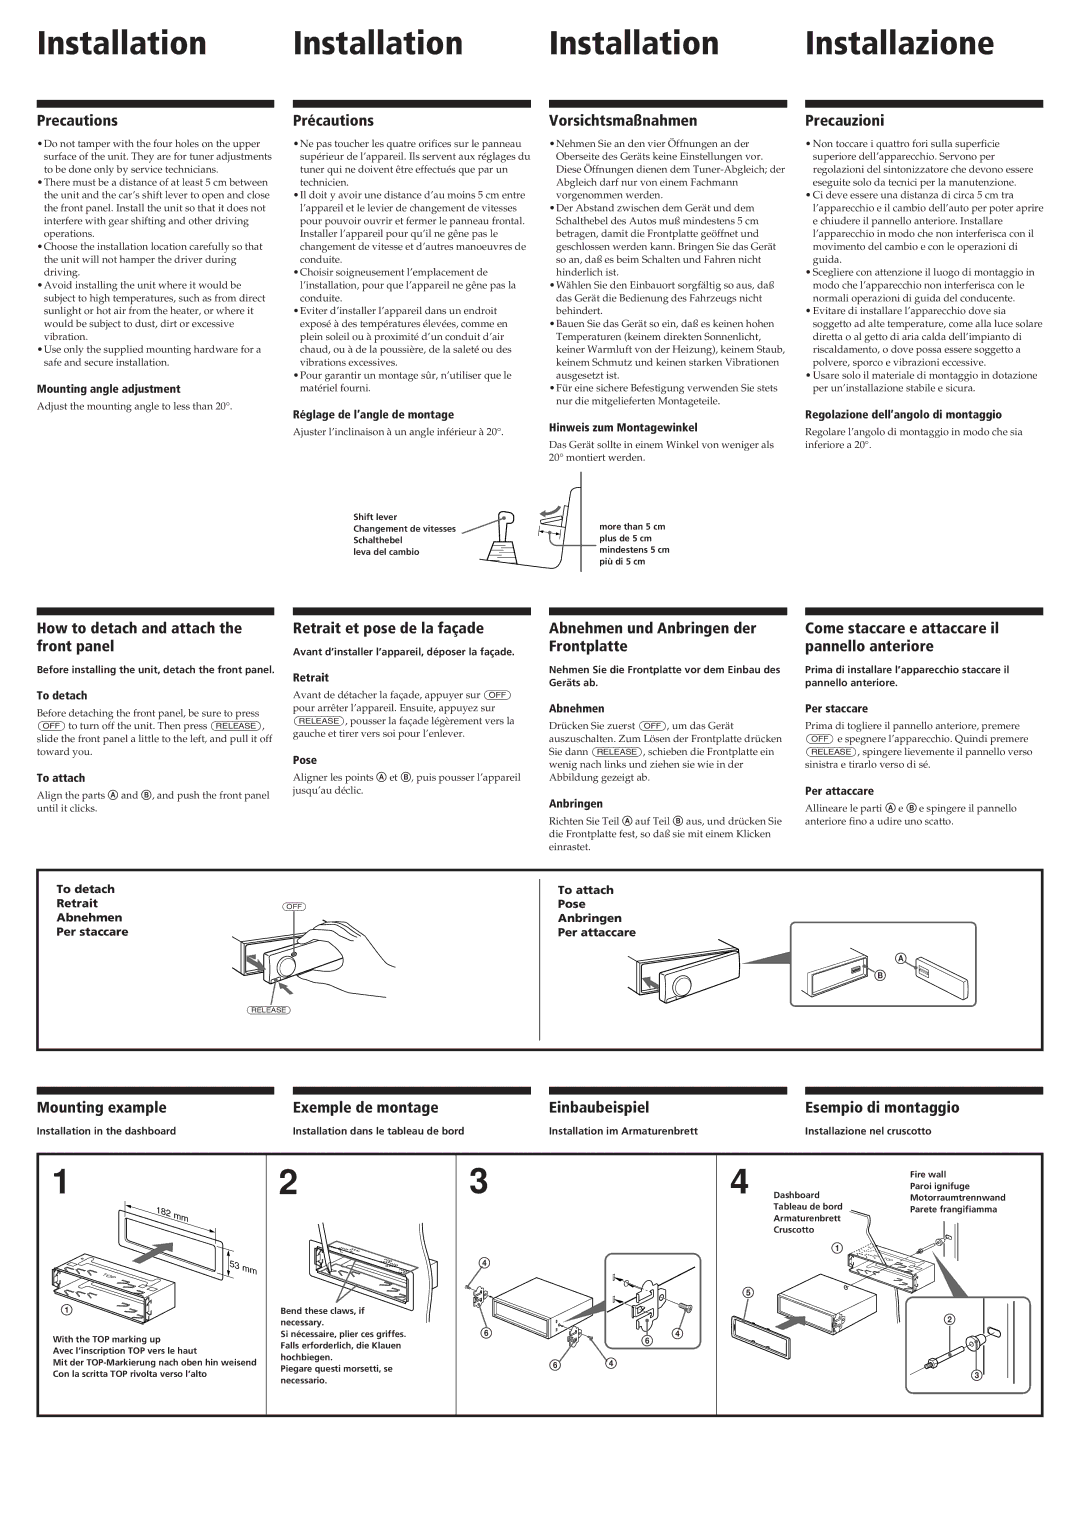
•There must be a distance of at least 5 cm between the unit and the car’s shift lever to open and close the front panel. Install the unit so that it does not interfere with gear shifting and other driving operations.

•Choose the installation location carefully so that the unit will not hamper the driver during driving.

•Avoid installing the unit where it would be subject to high temperatures, such as from direct sunlight or hot air from the heater, or where it would be subject to dust, dirt or excessive vibration.

•Use only the supplied mounting hardware for a safe and secure installation.

Mounting angle adjustment

Adjust the mounting angle to less than 20°.

Précautions

•Ne pas toucher les quatre orifices sur le panneau supérieur de l’appareil. Ils servent aux réglages du tuner qui ne doivent être effectués que par un technicien.

•Il doit y avoir une distance d’au moins 5 cm entre l’appareil et le levier de changement de vitesses pour pouvoir ouvrir et fermer le panneau frontal. Installer l’appareil pour qu’il ne gêne pas le changement de vitesse et d’autres manoeuvres de conduite.

•Choisir soigneusement l’emplacement de l’installation, pour que l’appareil ne gêne pas la conduite.

•Eviter d’installer l’appareil dans un endroit exposé à des températures élevées, comme en plein soleil ou à proximité d’un conduit d’air chaud, ou à de la poussière, de la saleté ou des vibrations excessives.

•Pour garantir un montage sûr, n’utiliser que le matériel fourni.

Réglage de l’angle de montage

Ajuster l’inclinaison à un angle inférieur à 20°.

Vorsichtsmaßnahmen

•Nehmen Sie an den vier Öffnungen an der Oberseite des Geräts keine Einstellungen vor. Diese Öffnungen dienen dem Tuner-Abgleich; der Abgleich darf nur von einem Fachmann vorgenommen werden.

•Der Abstand zwischen dem Gerät und dem Schalthebel des Autos muß mindestens 5 cm betragen, damit die Frontplatte geöffnet und geschlossen werden kann. Bringen Sie das Gerät so an, daß es beim Schalten und Fahren nicht hinderlich ist.

•Wählen Sie den Einbauort sorgfältig so aus, daß das Gerät die Bedienung des Fahrzeugs nicht behindert.

•Bauen Sie das Gerät so ein, daß es keinen hohen Temperaturen (keinem direkten Sonnenlicht, keiner Warmluft von der Heizung), keinem Staub, keinem Schmutz und keinen starken Vibrationen ausgesetzt ist.

•Für eine sichere Befestigung verwenden Sie stets nur die mitgelieferten Montageteile.

Hinweis zum Montagewinkel

Das Gerät sollte in einem Winkel von weniger als 20° montiert werden.

Precauzioni

Non toccare i quattro fori sulla superficie superiore dell’apparecchio. Servono per regolazioni del sintonizzatore che devono essere eseguite solo da tecnici per la manutenzione.

Ci deve essere una distanza di circa 5 cm tra l’apparecchio e il cambio dell’auto per poter aprire e chiudere il pannello anteriore. Installare l’apparecchio in modo che non interferisca con il movimento del cambio e con le operazioni di guida.

Scegliere con attenzione il luogo di montaggio in modo che l’apparecchio non interferisca con le normali operazioni di guida del conducente.

Evitare di installare l’apparecchio dove sia soggetto ad alte temperature, come alla luce solare diretta o al getto di aria calda dell’impianto di riscaldamento, o dove possa essere soggetto a polvere, sporco e vibrazioni eccessive.

Usare solo il materiale di montaggio in dotazione per un’installazione stabile e sicura.

Regolazione dell’angolo di montaggio

Regolare l’angolo di montaggio in modo che sia inferiore a 20°.

Shift lever

Changement de vitesses Schalthebel

leva del cambio

more than 5 cm plus de 5 cm mindestens 5 cm più di 5 cm

How to detach and attach the front panel

Before installing the unit, detach the front panel.

To detach

Retrait et pose de la façade

Avant d’installer l’appareil, déposer la façade.

Retrait

Avant de détacher la façade, appuyer sur (OFF)

Abnehmen und Anbringen der

Come staccare e attaccare il

Frontplatte

pannello anteriore

Nehmen Sie die Frontplatte vor dem Einbau des

Prima di installare l’apparecchio staccare il

Geräts ab.

pannello anteriore.

Before detaching the front panel, be sure to press (OFF) to turn off the unit. Then press (RELEASE), slide the front panel a little to the left, and pull it off toward you.

To attach

Align the parts A and B, and push the front panel until it clicks.

pour arrêter l’appareil. Ensuite, appuyez sur (RELEASE), pousser la façade légèrement vers la gauche et tirer vers soi pour l’enlever.

Pose

Aligner les points A et B, puis pousser l’appareil jusqu’au déclic.

Abnehmen

Drücken Sie zuerst (OFF), um das Gerät auszuschalten. Zum Lösen der Frontplatte drücken Sie dann (RELEASE), schieben die Frontplatte ein wenig nach links und ziehen sie wie in der Abbildung gezeigt ab.

Anbringen

Richten Sie Teil A auf Teil B aus, und drücken Sie die Frontplatte fest, so daß sie mit einem Klicken einrastet.

Per staccare

Prima di togliere il pannello anteriore, premere (OFF) e spegnere l’apparecchio. Quindi premere (RELEASE), spingere lievemente il pannello verso sinistra e tirarlo verso di sé.

Per attaccare

Allineare le parti A e B e spingere il pannello anteriore fino a udire uno scatto.

To detach

Retrait(OFF)

Abnehmen Per staccare

To attach

Pose

Anbringen

Per attaccare

A

B

(RELEASE)

Mounting example

Installation in the dashboard

Exemple de montage

Einbaubeispiel

Esempio di montaggio

Installation dans le tableau de bord

Installation im Armaturenbrett

Installazione nel cruscotto

1


182

mm


53

mm

TOP


1

With the TOP marking up

Avec l’inscription TOP vers le haut

Mit der TOP-Markierung nach oben hin weisend Con la scritta TOP rivolta verso l’alto

2

Bend these claws, if necessary.

Si nécessaire, plier ces griffes. Falls erforderlich, die Klauen hochbiegen.

Piegare questi morsetti, se necessario.

3

4

6

6

4

64

4


Fire wall

Dashboard

Paroi ignifuge

Motorraumtrennwand


Tableau de bord

Parete frangifiamma


Armaturenbrett


Cruscotto


1


TOP

5

2

3

Page 2
Image 2
Sony CDX-C910RDS manual Precautions, Précautions, Vorsichtsmaßnahmen, Precauzioni, How to detach and attach the front panel

CDX-C910RDS specifications

The Sony CDX-C910RDS is a compact and versatile car stereo that epitomizes Sony's commitment to delivering high-quality audio experiences on the go. Launched in the late 1990s, this model has become a favorite among audiophiles and casual listeners alike due to its impressive array of features and solid sound performance.

One of the standout features of the CDX-C910RDS is its RDS (Radio Data System) capability, which allows the receiver to decode and display additional information transmitted along with FM radio broadcasts. This includes details such as station names, song titles, and artist information, enhancing the overall listening experience. With RDS, drivers can easily find and tune into their favorite stations, even as they move through different geographic areas.

Equipped with a high-powered amplifier, the CDX-C910RDS delivers robust sound quality with dynamic bass response. The built-in equalizer offers multiple preset sound modes, enabling users to customize their audio settings to suit their preferences and the acoustics of their vehicles. Additionally, the unit features several preamp outputs for connecting external amplifiers, allowing enthusiasts to create a more powerful audio system if desired.

Another notable characteristic of the CDX-C910RDS is its compatibility with both CD playback and CD-R/CD-RW discs. This versatility ensures that users can enjoy their favorite music in various formats, whether from commercially produced CDs or personal compilations. The CD player also includes features like anti-shock protection, ensuring a smooth listening experience even on bumpy roads.

The user-friendly interface of the CDX-C910RDS is designed with convenience in mind. The large LCD display is easy to read, even in bright sunlight, and the well-organized control layout allows for quick access to various functions. The detachable faceplate adds a layer of security, protecting the unit from theft when the vehicle is parked.

In terms of connectivity, the CDX-C910RDS offers compatibility with auxiliary inputs, enabling users to connect external devices like smartphones or portable media players. This feature is particularly appealing to those who wish to expand their music library without relying solely on CDs or radio.

Overall, the Sony CDX-C910RDS stands out for its combination of advanced technology, user-friendly design, and exceptional sound quality. It remains a highly regarded choice for drivers seeking to enjoy their music while on the road. Whether cruising through city streets or embarking on long road trips, the CDX-C910RDS delivers an engaging and enjoyable audio experience that makes every drive more memorable.