Digital Photo Printer
Owner’s Record
Declaration of Conformity
User Registration
Table of contents
What you can do with the printer
On the demonstration mode
What you can do with the printer
Printing 25/30 sheets at one time
Wide variety of prints available with your printer
Getting started
Identifying the parts
Printer front panel
Printer rear panel
Printer operation panel
Identifying the parts
Paper tray
Screen
10 GB
Using the stylus and operation panel
Opening the operation panel
Open the operation panel while pressing PUSH/OPEN
11 GB
Using the stylus and operation panel
12 GB
Selecting an image or item on the screen
Tap directly on the image or item on the screen
13 GB
Connecting the printer
Inserting a Memory Stick or PC card
Printing an image from a Memory Stick
Printing an image from a PC card
Connecting to a television optional
15 GB
Connecting the printer Connecting the AC power cord
Connecting to a computer optional
16 GB
17 GB
Printing pack Contents
Preparing the printing pack
18 GB
Press the Power button to turn on the printer
Loading the print cartridge
19 GB
Loading the print cartridge
To replace the print cartridge
20 GB
Inserting the print paper
Set the print paper into the tray
21 GB
Inserting the print paper
22 GB
When you connect your printer to your television
Printing selected images
23 GB
Printing the selected image
Tap the image you want to print on the screen
To display a preview image
24 GB
To cancel the selection
Tap Enter or Print Quantity +
25 GB
To print multiple images at a time
Press the Print button
26 GB
To stop printing
Printing all images or Dpof preset images at one time
What is DPOF?
27 GB
Printing all images or Dpof preset images at one time
To return to the usual printing mode
28 GB
Adding effects to an image
What you can do with the Effect menu
To save the image with the selected effects
29 GB
To change the printer settings midway
Adding effects to an image
To print the edited image
30 GB
Procedures
Changing the image size and position
Tap Edit
Tap the desired item to edit the image
Adjusting the pictures
Tap Adjustment
Tap Back
32 GB
Tap the desired adjustment item
Items Procedures
33 GB
Tip
Adding a special filter to an image
Tap Filter
34 GB
Tap a filter you want to add to an image
35 GB
Items Filters
Adding drawings, stamps, or characters Tool
What you can do with the Tool sub menu
36 GB
Icons Tools Functions
To exit the Tool sub menu
37 GB
To select the stroke weight for the pencil drawings, tap
Tool sub menu page 36, tap Pencil tool
Tap the desired color box
Tap and draw a freehand line on the preview
Tap Pencil tool to release the pencil tool mode
Tap Enter
Repeat steps 2 through 6 to draw other line art
39 GB
Tap on the preview image where you want to paste the stamp
Adding drawings, stamps, or characters Tool Pasting stamps
Tool sub menu page 36, tap Stamp tool
Tap the desired stamp
Tap Stamp tool to release the stamp tool mode
To paste the same stamps, repeat steps 3 through
41 GB
To move the stamp
Tool sub menu page 36, tap Type tool
Tap the characters you want to input in the character table
42 GB
43 GB
To select the color
To delete characters in the input box
Adding drawings, stamps, or characters Tool
To input the same characters, repeat steps 4 through
44 GB
To erase the characters input
During or after the Creative Print procedures
Making various prints Creative Print
What you can do with the Creative Print menu
45 GB
Making various prints Creative Print
To display the preview image only
To print the Creative Print image
To exit the Creative Print menu
Making a card
Tap Card in the main Creative Print menu
Tap the desired paper size icon
47 GB
Tap the desired template
Entering a greeting
48 GB
Entering characters
Selecting images
49 GB
Tap Done
Making a calendar
Tap Calendar in the main Creative Print menu
51 GB
Setting the calendar
Making a split print
Tap Split Images in the main Creative Print menu
53 GB
Select and adjust an image
Tap an image area
Making a sticker
Making a 9-split image sticker with a frame
Tap Sticker in the main Creative Print menu
Tap the desired 9-split template
Select and adjust the desired image
Making a 9-split image sticker without a frame
Tap the desired frame
56 GB
Making an index print
Tap Index Print in the main Creative Print menu
Tap the desired pattern of image alignment
57 GB
Tap Done
Check the preview and press the Print button
Tap Creative Print to exit the Creative Print menu 58 GB
Setting up the printer Menu
What you can do with the Menu
To display the Menu screen, tap Menu on the operation panel
To exit the Menu
Tap Set Up
Tap the setting items you want to select
Tap Menu
60 GB
Items Settings Contents
61 GB
Setting the printer Menu
62 GB
Setting video output and LCD screen contrast
Tap Screen Setup
Set the video output or LCD screen contrast
63 GB
Viewing a slideshow
Tap Slideshow
To stop the slideshow
64 GB
Deleting images
Deleting selected images
Tap Delete Image
65 GB
Tap Yes to delete the image or No to cancel deletion
Deleting images
Formatting a Memory Stick
To exit the Menu, tap Menu
Using your printer with Windows computers
System requirements
67 GB
When using Windows 98/98SE/Me
Installing the USB driver
Click Next
68 GB
To check the installation
Click Finish
69 GB
Using your printer with Windows computers
Installing the printer driver and reader software
Select the language for the application, then click OK
70 GB
Check Local printer and click Next
Click Have Disk
Click Browse
Drives box, select the CD-ROM drive
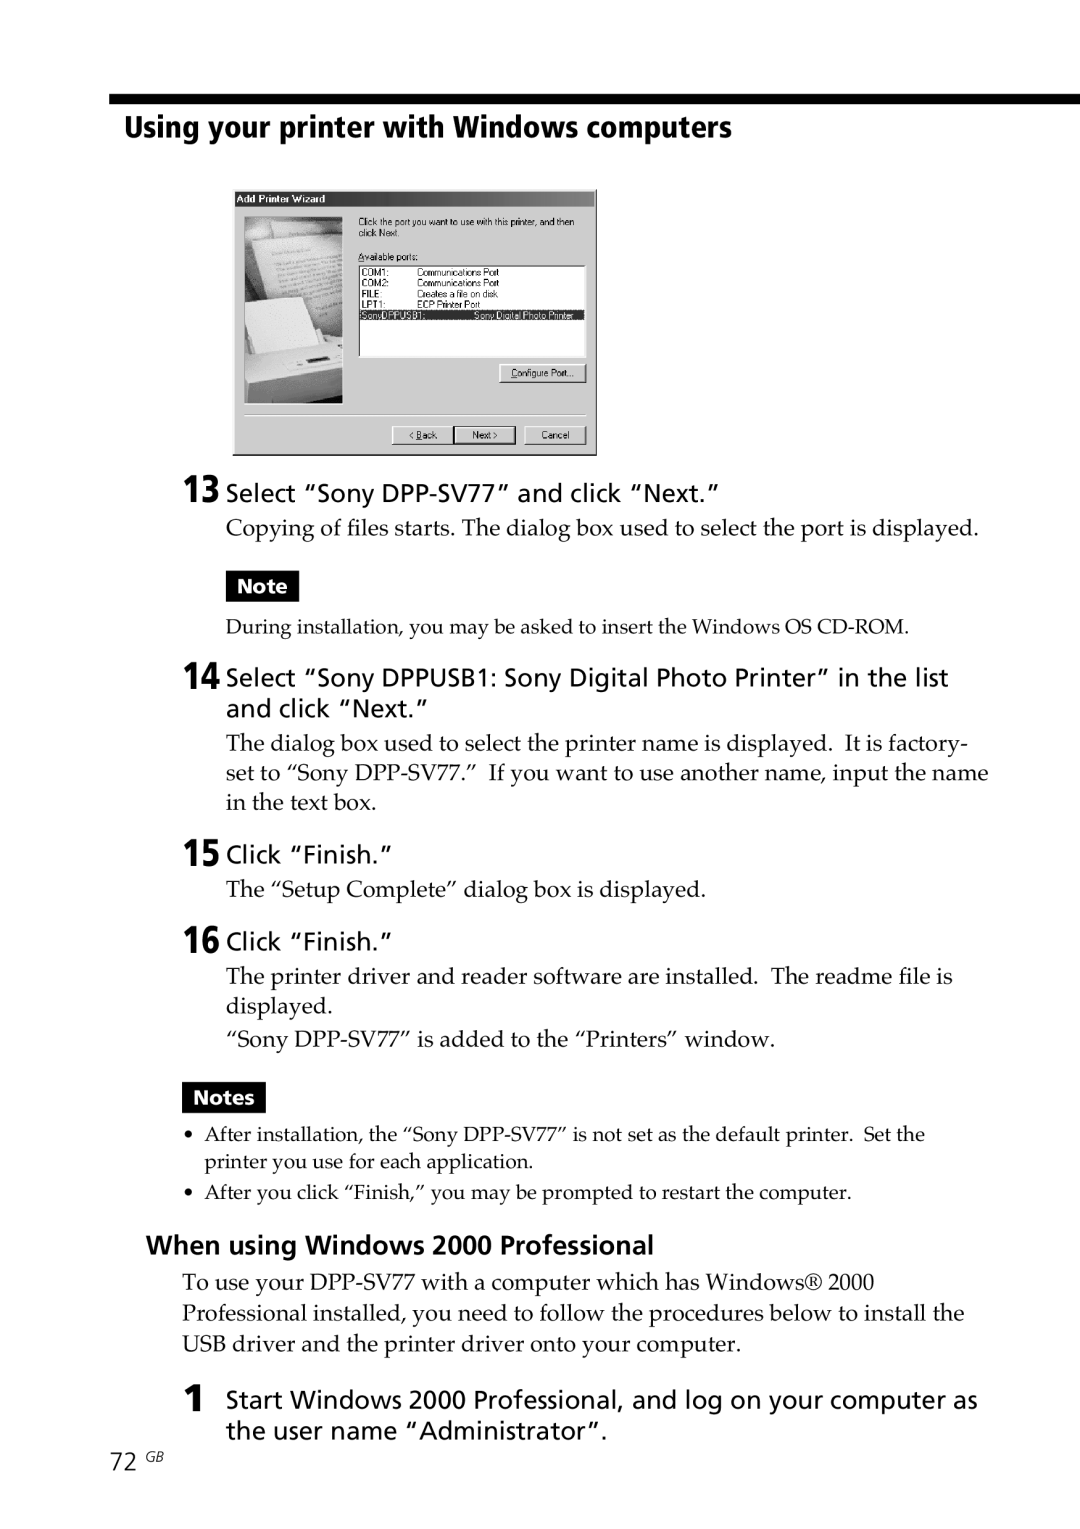
When using Windows 2000 Professional
Select Sony DPP-SV77 and click Next
73 GB
Uninstalling the software
Uninstalling the Sony DPP-SV77
Uninstalling the printer driver
74 GB
Using the reader software
75 GB
Choose When you make
Set the printer
76 GB
To set properties of the printer
Set the print range and copies and click Print
77 GB
Graphics tab
Using your printer with Macintosh computers
Installing the printer driver
Connect your Macintosh and the printer
Turn on the printer and start your Macintosh
Uninstalling the printer driver
Double-click Setup Program Click Install
79 GB
Choose the printer settings
80 GB
81 GB
Precautions
On safety
On installation
On moisture condensation
On cleaning
On transport
On restrictions on duplication
83 GB
About the Memory Stick and PC card media
On Memory Stick
To protect Memory Stick Images
84 GB
85 GB
Troubleshooting
LCD screen of the printer displays no images
Television displays no images
Cannot print
Or indicator is lit or an error message is displayed
Beeps sound
Cannot remove the print cartridge
87 GB
Troubleshooting If paper jams
88 GB
Specifications
89 GB
Index
90 GB
91 GB